目次
- 1. Debian Edu 12 コード名 12 Bookworm のマニュアル
- 2. Debian Edu と Skolelinux について
- 2.1. 簡単な歴史と名前が 2 つある理由
- 3. 全体の構成
- 3.1. ネットワーク構成
- 3.1.1. デフォルトのネットワーク設定
- 3.1.2. 主サーバー
- 3.1.3. 主サーバーで動作するサービス
- 3.1.4. LTSP サーバー
- 3.1.5. シンクライアント
- 3.1.6. ディスクレスワークステーション
- 3.1.7. ネットワーククライアント
- 3.2. 管理
- 3.2.1. インストール
- 3.2.2. ファイルシステムのアクセス設定
- 4. 要件
- 4.1. ハードウェア要件
- 4.2. 動作確認済みのハードウェア
- 5. ネットワーク設定の要件
- 5.1. デフォルト設定
- 5.2. インターネットルーター
- 6. インストールとダウンロードの選択肢
- 6.1. 追加情報のありか
- 6.2. Download the installation media for Debian Edu 12 Codename bookworm
- 6.2.1. amd64 もしくは i386
- 6.2.2. i386 及び amd64 用の netinst ISO イメージ
- 6.2.3. BD iso images for amd64 or i386
- 6.2.4. ダウンロードしたイメージの検証
- 6.2.5. ソース
- 6.3. Debian Edu のインストール
- 6.3.1. 主サーバーのインストールの場合
- 6.3.2. デスクトップ環境
- 6.3.3. インストールにおけるモジュラー構成
- 6.3.4. インストール方法と選択肢
- 6.3.5. インストールの手順
- 6.3.6. Installing a gateway using debian-edu-router
- 6.3.7. いくつかの注意事項
- 6.3.8. CD / Blu-ray ディスクの代わりに USB フラッシュドライブを利用したインストール
- 6.3.9. PXE によるネットワーク経由でのインストールと起動
- 6.3.10. PXE インストールの調整
- 6.3.11. 独自イメージ
- 6.4. スクリーンショットツアー
- 7. さあ始めよう
- 7.1. 開始までの最小手順
- 7.1.1. 主サーバーで動作するサービス
- 7.2. GOsa² の紹介
- 7.2.1. GOsa² のログインと概観
- 7.3. GOsa² によるユーザー管理
- 7.3.1. ユーザーの追加
- 7.3.2. ユーザーの検索、変更、削除
- 7.3.3. パスワード設定
- 7.3.4. 高度なユーザー管理
- 7.4. GOsa² によるグループ管理
- 7.5. GOsa² によるマシン管理
- 7.5.1. マシンの検索、削除
- 7.5.2. 既存マシンの変更 / NetGroup の管理
- 8. プリンタ管理
- 8.1. ワークステーションに接続されたプリンターの利用方法
- 8.2. ネットワークプリンタ
- 9. 時刻の同期
- 10. パーティション全体の拡張
- 11. 保守
- 11.1. ソフトウェアの更新
- 11.1.1. セキュリティ更新に関する通知を受け取り続ける
- 11.2. バックアップ管理
- 11.3. サーバー監視
- 11.3.1. Munin
- 11.3.2. Icinga
- 11.3.3. Sitesummary
- 11.4. Debian Edu の独自化に関するさらなる情報
- 12. アップグレード
- 13. HowTo
- 14. 管理一般 HowTo
- 14.1. Configuration history: tracking /etc/ using the Git version control system
- 14.1.1. 使用例
- 14.2. パーティションのサイズ変更
- 14.2.1. LVM 論理ボリューム管理
- 14.3. ldapvi の利用
- 14.4. Kerberos 対応 NFS
- 14.4.1. デフォルト設定の変更方法
- 14.5. Standardskriver
- 14.6. LDAP GUI環境 JXplorer
- 14.7. ldap-createuser-krb5, a command-line tool for adding users
- 14.8. stable-updates の利用
- 14.9. backports を利用した、より新しいソフトウェアのインストール
- 14.10. CD などのイメージを用いたアップグレード
- 14.11. 自動での残存プロセスの掃除
- 14.12. セキュリティ更新の自動インストール
- 14.13. 夜間の自動マシンシャットダウン
- 14.13.1. shutdown-at-night の設定方法
- 14.14. Access Debian Edu servers located behind a firewall
- 14.15. Installing additional service machines for spreading the load from the main server
- 14.16. wiki.debian.org の HowTo
- 15. 高度な管理 HowTo
- 15.1. GOsa² によるユーザーの独自設定
- 15.1.1. 年次グループ内のユーザー作成
- 15.2. その他のユーザー独自設定
- 15.2.1. 全ユーザーのホームディレクトリ内へのディレクトリ作成
- 15.3. ストレージ専用サーバーの利用
- 15.4. Restrict SSH login access
- 15.4.1. LTSP クライアント無しでの準備
- 15.4.2. LTSP クライアントの設定
- 15.4.3. 更に複雑な場合のセットアップでの注意点
- 16. デスクトップ HowTo
- 16.1. 多国語対応デスクトップ環境のセットアップ
- 16.2. DVD の再生
- 16.3. 手書きフォント
- 17. ネットワーククライアント HowTo
- 17.1. シンクライアント及びディスクレスワークステーションについて
- 17.1.1. LTSP クライアントの種類の選択
- 17.1.2. 異なる LTSP クライアントネットワークの利用
- 17.1.3. 32 ビットクライアント向けの LTSP chroot 環境の追加方法
- 17.1.4. LTSP クライアントの設定
- 17.1.5. LTSP クライアントのオーディオ
- 17.1.6. Access to USB drives and CD-ROMs/DVDs
- 17.1.7. LTSP クライアントに接続されたプリンターの利用
- 17.2. PXE メニューの変更
- 17.2.1. PXE メニューの設定
- 17.2.2. PXE インストールの設定
- 17.2.3. PXE インストール用の独自リポジトリの追加
- 17.3. ネットワーク設定の変更
- 17.4. リモートデスクトップ
- 17.4.1. Xrdp
- 17.4.2. X2Go
- 17.4.3. 利用できるリモートデスクトップクライアント
- 17.5. 無線接続クライアント
- 17.6. Authorize Windows machine with Debian Edu credentials using pGina LDAP plugin
- 17.6.1. Adding pGina user in Debian Edu
- 17.6.2. Install pGina fork
- 17.6.3. Configure pGina
- 18. Debian Edu の Samba
- 18.1. ファイルへの Samba 経由のアクセス
- 19. クラスルーム HowTo
- 19.1. プログラミングを教える
- 19.2. 生徒の監視
- 19.3. 生徒のネットワークアクセスの制限
- 20. ユーザー向け HowTo
- 20.1. パスワード変更
- 20.2. 単体 Java アプリケーションの実行
- 20.3. 電子メールの利用
- 20.4. Thunderbird
- 21. 貢献
- 21.1. Contribute online
- 21.2. バグ報告
- 21.3. 文書の著者及び翻訳者
- 22. サポート
- 22.1. ボランティアベースのサポート
- 22.2. 商業的なプロのサポート
- 23. New features in Debian Edu Bookworm
- 24. 著作権と著者
- 25. この文書の翻訳
- 25.1. この文書の翻訳方法
- 25.1.1. POファイルを使った翻訳
- 25.1.2. ウェブブラウザを使ったオンラインでの翻訳
- 26. 付録A - GNU General Public License
- 27. Appendix B - Features in older releases
- 27.1. New features for Debian Edu 11 Codename Bullseye released 2021-08-14
- 27.1.1. インストールの変更
- 27.1.2. ソフトウェアの更新
- 27.1.3. 文書や翻訳の更新
- 27.1.4. 前のリリースからの他の変更点
- 27.2. 更に古いリリースについての情報
翻訳:
2016, 2017 victory
2019, 2021 hoxp18
![]()
このマニュアルは Debian Edu 12 (bookworm) リリース用です。
https://wiki.debian.org/DebianEdu/Documentation/12 Bookworm の wiki でこの文書のバージョンは頻繁に更新されています。
Updated translations are available online.
Debian Edu (別名 Skolelinux) は Debian を元にしたディストリビューションで、学校ネットワークシステムをすぐに構築できるよう設定されています。クライアント・サーバーの実装様式で、サーバーやクライアントは協調して動作する 数々のソフトウェア で構成されます。各サーバーがそのクライアントの機能に必要な情報を提供します。サーバーがインストールされているハードウェア機材 (マシン) とクライアントのマシンが異なる場合には、その概念の延長上、それらのマシン自体をそれぞれサーバーやクライアントと呼びます。
The chapters about hardware and network requirements and about the architecture contain basic system design details.
After installation of a main server, all services needed for a school network are set up and the system is ready to be used. Only users and machines need to be added via GOsa², a comfortable Web-UI, or any other LDAP editor. A netbooting environment using PXE/iPXE has also been prepared, so after initial installation of the main server from CD, Blu-ray disc or USB flash drive all other machines can be installed via the network, this includes "roaming workstations" (ones that can be taken away from the school network, usually laptops or netbooks). Also, machines can be booted via PXE/iPXE as diskless workstations or thin clients.
Several educational applications like GeoGebra, Kalzium, KGeography, GNU Solfege and Scratch are included in the default desktop environment setup, which can be extended easily and almost endlessly via the Debian universe.
Debian Edu / Skolelinux は Debian Edu プロジェクトで制作されている Linux ディストリビューションです。Debian Pure Blend ディストリビューションのひとつであり、公式の Debian サブプロジェクトです。
つまり Debian Edu / Skolelinux は学校ネットワークシステムを手早く構築できる Debian の一派生バージョンなのです。
経緯として、2001 年 7 月 2 日にノルウェーで Skolelinux プロジェクトが創設され、同時期に Raphaël Hertzog さんがフランスで Debian-Edu を始めました。2003 年に 2 つのプロジェクトは名前を残した形で統合しました。「Skole」も 「(Debian-) Education」もそれぞれの地域でわかりやすい語だったからです。
今や世界的に広まり、複数の国でこのシステムは利用されています。
この節では Skolelinux の全体像や提供するネットワーク構成とサービスについて説明します。
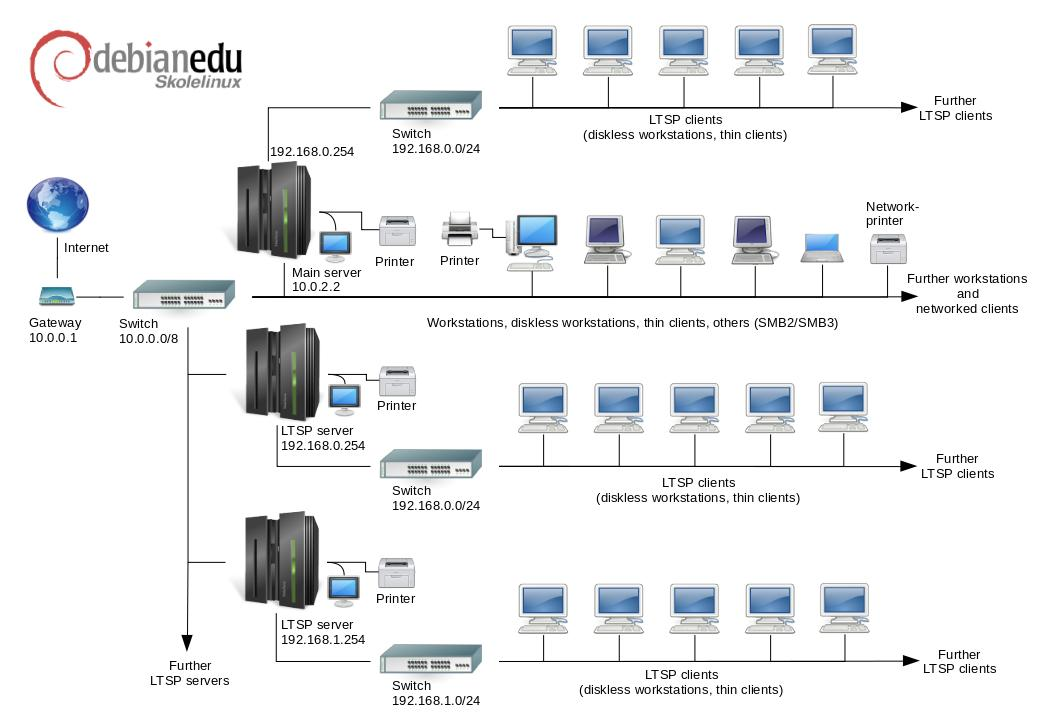
図はネットワーク接続形態の例です。Debian Edu / Skolelinux のデフォルトでは、ネットワークに通常のワークステーションや LTSP サーバー (それと関係するシンクライアントやディスクレスワークステーション) は複数想定されています。ただし「主サーバーは 1 つだけ」です。ワークステーションの数はお好みで設定できます (無くてもいいですし、多数でも大丈夫です)。LTSP サーバーについても同様で、それぞれが別のネットワークを構成するため、クライアントと LTSP サーバーの間の通信が他のネットワークサービスに悪影響を及ぼすことはありません。LTSP の詳細は 別の章の HowTo をご覧ください。
主サーバーが学校ネットワークごとに 1 台だけというのは、主サーバーが DHCP を提供するという技術的な理由です (ネットワーク中に 1 台のマシンだけが可能です)。サービスを主サーバーから他のマシンに移動させることは可能です。別のマシンでサービスを提供させた上で、そのサービスがそのコンピューターにあることを示す DNS エイリアスを設定することで実現できます。
Skolelinux の標準設定では、構成を単純で分かりやすくするために、インターネットとの通信は「ゲートウェイ」と呼ばれる独立したルーターを経由します。 インターネットルーターの章 で「ゲートウェイ」の構築方法やお手持ちのものを流用できるかを解説しています。
主サーバーの DHCP は 10.0.0.0/8 ネットワークを提供し、PXE ブートによる 新しいサーバーやワークステーションのインストール、シンクライアントやディスクレスワークステーションの起動、memtest の実行、ローカルハードディスクからのブート等を選択できるようになっています。
ただしこれらは個別対応のために修正できる設計です。詳細は 関連するHOWTO をご覧になってください。
LTSP サーバーの DHCP は 2 つの専用ネットワーク ( 192.168.0.0/24 と 192.168.1.0/24 が初期設定です) だけを対象とします。これを変更する必要は滅多にありません。
サブネットの設定は全て LDAP に格納されます。
A Skolelinux network needs one main server (hostname "tjener" which is Norwegian and means "server") which per default has the IP address 10.0.2.2 and is installed by selecting the Main Server profile. It's possible (but not required) to also select and install the LTSP Server and Workstation profiles in addition to the Main Server profile.
シンクライアントの制御を例外として、初期設定ではサービスは全て主サーバーに設定されます。性能の低下を防ぐため、 LTSP サーバーは複数あるべきです (同一のマシンに「主サーバー」と「 LTSP サーバー」のプロファイルを両方インストールすることは可能です)。専用の DNS 名が全サービスに割り当てられますが、IPv4 だけで提供されます。DNS 名を割り当てられているので、個々のサービスを主サーバーから異なるマシンに移動するのは簡単です。単純に主サーバーのサービスを止めて、そのサービスを提供する新しいマシンを参照するように DNSの 設定を変更するだけです (もちろん最初にそのサービス用のマシンを準備しないといけません)。
セキュリティ確保のため、ネットワークでパスワードを送る接続は全て暗号化されています。平文のままのパスワードがネットワークに送られることはありません。
以下は Skolelinux ネットワークにデフォルトで用意されるサービスと、それぞれの DNS 名を示した表です。設定ファイルでは可能な限りサービスを全て DNS 名 (ドメイン名は含めません) で参照しているため、学校で利用しているドメイン名 (DNS のドメインを独自に持っている場合) や IP アドレスを変更するのは容易です。
|
サービスの一覧 | ||
|
サービスの説明 |
技術名称やパッケージ名 |
DNS サービス名 |
|
中央ログ収集 |
rsyslog |
syslog |
|
ドメイン名サービス |
DNS (BIND) |
domain |
|
自動ネットワーク設定機能 |
DHCP |
bootps |
|
時刻の同期 |
NTP |
ntp |
|
ネットワーク経由のホームディレクトリ提供 |
SMB / NFS |
homes |
|
電子メール |
IMAP (Dovecot) |
postoffice |
|
ディレクトリサービス |
OpenLDAP |
ldap |
|
ユーザーの管理 |
GOsa² |
--- |
|
ウェブサーバー |
Apache/PHP |
www |
|
中央バックアップ |
sl-backup, slbackup-php |
backup |
|
ウェブキャッシュ |
プロキシ (Squid) |
webcache |
|
印刷 |
CUPS |
ipp |
|
安全なリモートログイン |
OpenSSH |
ssh |
|
自動設定 |
CFEngine |
cfengine |
|
LTSP サーバー |
LTSP |
ltsp |
|
マシン及びサービスの監視、エラー報告や状態の確認、履歴のウェブでの確認、電子メールでのエラー報告 |
Munin、Icinga、Sitesummary |
sitesummary |
各ユーザーのファイルはサーバー上のそれぞれのホームディレクトリに保存されます。ホームディレクトリにはどのマシンからもアクセス可能です。ユーザーはどのマシンからでも同一のファイルにアクセスできます。サーバーはオペレーティングシステム毎に柔軟に対応します。Unix クライアント向けには NFS、 他のクライアント向けには SMB2/SMB3 を経由したアクセスを提供します。
メールはデフォルトでローカル配送 (つまり学校内) だけが使えるように設定されます。学校に専用のインターネット回線がある場合には、インターネットへメールを送信することも可能です。クライアントのメールは (「スマートホスト」を使って) サーバーに送信される設定になり、ユーザーは IMAP 経由で個人のメールにアクセスできます。
中央ユーザーデータベースで認証及び承認を行うため、どのサービスにも同一のユーザー名とパスワードを使ってアクセスできます。
校内からのアクセスが多いウェブサイトへのアクセス速度の改善とトラフィック集中の回避のため、ウェブプロキシサーバー (Squid) を利用します。ルーターでのウェブ関連の通信ブロックと組み合わせれば、マシン個別にインターネットアクセスを管理できます。
クライアントのネットワーク設定は DHCP を使って自動的に行われます。通常のクライアントは全てプライベート用のサブネット 10.0.0.0/8 に接続され、それに応じたIPアドレスが割り当てられます。一方でシンクライアントは、担当する LTSP サーバーに別のサブネット 192.168.0.0/24 を経由して接続します (このためLTSP クライアントのネットワーク通信が他のネットワークサービスに悪影響を与えることはありません)。
中央ログ収集機能が設定され、全てのマシンは各々の syslog メッセージをログサーバーに送るように設定されます。syslog サービスはローカルネットワーク内部から来るメッセージだけを受け付けるように設定されています。
DNS サーバーはデフォルトでは、実際 (外部) の DNS ドメインを設定しない限り、学校ネットワーク内部でのみ利用するドメイン *.intern と設定されます。DNS サーバーはキャッシュ機能も設定されるため、性能面を気にせずネットワーク上の全マシンでメインの DNS サーバーとして利用できます。
生徒や教員はウェブサイトを公開できます。ユーザー認証機能や、ページやサブディレクトリへのアクセスを特定のユーザーやグループに制限する機能は、ウェブサーバーが提供します。サーバーサイドプログラミング機能もあるため、ユーザーは動的なウェブページも作成できます。
ユーザーやマシンの情報は中央管理で一括変更でき、自動的にネットワーク上の全コンピュータに反映されます。これには中央ディレクトリサーバーが用いられます。ディレクトリはユーザーやユーザーグループ、マシン、マシングループの情報を持つことになります。混乱を避けるためファイルグループとネットワークグループに違いは全くありません。ネットワークグループを構成するマシン群は同一の名前空間を利用するということです。
サービスやユーザーの管理は主にウェブ経由で、標準的な手順に沿って行います。Skolelinux に収録されているウェブブラウザで実行できます。管理システムから特定のタスクについて、個々のユーザーやユーザーグループに権限を委譲することもできます。
NFS に特有の問題を回避し、問題発生時の解決を容易にするため、各マシンは時刻同期が必要になります。 Skolelinux サーバーはローカルの Network Time Protocol (NTP) サーバーとして設定されており、全てのワークステーションやクライアントの時刻は同期されます。ネットワーク全体での正確な同期時刻を確保するため、サーバー自体もインターネットから NTP 経由で時刻を同期するようにしてください。
プリンターは都合のいい場所でメインのネットワークに直接接続するか、ネットワーク内のサーバー、ワークステーション、あるいは LTSP サーバーに接続します。プリンターへのアクセスは個々のユーザーの所属グループ毎に制御できます。これはプリンターに対するクォータ設定とアクセス制御で実装しています。
Skolelinux ネットワークには多数の LTSP サーバーが設定できます。「LTSP サーバー」のプロファイルを用いてインストールします。
LTSP サーバーは syslog をシンクライアントやワークステーションから受け取り、中央ログ収集サーバーに送るように設定されます。
注意:
LTSP ディスクレスワークステーションは、サーバーにインストールされたプログラムを利用します。
LTSP クライアントのルートファイルシステムは NFS で構成されます。LTSP 環境を変更した後には関連するイメージを更新するため LTSP サーバーで
debian-edu-ltsp-install --diskless_workstation
yes
を実行してください。
シンクライアントの設定を用いると一般的な PC を (X-) 端末として機能させることもできます。つまりマシンはローカルのハードドライブを利用せず、PXE を使ってサーバーから直接起動します。シンクライアント機能は X2Go を用いています (LTSP の対応がなくなったため)。
シンクライアントを用いると 32 ビットマシンのような古いものも活用できます。プログラムは全て LTSP サーバーで効率的に実行されるためです。仕組みは次のようになっています。まず DHCP と TFTP を使ってネットワーク構築がされシンクライアントがネットワーク経由で起動します。次に LTSP サーバーのファイルシステムが NFS 経由でマウントされます。最後に X2Go クライアントが起動します。
ディスクレスワークステーションではソフトウェアは全て、PC それぞれにインストールされたオペレーティングシステムを使わずに動作します。クライアントマシンは PXE 経由で起動するので、それぞれのローカルドライブにインストールされたソフトウェアは使われません。
ディスクレスワークステーションは高性能なハードウェアを、シンクライアント並に低い保守コストで活用できる優れた手段です。ソフトウェアの保守管理はサーバーで行われますので各クライアント側でソフトウェアを保守する必要はありません。ホームディレクトリやシステム設定もサーバーに保管されます。
Skolelinux インストーラによりインストールされる Linux
マシンはすべて、中央コンピュータ、ほとんどの場合は主サーバーから管理できます。SSH
を経由して全マシンへのログインでき、すべてのマシンへの完全なアクセスが可能です。ただし root 権限を得るには
kinit を実行して Kerberos TGT を得る必要があります。
ユーザー情報は全て LDAP ディレクトリに保管されます。ユーザーアカウントの更新はこのデータベースに対して行われ、クライアントのユーザー認証にもこれが利用されます。
インストール用メディアのイメージは現在 netinst イメージ と BD イメージの 2 種類があります。どちらのイメージも USB メモリなどからでも起動できます。
任意のメディアからサーバーを一旦インストールしてしまえば、他のクライアントは全てネットワークからブートし、ネットワーク経由でインストールできるようにするのが狙いです。
netinst イメージはインストール時にインターネットへのアクセスが必要です。
The installation should not ask any questions, with the exception of desired language, location, keyboard layout and machine profile (Main Server, Workstation, LTSP Server, …). All other configuration will be set up automatically with reasonable values, to be changed from a central location by the system administrator subsequent to the installation.
Skolelinux のユーザーアカウントには、ファイルサーバー上のファイルシステムが割り当てられます。それ (ホームディレクトリ) にはユーザーの設定ファイルや文書、メール、ウェブページが保存されます。システム上の他のユーザーも読むことができるファイル、インターネットの誰からでも読み取れるファイル、そのユーザー以外の誰からも読み取れないファイルなど、アクセス権限は設定管理してください。
ユーザーディレクトリや共有ディレクトリに利用する全てのディスクに関して、インストールしたシステムの全コンピューターの間で一意の固有名でアクセスできるようにするため、/skole/ホスト/ディレクトリ/
としてマウントする方法があります。初期状態では単一のディレクトリ
/skole/tjener/home0/
がファイルサーバーに作成され、ユーザーアカウントは全てそこに作成されます。特定のユーザーグループや使い方によって、必要に応じてディレクトリを追加することもできます。
通常の UNIX 権限を利用してファイルへの共有アクセスができるようにするためには、ユーザーはそれぞれ個人がデフォルトで属する基本グループに加えて、追加で共有グループ (例えば "students" グループ) にも属する必要があります。新しく作成される項目をユーザーのグループからもアクセスできるように、適切な umask (002 や 007) を設定し、作業ディレクトリが setgid されていてファイルが正しいグループ権限を引き継ぐようになっていれば、グループメンバー間での制御されたファイル共有ができます。
新しく作成されるファイルの初期アクセス設定は、ポリシーの問題です。Debian のデフォルト umask は 022
(上記で説明したようにグループからのアクセスを許可しない) ですが、 Debian Edu では 002
をデフォルトとしています。つまりファイルは誰からも読み取れる状態で作成され、後からユーザーが介入して操作すれば削除もできるということです。代わりに
(/etc/pam.d/common-session を編集することで) umask
を 007
にすることも可能です。この場合は、読み取りアクセスをまずブロックしておき、必要な場合にはユーザーによる操作で読み取れるようにするという方法です。前者は知識の共有を奨励し、システムをより透過的にするのに対し、後者は秘密情報が意図せず読み取られてしまう危険性を減らせます。前者の問題は、自分が作成したものが他のあらゆるユーザーからアクセスできる点が、ユーザーにとってわかりにくいことです。他のユーザーのディレクトリを調べたときに他人のファイルを読めてしまうことからしか、この問題に気づけないかもしれません。一方で後者の問題は、秘密情報の有無を問わず、自分のファイルを他人にもアクセスできるようにわざわざ設定する人は少ないでしょうから、特定の問題
(主に設定の問題) を他の人がどのように解決しているのかなどを、他のユーザーが調べようとしても役に立たない点です。
Skolelinux ソリューションの導入方法は複数あります。単一のPCだけにインストールすることも、地域にあるいくつもの学校を中央から運営するようにもできます。柔軟性があるので、ネットワーク構成要素やサーバー、クライアントマシンの設定は大きく変えることができます。
様々なプロファイルの目的についてはネットワーク構成の章で説明しています。
 LTSP をご利用の場合は LTSP
ハードウェア要件の wiki ページ をご覧になってください。
LTSP をご利用の場合は LTSP
ハードウェア要件の wiki ページ をご覧になってください。
Debian Edu / Skolelinux を実行するコンピュータとして、32 ビット時代のかなり古いプロセッサーを搭載しているものか (Debian アーキテクチャー名は i386 で、i686 クラスまでのプロセッサです)、 または最近の 64 ビット対応 x86 プロセッサー (Debian アーキテクチャー名は amd64) が必要になります。
シンクライアントは DRAM が 256 MiB で 400 MHz 程度のプロセッサーでも動作はしますが、現実的にはより多くの DRAM とより高速なプロセッサーを搭載したマシンを推奨します。
「ワークステーション」「ディスクレスワークステーション」や「スタンドアロン」プロファイルのシステムのマシンには、1,500 MHz 以上で動作する CPU と、1,024 MiB 以上の DRAM が絶対必要となります。最近のウェブブラウザや LibreOffice を使う場合には、2,048 MiB 以上の DRAM を推奨します。
要求される最小ディスク容量はインストールするプロファイルにより異なります:
combined main server + LTSP server + workstation (if a GUI on the server is desired): 60 GiB (plus additional space for user accounts).
「LTSP サーバー」プロファイル: 40 GiB 以上。
「ワークステーション」や「スタンドアロン」プロファイル:30 GiB は必要です。
minimal networked machine installation: 4 GiB.
デフォルトのネットワーク構成で利用する場合、LTSP サーバーにはネットワークカードが 2 つ必要です:
eth0 はメインネットワーク (10.0.0.0/8) に接続します。
eth1 は LTSP クライアント用ネットワークに使用します。
ノート PC はモバイルワークステーションなので、要件は「ワークステーション」プロファイルと同一です。
A list of tested hardware is provided at https://wiki.debian.org/DebianEdu/Hardware/ . This list is not nearly complete.
https://wiki.debian.org/InstallingDebianOn は Debian を特定のハードウェアにインストール、設定、利用する方法を記録した成果です。そういったハードウェアの導入を考えている方がサポート状況を確認したり、既に所有しているハードウェアを最大限活用する方法を探すことに利用できます。
デフォルトのネットワーク構成で利用する場合は以下のようになります。
You need exactly one main server.
ワークステーションは中心ネットワークに数百台も配置可能です。
中心ネットワークには多数の LTSP サーバーも配置できます。LDAP では 2 つ (DNS、DHCP) のサブネットが事前設定されていますが、更に追加することもできます。
シンクライアントやディスクレスワークステーションは、各 LTSP サーバーのネットワークに数百台は配置可能です。
その他のマシンも、動的 IP アドレスの割り当てになりますが、数百台配置可能です。
インターネットへのアクセスにはルーターやゲートウェイが必要です (以下参照)。
インターネットへの接続には、外部インターフェイスがインターネットに接続していて、内部インターフェイスにIPアドレス 10.0.0.1、ネットマスク netmask 255.0.0.0 を設定できるルーターかゲートウェイが必要です。
ルーターで DHCP サーバーを動作させるべきではありません。DNS サーバーを動作させることはできますが、その必要はなく、また利用もされません。
In case you do not already have a router or your existing router cannot be
set up accordingly, any machine which fulfills the requirements for a
minimal Debian installation and which has at least two network interfaces
can be turned into a gateway between the existing network and the Debian Edu
one. See installation
documentation for a simple way to install and set up a Debian machine
using debian-edu-router-config.
ルーターやアクセスポイントのファームウェアには OpenWRT も利用できます。もとのファームウェアでもちろん構いませんしそれが容易です。OpenWRT を用いるとより仔細に設定管理できます。対応機器は OpenWRT のウェブページにある supported hardware でご確認ください。
異なるネットワーク設定も可能ではあります (手順は Change subnet in Debian Edu / Skolelinux にあります)。ただ、貴校の既存のネットワーク構成の都合でやらざるを得ないのでなければ、異なる設定にするよりもデフォルトの ネットワーク構成 にしておくことを勧めます。
We recommend that you read or at least take a look at the release notes for Debian Bookworm before you start installing a system for production use. There is more information about the Debian Bookworm release available in its installation manual.
ぜひ Debian Edu/Skolelinux をご検討ください。お役に立ちます。
主サーバーのインストールを始める前に、まずは ハードウェアとネットワークの要件 と、全体的な構成 についての章をご一読ください。
このマニュアルの さあ始めよう の章も必ず読んでください。初めてのログインについて説明しています。
amd64 and
i386 are the names of two Debian
architectures for x86 CPUs, both are or have been build by AMD, Intel and
other manufacturers. amd64 is a 64-bit
architecture and i386 is a 32-bit
architecture. New installations today should be done using
amd64.
i386 should only be used for very old
hardware.
The netinst iso image can be used for installation from CD/DVD and USB flash drives and is available for two Debian architectures: amd64 or i386. As the name implies, Internet access is required for the installation.
Once Bookworm has been released these images will be available for download from:
These ISO image are approximately 7.5 GB large and can be used for installation of amd64 or i386 machines, also without access to the Internet. Like the netinst image it can be used on USB flash drives or disk media of sufficient size.
Once Bookworm has been released these images will be available for download from:
Detailed instructions for verifying and using these images are part of the Debian-CD FAQ.
ソースコードは通常の Debian アーカイブと同様に様々な方法で入手できます。http://get.debian.org/cdimage/release/current/source/
When you do a Debian Edu installation, you have a few options to choose from. Don't be afraid; there aren't many. We have done a good job of hiding the complexity of Debian during the installation and beyond. However, Debian Edu is Debian, and if you want there are more than 59,000 packages to choose from and a billion configuration options. For the majority of our users, our defaults should be fine. Please note: if LTSP is intended to be used, choose a lightweight desktop environment.
ルーターの DHCP 機能を利用した、一般的な学校やご家庭でのインターネットアクセス:
主サーバーのインストールは可能ですが、再起動後のインターネットアクセスに留意点があります (主ネットワークの IP アドレスが 10.0.2.2/8 になるためです)。
お手持ちのルーターをゲートウェイとして設定できない場合は別の方法がありますので、インターネットルーター の章をご覧ください。
すべての機材は ネットワーク構成 の章で説明しているように接続してください。
The main server should have Internet connection once booted the first time in the correct environment.
典型的な学校や組織のネットワークで、上の例に似ているもののプロキシサーバーが必要な場合。
カーネルコマンドラインで 'debian-edu-expert' を加えることになります。詳細は後述します。
プロキシサーバー関係の質問などが追加され、必須項目になります。
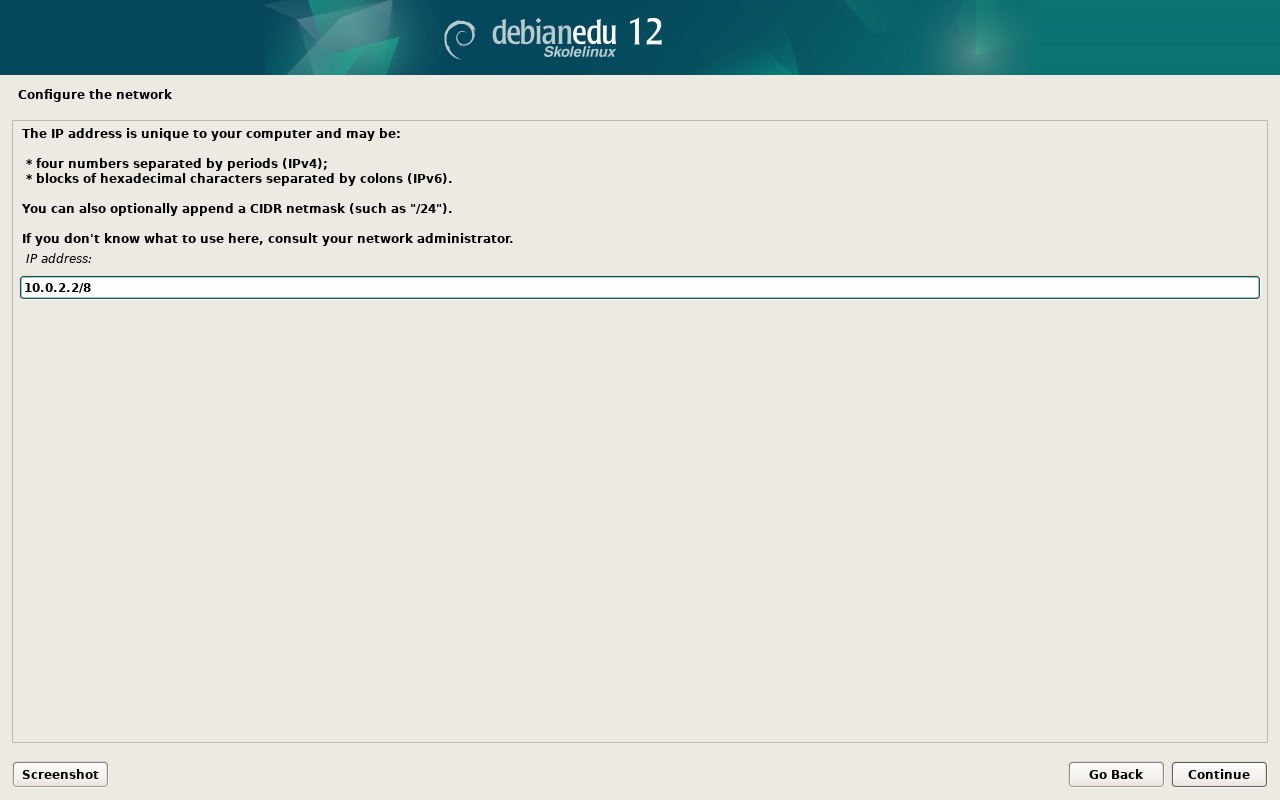
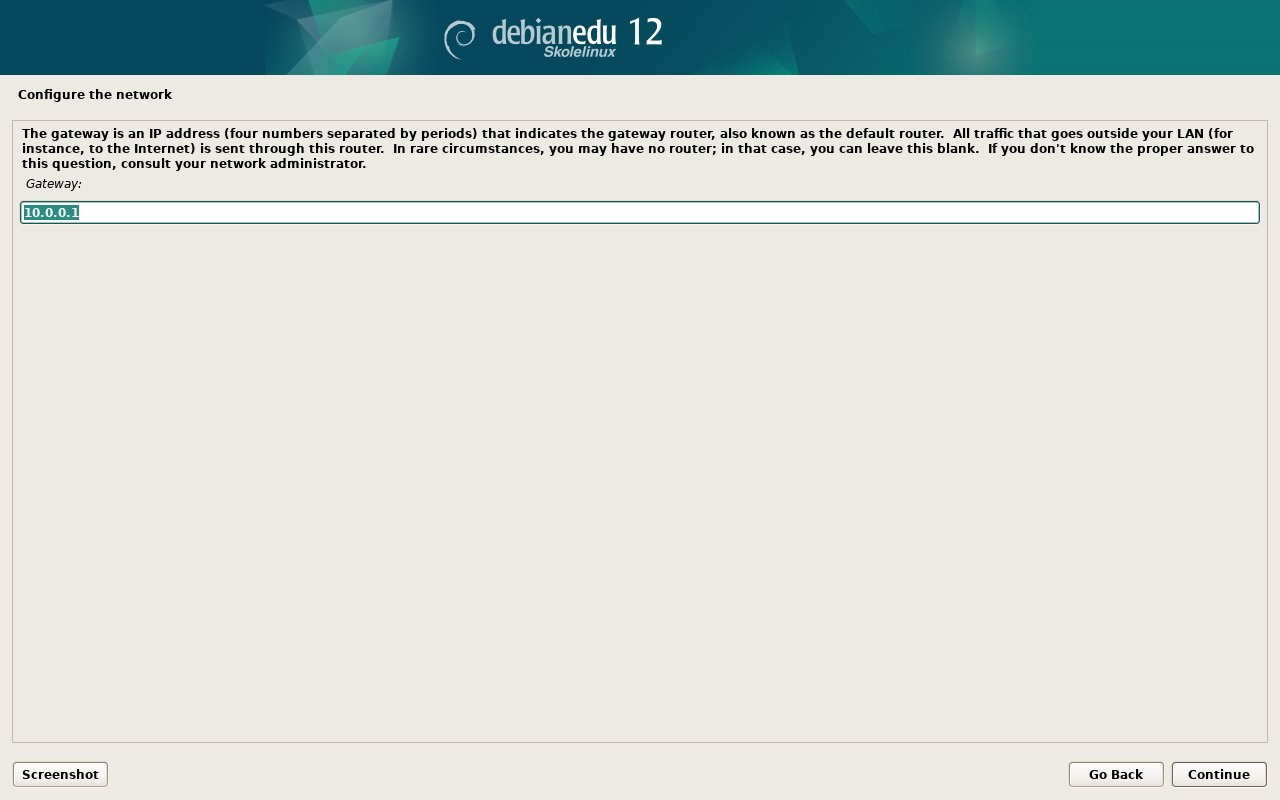
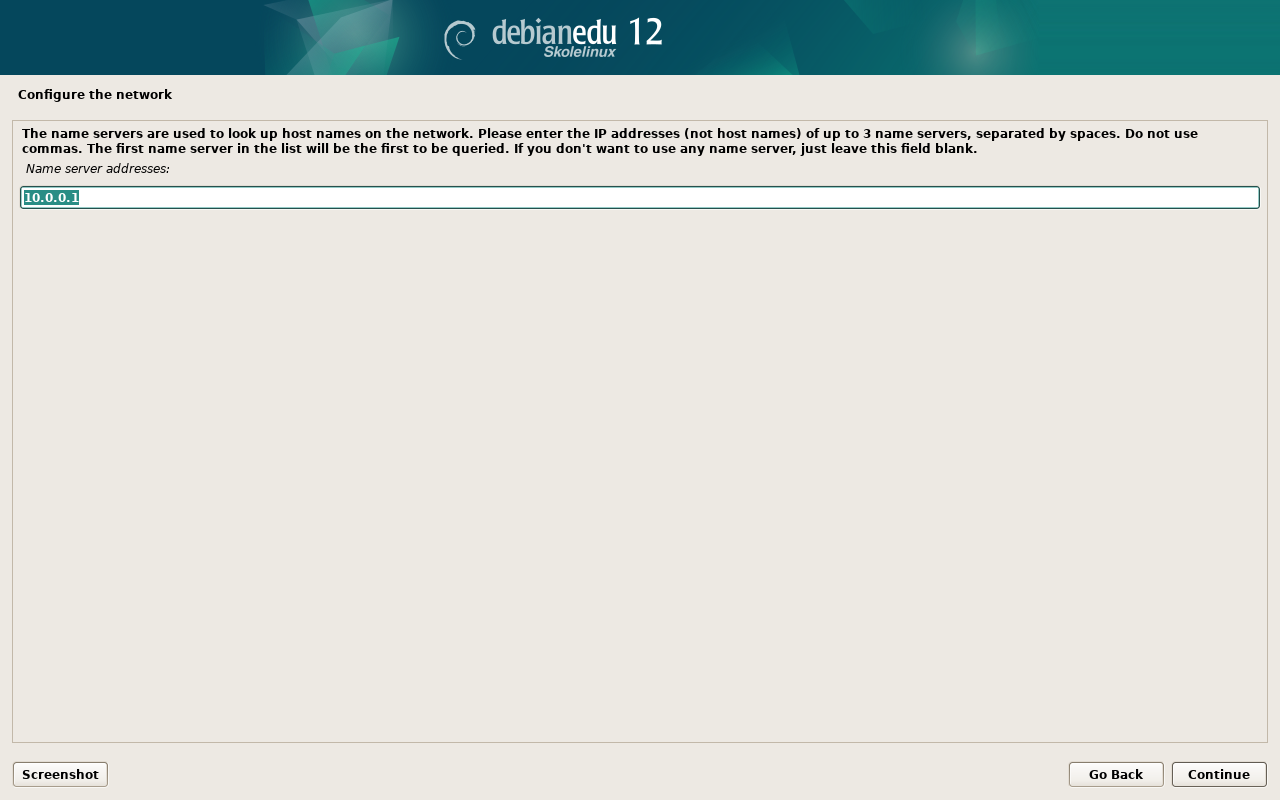
DHCP サーバー機能を持たないルーターで IP 10.0.0.1/8 に構成されたネットワークで、インターネット接続がある場合。
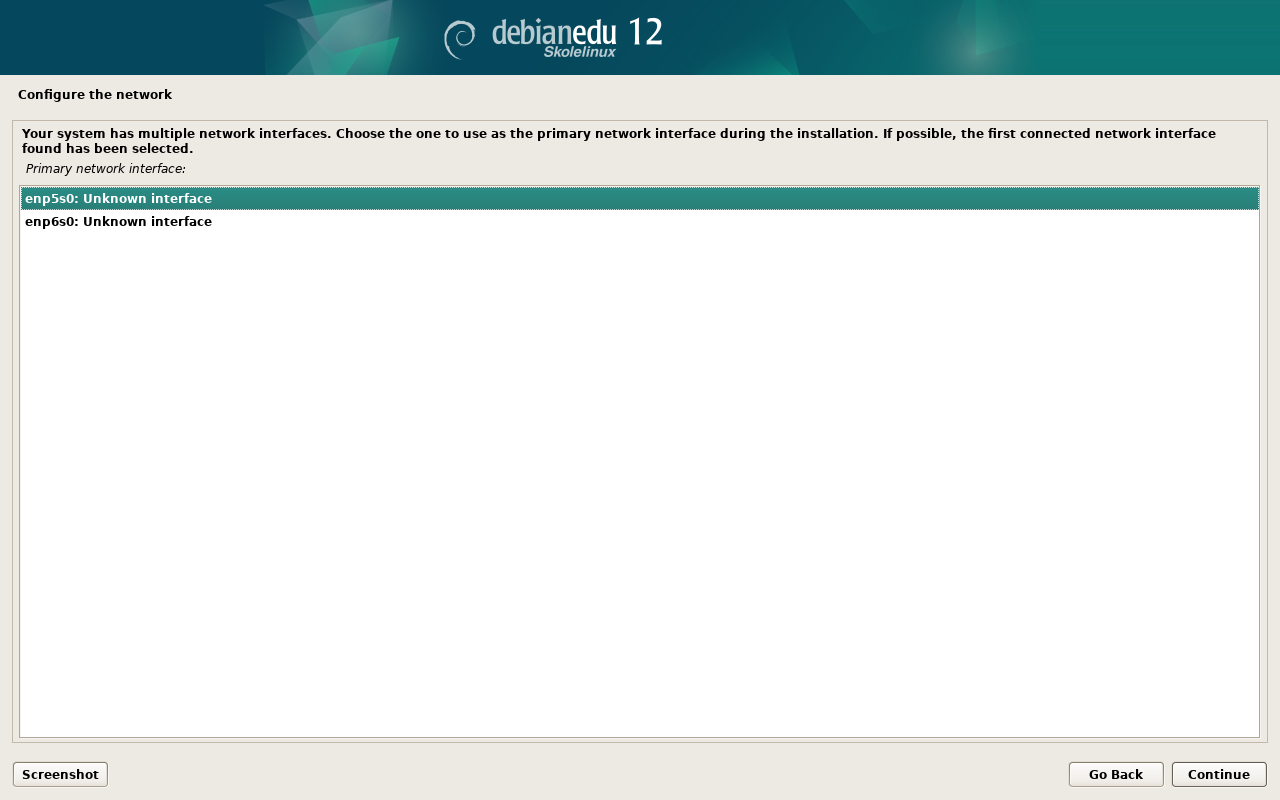
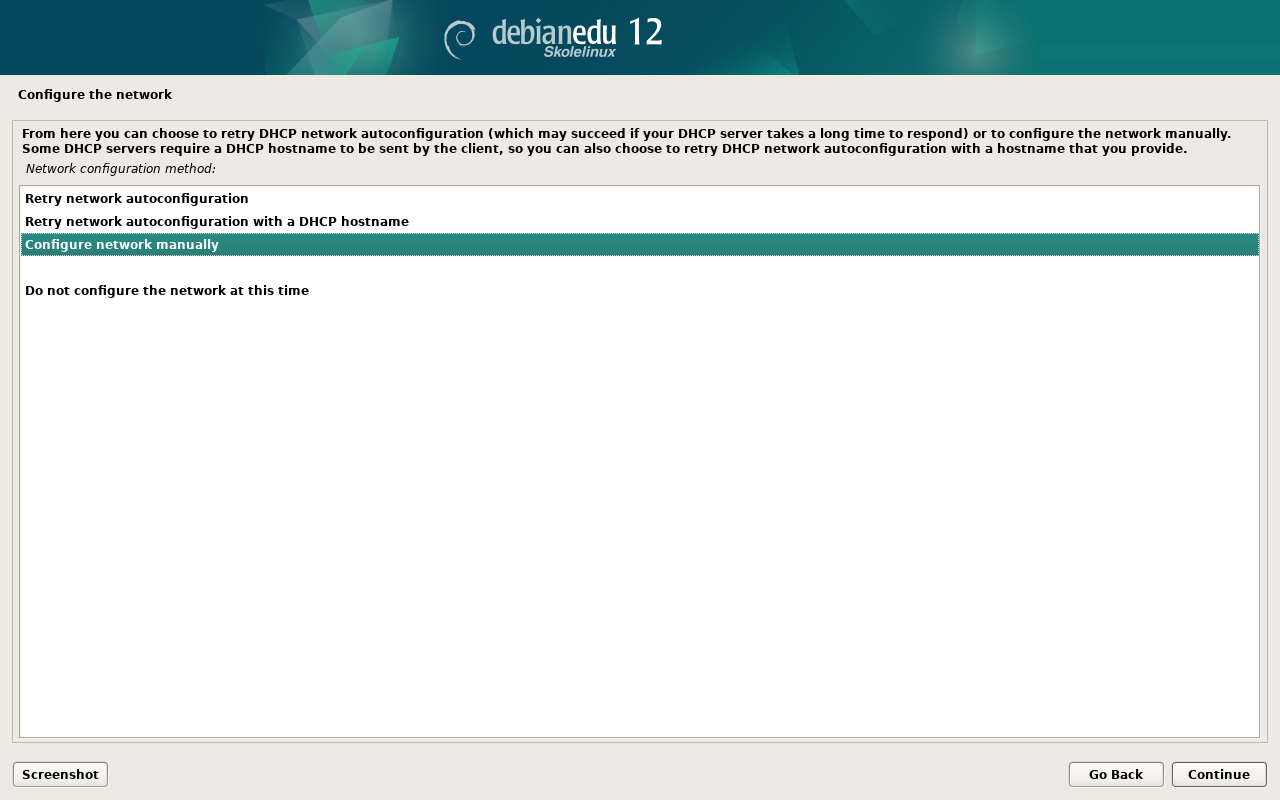
ネットワーク設定が DHCP 機能の欠落によって失敗し次第、手動でのネットワーク設定を行うことになります。
ホストIP には 10.0.2.2/8 を設定します。
ゲートウェイIP には 10.0.0.1 を設定します。
代案がない場合は 8.8.8.8 をネームサーバーの IP として入力します。
以上の設定で、主サーバーは初回起動後に正常に動作するはずです。
オフライン(インターネット接続がない) 場合:
ISO イメージには BD を利用します。
(実物も仮想も含めて) あらゆるネットワークケーブルが接続されていないことを確認します。
ネットワーク設定時の DHCP で失敗の表示が出て、「続ける」を押した後、「今はネットワークを設定しない」を選びます。
インターネット接続のある環境でシステムを起動した後に、システムを更新してください。
デスクトップ環境の選択肢:
Xfce はやや LXDE より大きな構成ですが、106 カ国語の言語対応が整っています。
KDE と GNOME は言語サポートが充実していますが、古いコンピューターや LTSP クライアントには重い構成になります。
Cinnamon は GNOME の軽量版として扱えます。
MATE は上の 3 つよりも軽量に動作しますが、言語対応が若干不足しています。
LXDE は一番軽量な構成で、35 ヶ国語をサポートしています。
LXQt は軽量なデスクトップ環境で (言語サポートは LXDE 並み) より見た目と使い勝手が向上しています (KDE 同様に Qt をベースにしています)。
Debian Edu は国際的プロジェクトなので Xfce を標準デスクトップ環境にしています。他のものに変更する場合は次の章をご覧になってください。
システムを「ワークステーション」プロファイルありでインストールした場合、教育関連のプログラムが多くインストールされます。基本的な構成でのみインストールするには、desktop=xxxx をカーネルコマンドラインから外した状態でインストールしてください。詳細は後述します。この手法を利用することで個別対応したシステムの構築や、テストインストールのスピード向上が図れます。
Please note: If you want to install a desktop environment afterwards, don't use the Debian Edu meta-packages like e.g. education-desktop-xfce because these would pull in all education related programs; rather install e.g. task-xfce-desktop instead. One or more of the new school level related meta-packages education-preschool, education-primaryschool, education-secondaryschool, education-highschool could be installed to match the use case.
Debian Edu メタパッケージの詳細は、Debian Edu packages overview をご覧になってください。
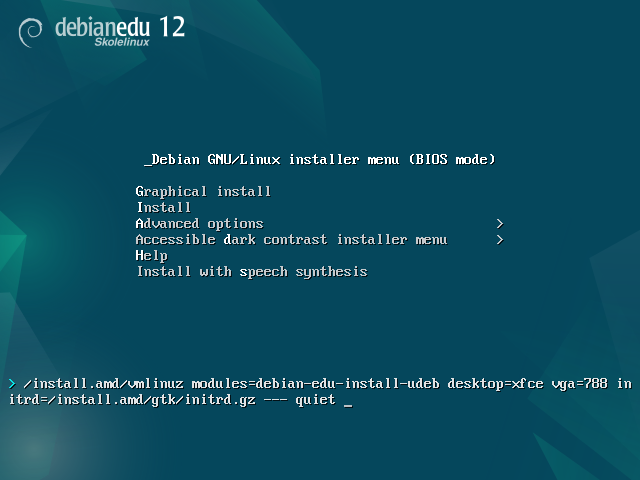
Installer boot menu on 64-bit Hardware - BIOS mode
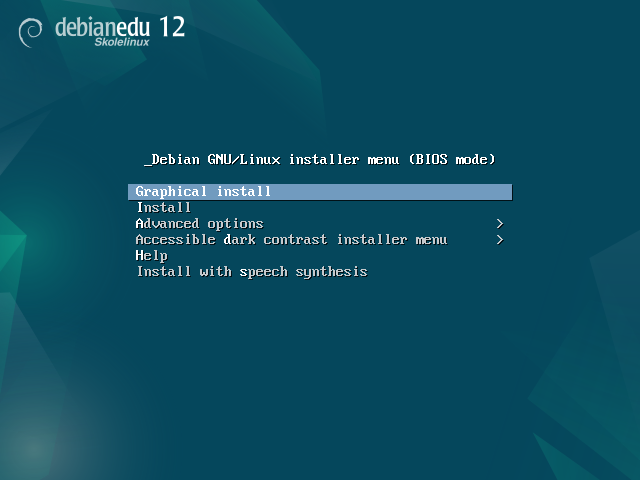
Graphical installは GTK を利用したインストーラで、マウスを利用できます。
Install ではテキストモードを使います。
Advanced options > にはもっと詳細なオプションを選択できるサブメニューがあります。
Help でインストーラの使用に関するいくらかのヒントを提供します。以下のスクリーンショットを見てください。
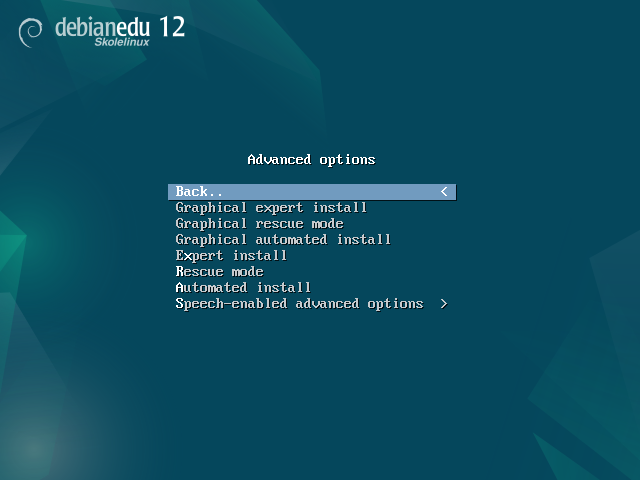
Back.. を選択するとメインメニューに戻ります。
Graphical expert install では全ての項目を設定でき、マウスも使えます。
Graphical rescue mode により、このインストール用メディアは緊急時用のレスキューディスクとして使えます。
Graphical automated install には preseed ファイルが必要です。
Expert install ではテキストモードで全ての項目を設定できます。
Rescue mode ではテキストモードで、このインストール用メディアを緊急時用のレスキューディスクとして使えます。
Automated install のテキストモードには preseed ファイルが必要です。
 Do not use
 Graphical expert install or
Expert install, use
debian-edu-expert instead as an additional
kernel parameter in exceptional cases.
ヘルプ画面
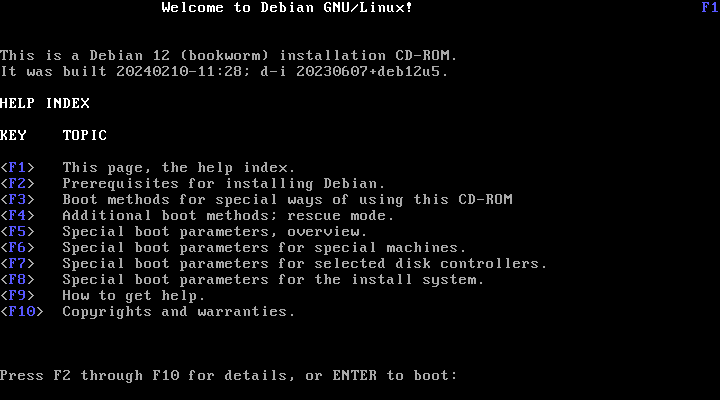
このヘルプ画面は自己説明的になっていて、キーボードの <F数字> キーを押すと、説明されている項目についてもっと詳細なヘルプを得られるようになっています。
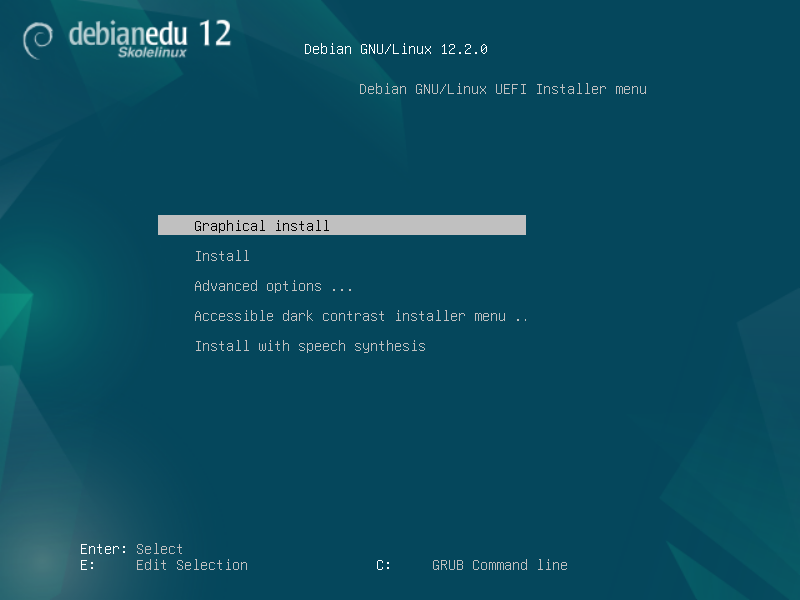
Installer boot menu on 64-bit Hardware - UEFI mode
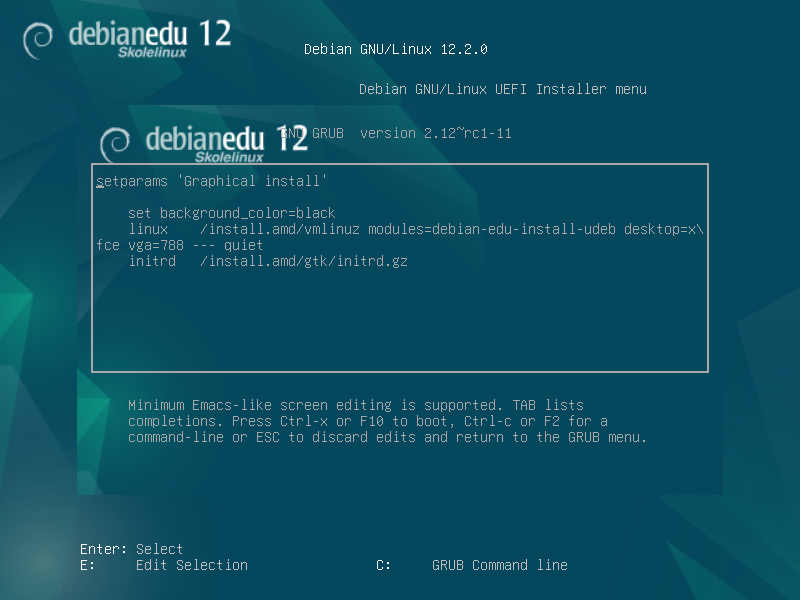
インストール時のブートパラメータの追加や変更
In both cases, boot options can be edited by pressing the TAB or E key in the boot menu; the screenshots show the command line for Graphical install.
You can use an existing HTTP proxy service on the network to speed up the installation of the Main Server profile from CD. Add e.g.
mirror/http/proxy=http://10.0.2.2:3128as an additional boot parameter.If you have already installed the Main Server profile on a machine, further installations should be done via PXE, as this will automatically use the proxy of the main server.
標準の Xfce デスクトップではなく GNOME デスクトップをインストールするには、カーネルのブートパラメータ
desktop=xfceのxfceをgnomeに置き換えます。LXDE デスクトップをインストールするには
desktop=lxdeを使います。LXQt デスクトップをインストールするには
desktop=lxqtを使います。KDE Plasma デスクトップをインストールするには
desktop=kdeを使います。Cinnamon デスクトップをインストールするには
desktop=cinnamonを使います。MATE デスクトップをインストールするには
desktop=mateを使います。
LTSP サーバーの利用を検討する際は システム要件 とネットワークカード (NIC) が 2 つ以上あることを必ず確認してください。
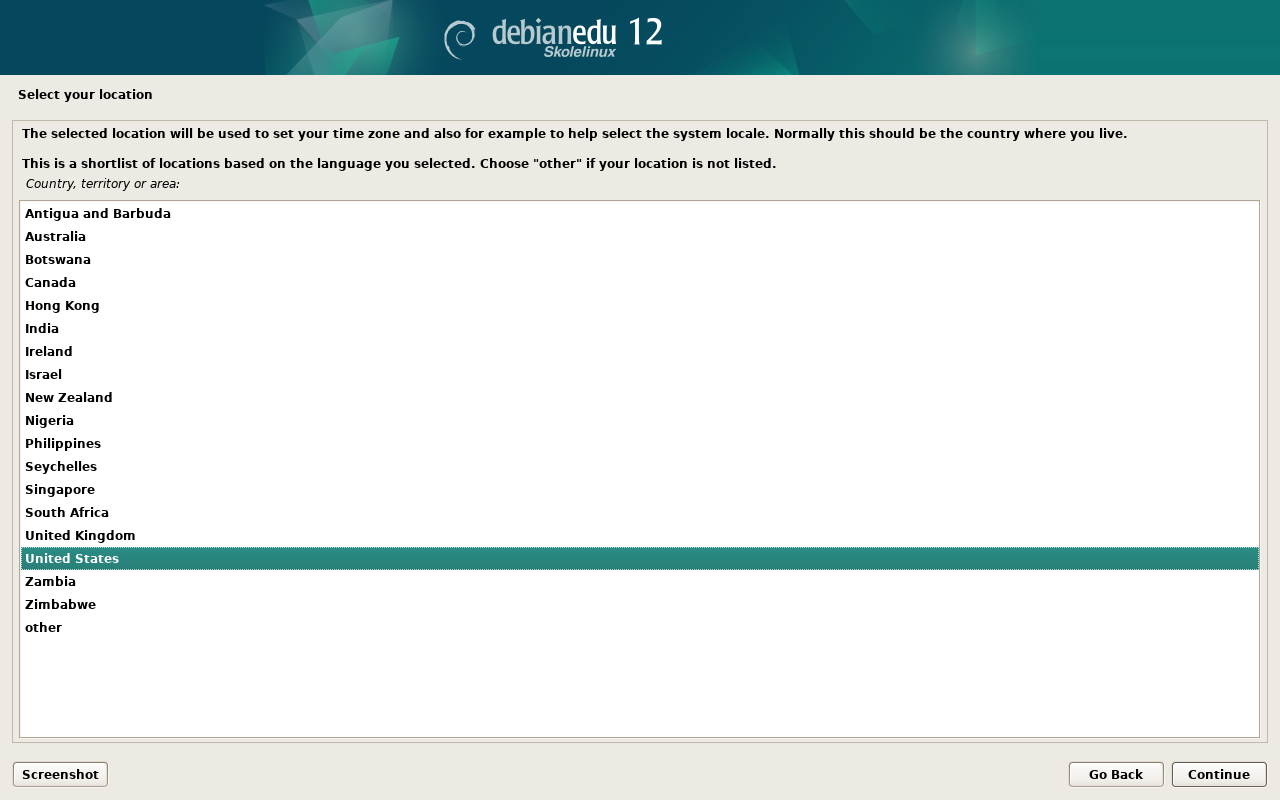
言語を選択します (インストール時とインストールしたシステム)。
国や地域を選択します。通常はあなたがお住みの国や地域です。
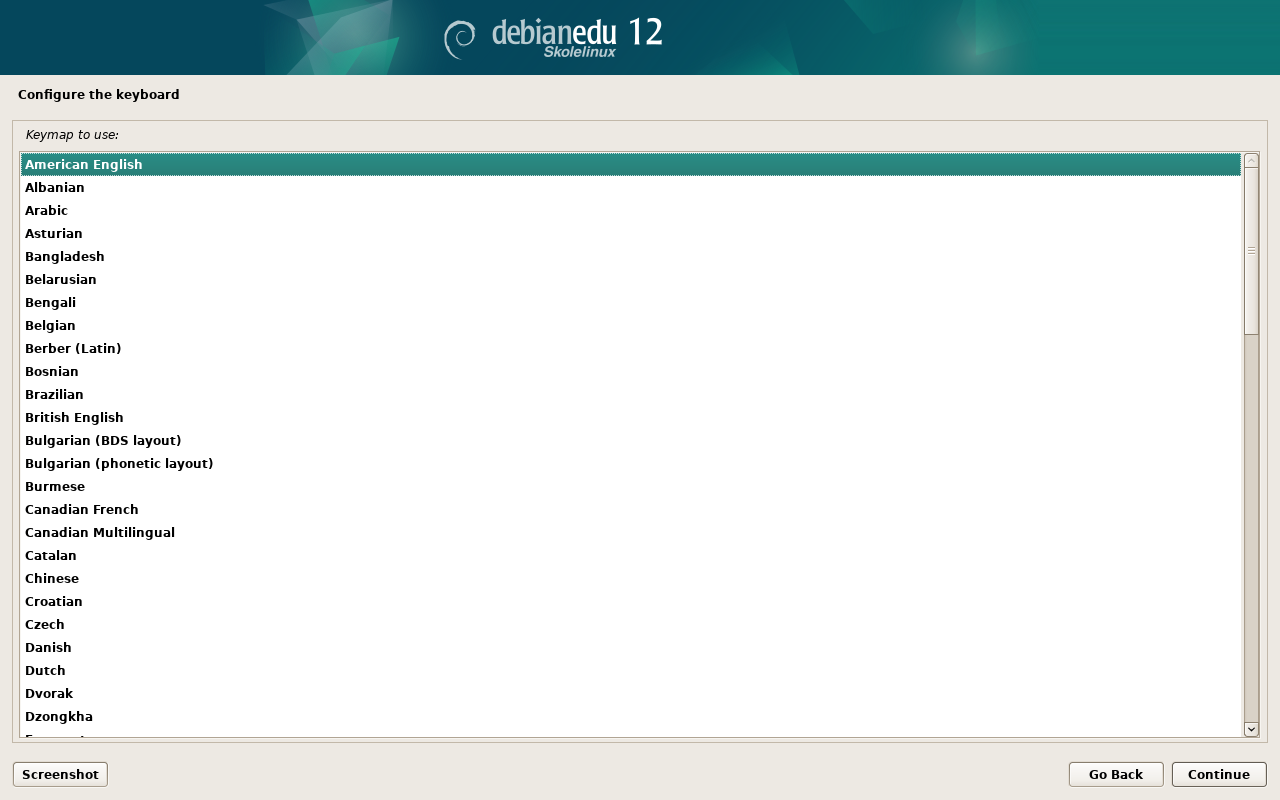
キーボードの種類を選択します。「国や地域」と基本的には同じです (もし英語表示でインストールする場合でも日本語キーボードを利用する場合には "Japanese" キーボードレイアウトを選択してください)。
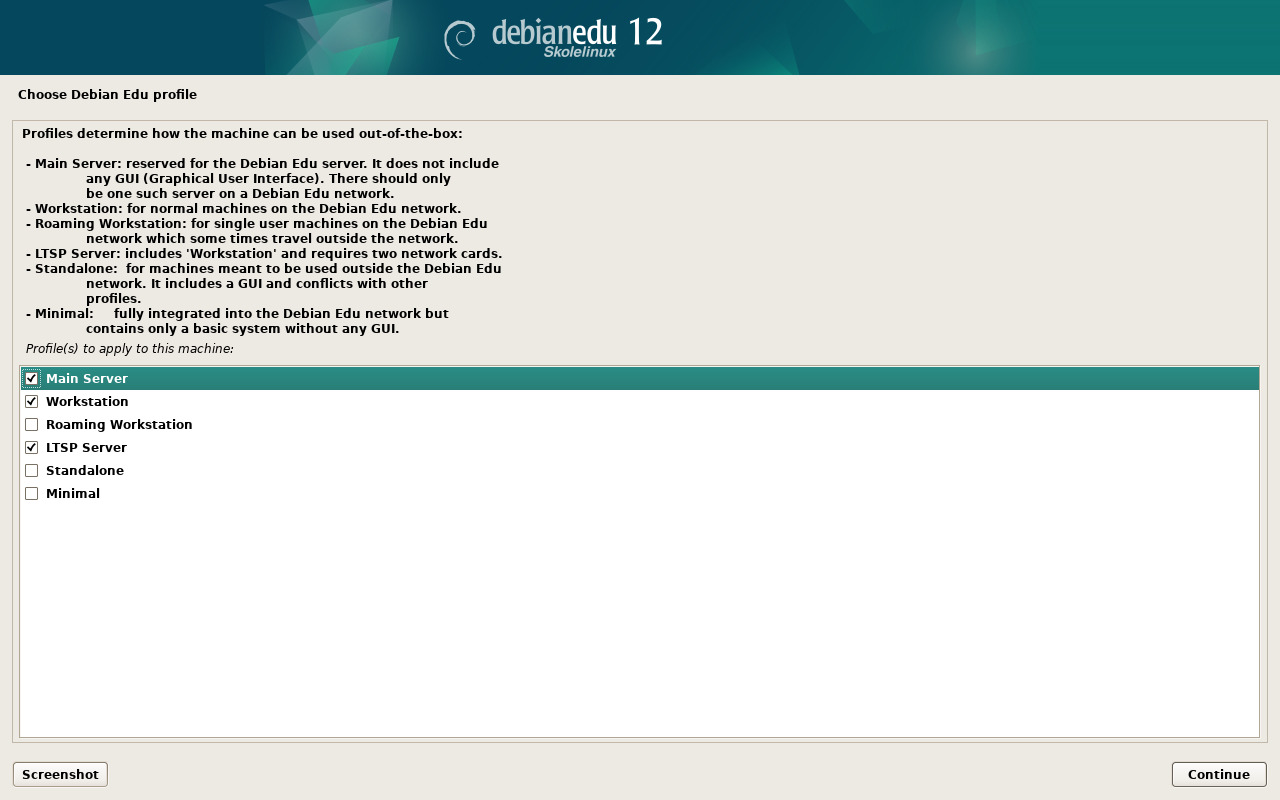
以下のリストからプロファイルを選択します:
「主サーバー (Main server)」プロファイル
このプロファイルが学校向けの全サービスを設定済みでそのまま主サーバー (tjener) として使えるものです。学校のネットワークには主サーバーを「 1 台だけ」インストールする必要があります。このプロファイルには GUI は収録されていません。GUI が必要であればこれに加えて「ワークステーション」か 「LTSP サーバー」のプロファイルも選択してください。
「ワークステーション (Workstation)」プロファイル
一般的なコンピューターと同様に、それぞれのハードドライブからブートし、ソフトウェアやデバイスは全てローカルにあるものが利用されます。異なる点は、ユーザーログインの認証が主サーバーで行われる点と、ユーザーのファイルやデスクトップ設定が置かれている場所も主サーバーであるという点です。
「ローミングワークステーション (Roaming workstation)」プロファイル
ワークステーションと同じですが、認証にキャッシュされた資格情報が利用できます。つまり学校ネットワーク外でも利用できます。ユーザーのファイルや設定はローカルディスクに保存されます。シングルユーザー向けのノート PC では、以前のリリースで提案していた 「ワークステーション」 や 「スタンドアロン」 ではなく、このプロファイルを選択してください。
「LTSP サーバー (LTSP Server)」プロファイル
シンクライアント (ディスクレスワークステーションも含む) 用のサーバーで、LTSP サーバーと呼ばれます。ハードドライブを持たないクライアントはブートとソフトウェアの実行をこのサーバーから行えます。このコンピュータには 2 つのネットワークインターフェイス、大量のメモリ、それに理想的には複数のプロセッサまたはマルチコア CPU が必要になります。これらの詳細については、ネットワーククライアントの章を見てください。このプロファイルを選択すると「ワークステーション」プロファイルも有効になります (選択有無を問わず)。LTSP サーバーはワークステーションとしても使えるということです。
「スタンドアロン (Standalone)」プロファイル
主サーバーが無くても利用できる、普通のコンピュータです。つまり学内ネットワークにある必要がありません。ノートPC などが該当します。
「最小 (Minimal)」プロファイル
This profile will install the base packages and configure the machine to integrate into the Debian Edu network, but without any services and applications. It is useful as a platform for single services manually moved out from the main server.
In case ordinary users should be able to use such a system, it needs to be added using GOsa² (similar to a workstation) and the libpam-krb5 package needs to be installed.
「主サーバー」と「ワークステーション」と「LTSP サーバー」のプロファイルは事前選択されています。複合主サーバー としてインストールする場合にこの 3 つのプロファイルを 1 つのマシンにインストールします。つまり主サーバーが LTSP サーバーでもあり、ワークステーションとしても利用できるというものです。多数の利用者の利便にかなうと思われるためデフォルトの構成となっています。複合主サーバーや LTSP サーバーとしてインストールして運用する場合にはそのマシンにネットワークカードが 2 つないといけないことに注意してください。
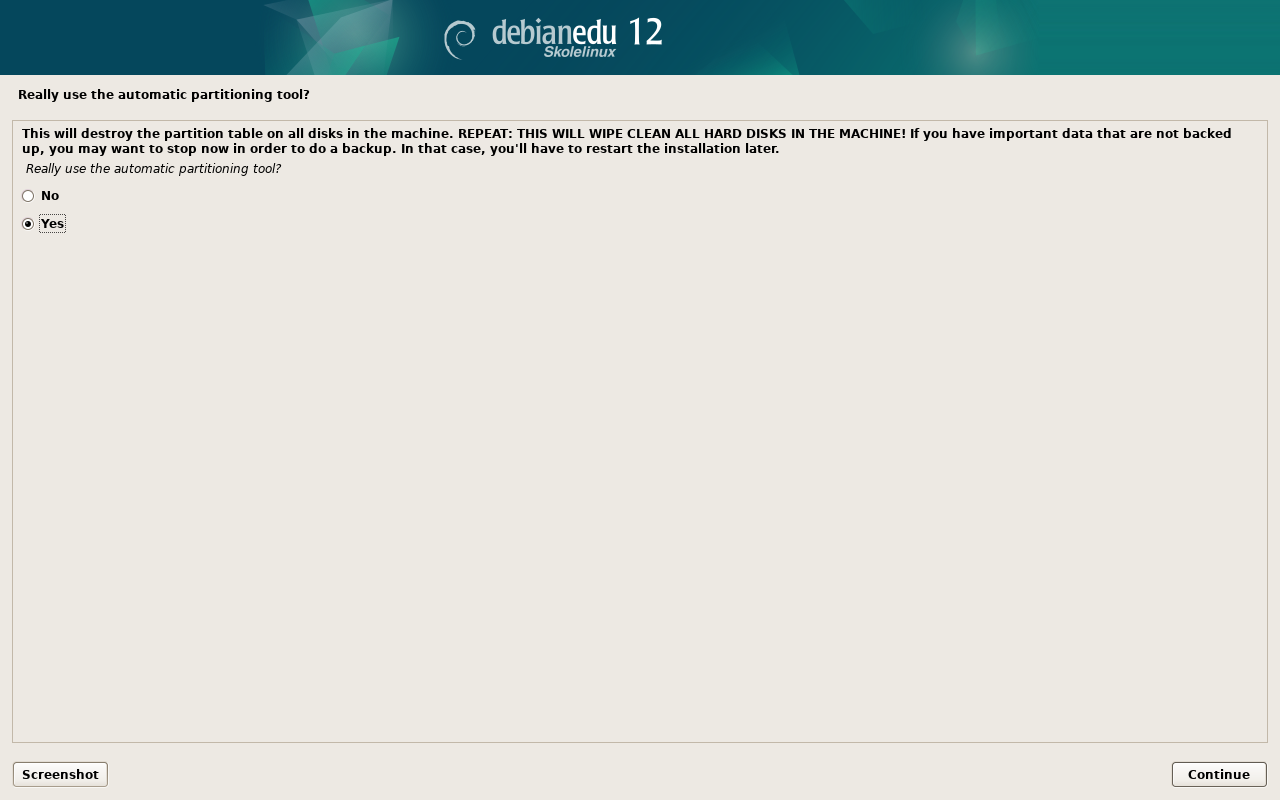
自動でパーティション設定するか、「yes」か「no」で答えます。「yes」と答えた場合は「ハードドライブにあるデータはすべて壊れる」ことに注意してください!「no」と答え、自動で設定しない場合は少々作業が必要となります。その場合は、必要なパーティションが作成されていて、かつ十分な容量があることを確認してください。
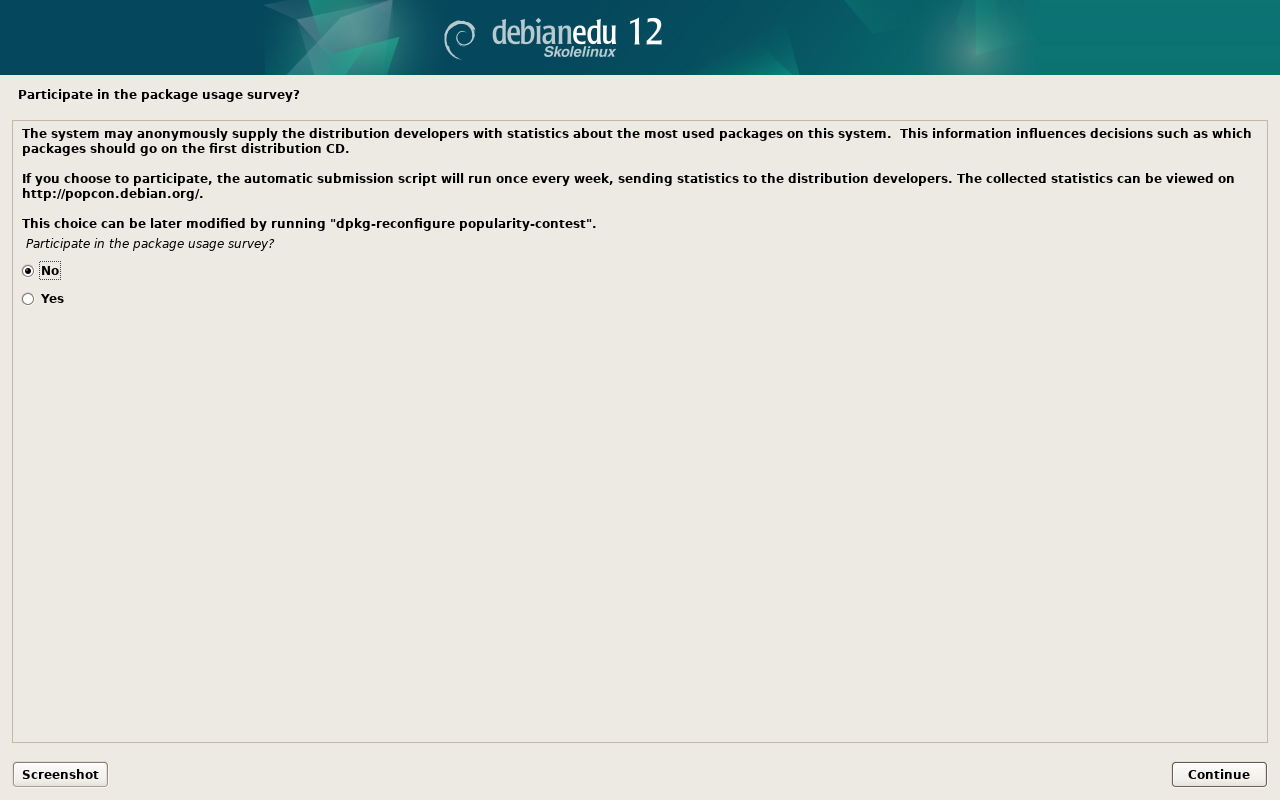
https://popcon.debian.org/ への情報送信の確認時に「yes」として頂ければ将来のリリースに役立つパッケージ調査データが送信されます。必須ではありませんが簡単にご支援頂ける手段です。

Wait. If the selected profiles include LTSP Server then the installer will spend quite some time at the end, "Finishing the installation - Running debian-edu-profile-udeb...".
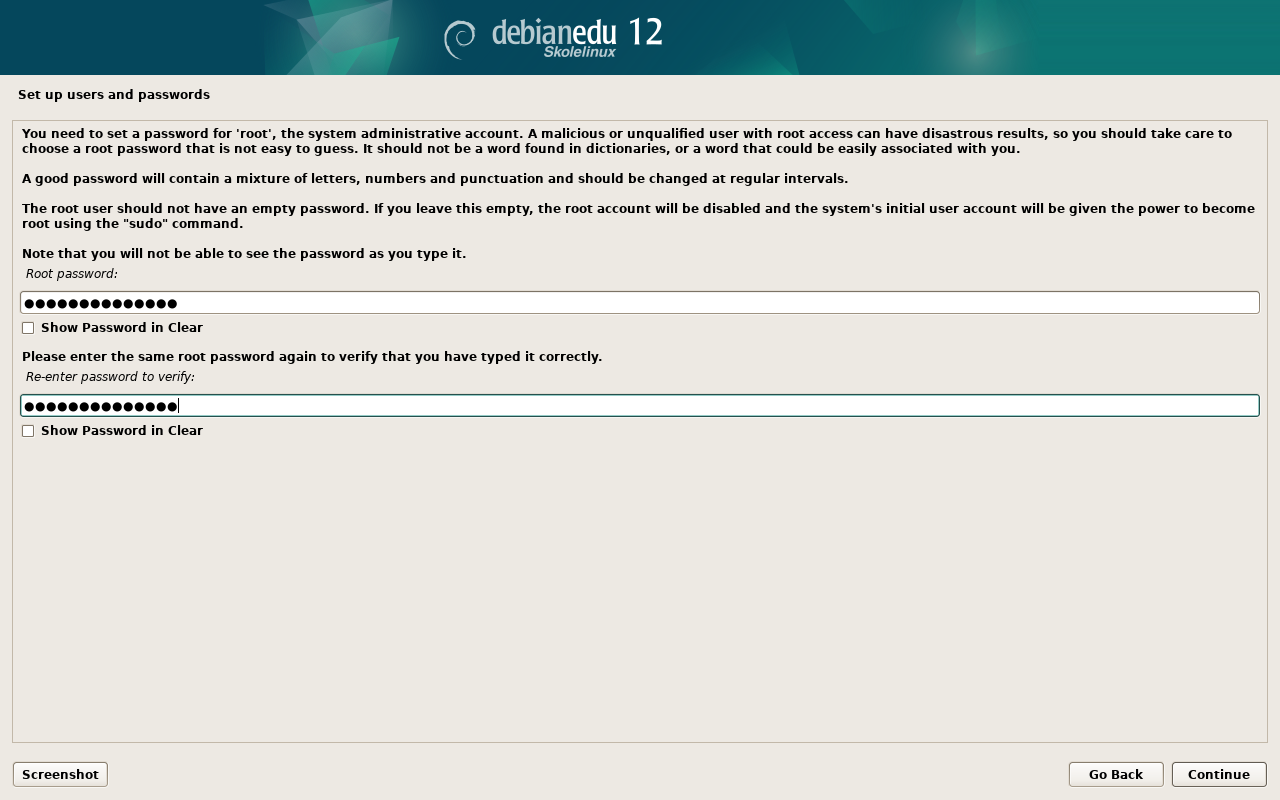
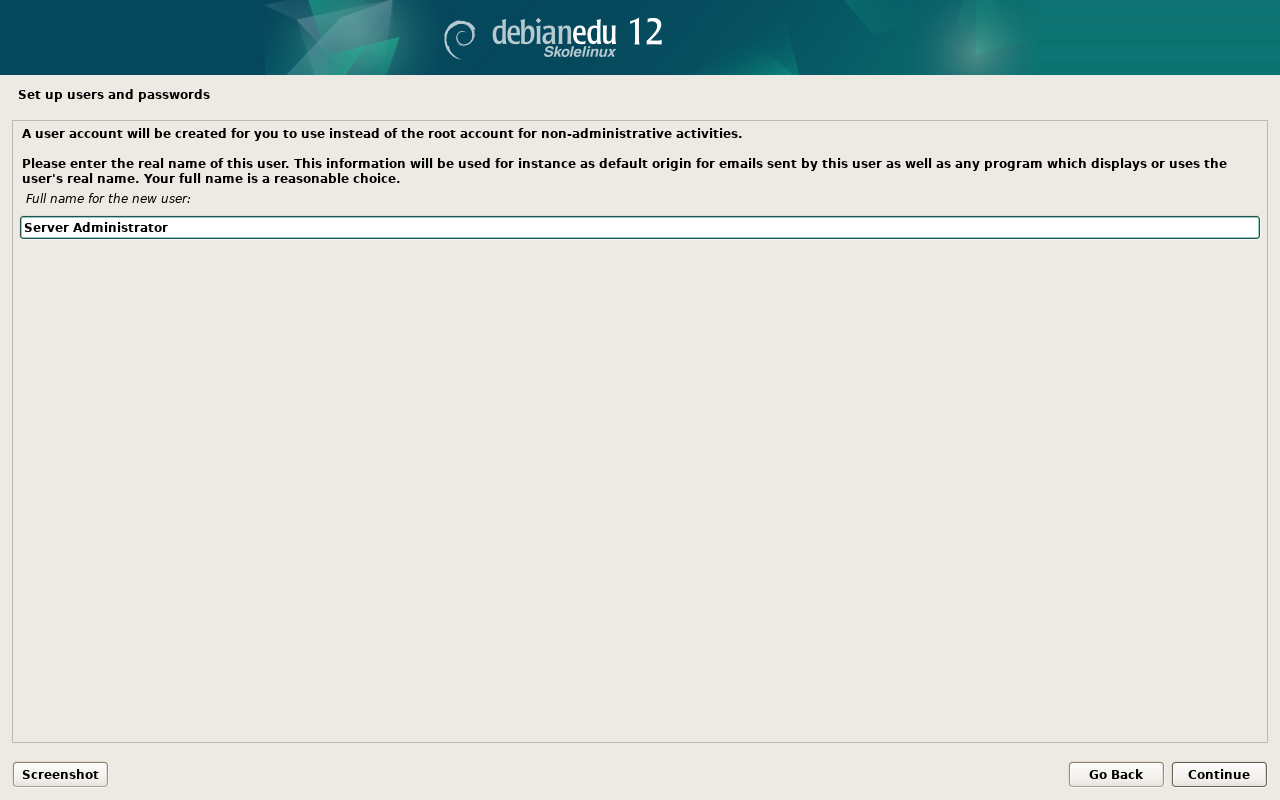
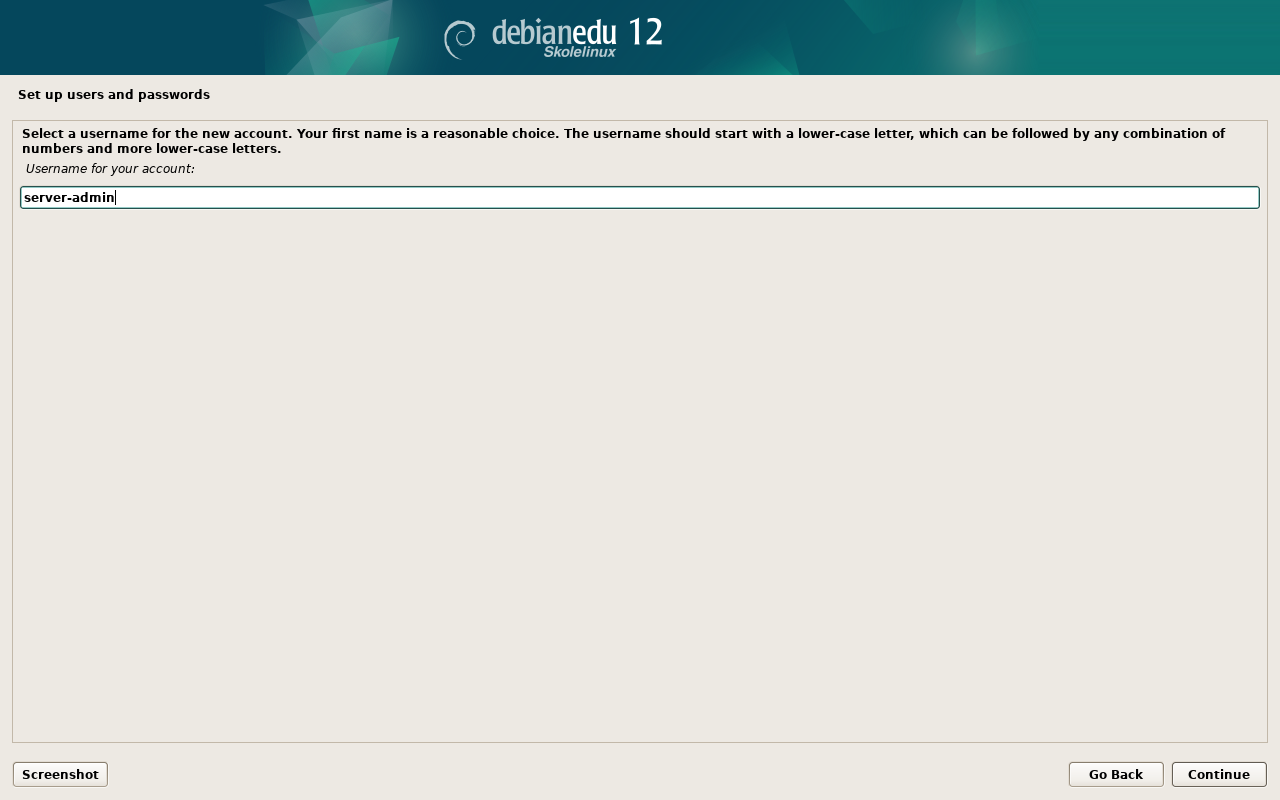
[注意] root パスワードの設定の後に「管理作業以外の用途向け」に通常のユーザーアカウントを作成するかが質問されます。Debian Edu ではこのアカウントが非常に重要で、Skolelinux ネットワークの管理に用います。
この「最初のユーザー」のパスワードは、長さが 最低 5 文字あり かつ
ユーザー名と異なる必要があります。5
文字未満やユーザー名と一致するようなパスワードを設定してしまった場合は、ログインが不可能になります
(インストーラーはそういったパスワードを許容してしまいます)。
複合主サーバー の再起動後はディスクレスワークステーション用の SquashFS イメージ作成のため、時間を要する場合があります。
LTSP サーバーを分離する構成ではディスクレスワークステーションやシンクライアントの構成時に手動での設定が必要になります。詳細は ネットワーククライアント HowTo をご覧ください。
The debian-edu-router-config package
simplifies the the setup of a gateway for a Debian Edu network through an
interactive configuration process where the necessary information is
obtained through a series of dialogues.
In order to make use of it, perform a minimal Debian installation. Be sure
to use the regular Debian installer and not the Debian Edu installer since
Debian Edu installations are not supported by
debian-edu-router-config.
Install the debian-edu-router-config
package using
DEBIAN_FRONTEND=noninteractive apt install -y -q debian-edu-router-config
Error messages regarding the configuration are expected and can be ignored for now.
For the configuration process following the installation of
debian-edu-router-config, physical access
to the computer is required.
The network interfaces may already be connected to the corresponding networks but do not have to be. However it is necessary to be aware which interface will be connected to which network. In order to obtain more information about the network hardware
lshw -class network
can be used.
Remove the configuration of the two network interfaces to be used from
/etc/network/interfaces or files in
/etc/network/interfaces.d/ and un-configure
the two interfaces using
ip addr flush <interface>
The actual configuration process is started with
dpkg-reconfigure --force uif debian-edu-router-config

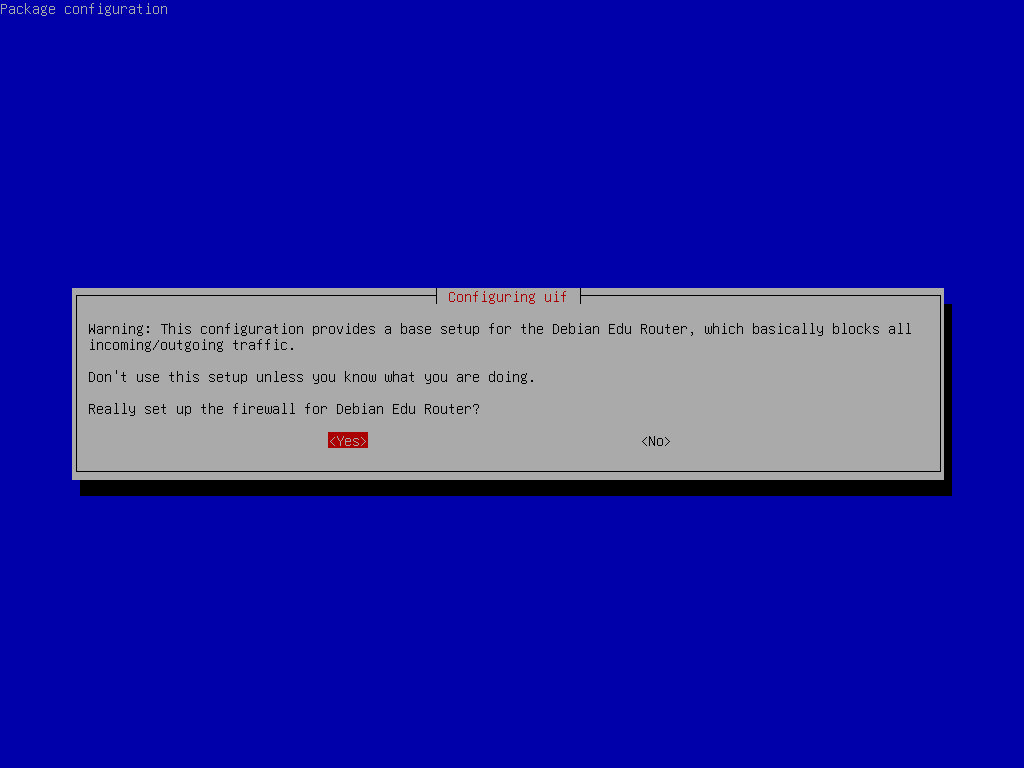
When asked about the uif firewall configuration method choose "debian-edu-router". Confirm that you want to set up the firewall for Debian Edu Router.
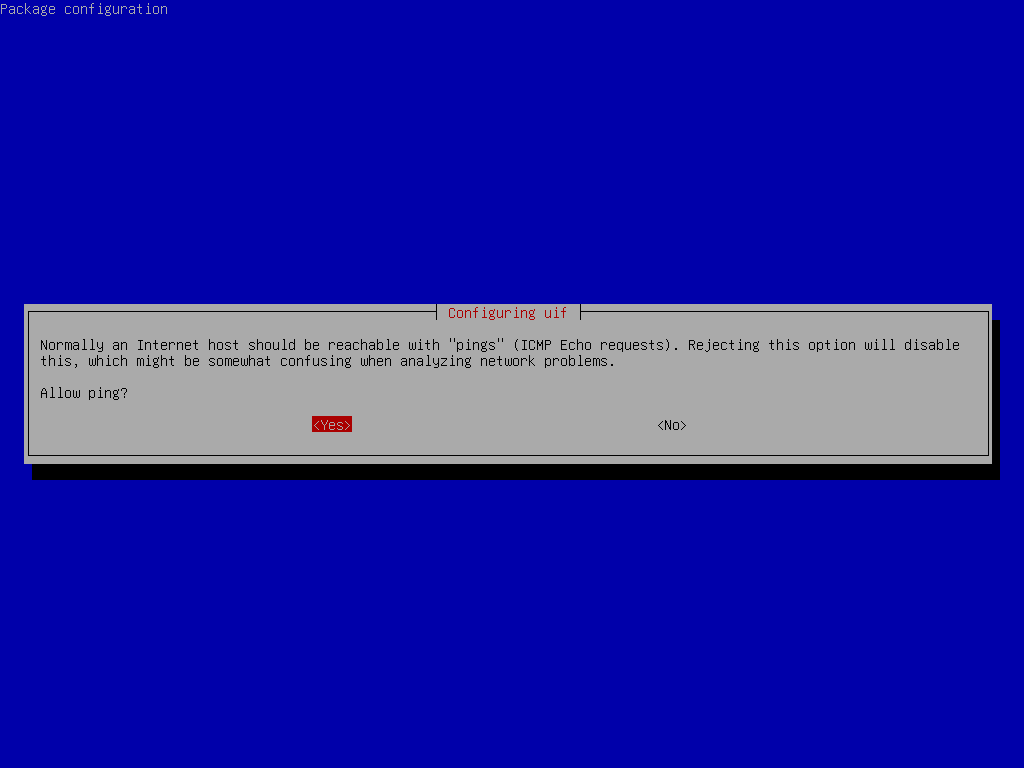
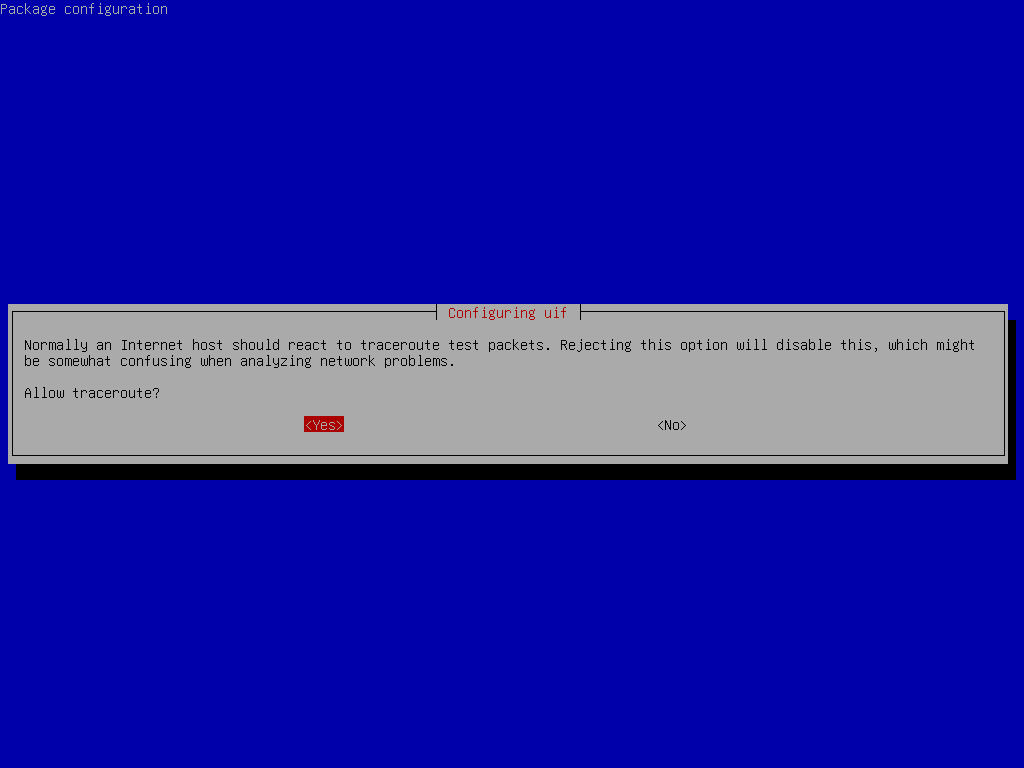
Decide whether you want to respond to ping and traceroute. If unsure answer with yes as it can be useful for diagnosing network issues.
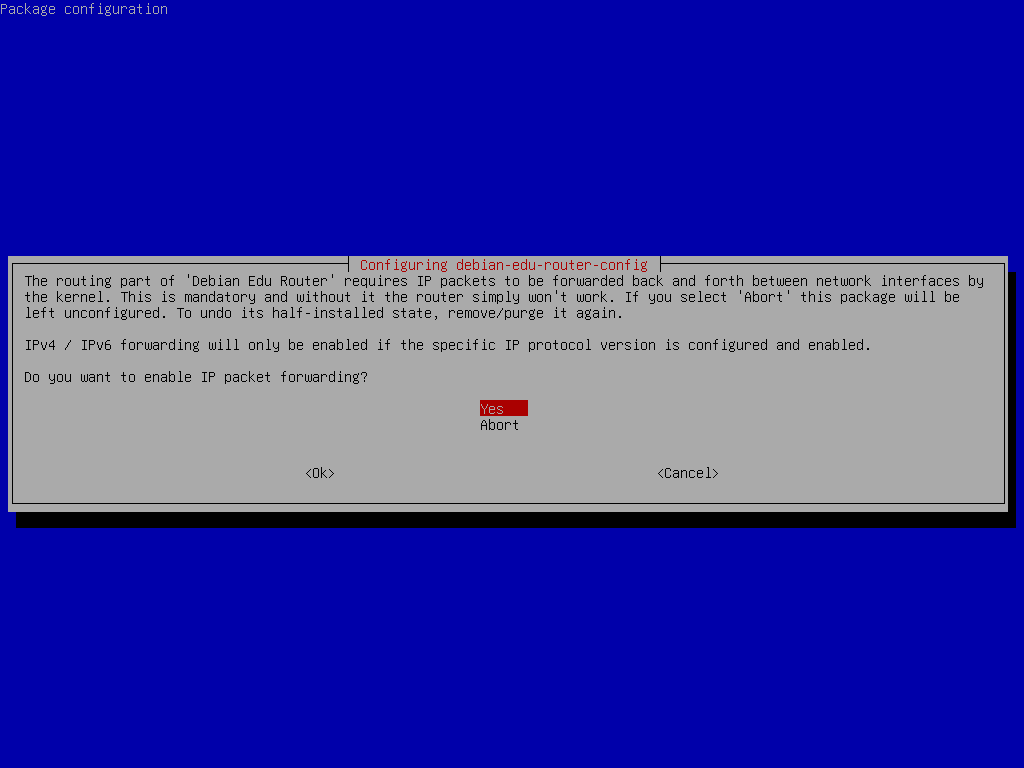
Confirm that you want to enable IP packet forwarding.
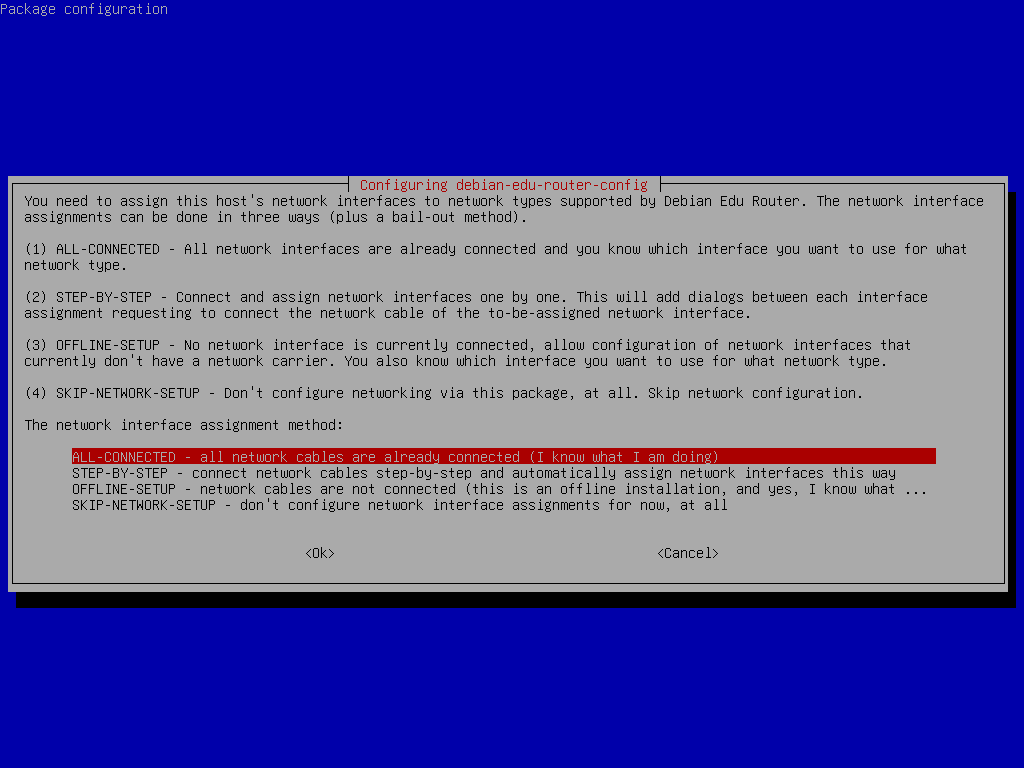
Next, assign networks to the network interfaces in your router, choose one of the offered options depending on whether your network interfaces are already connected or not.
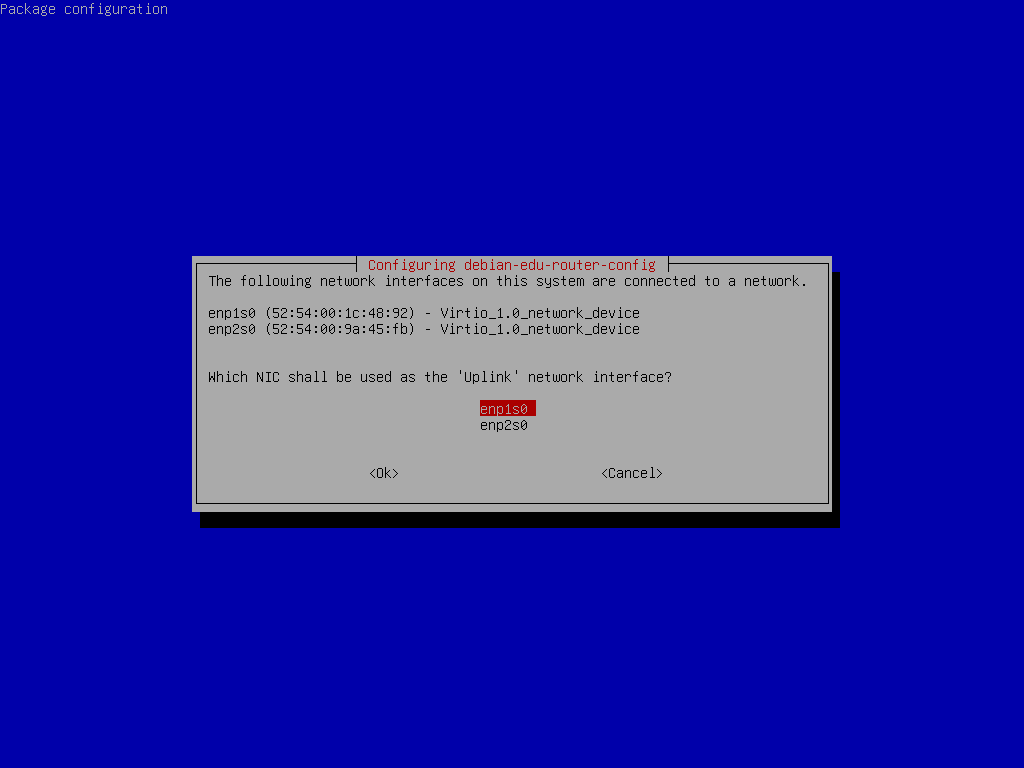
Select the interface which is connected to the upstream network.
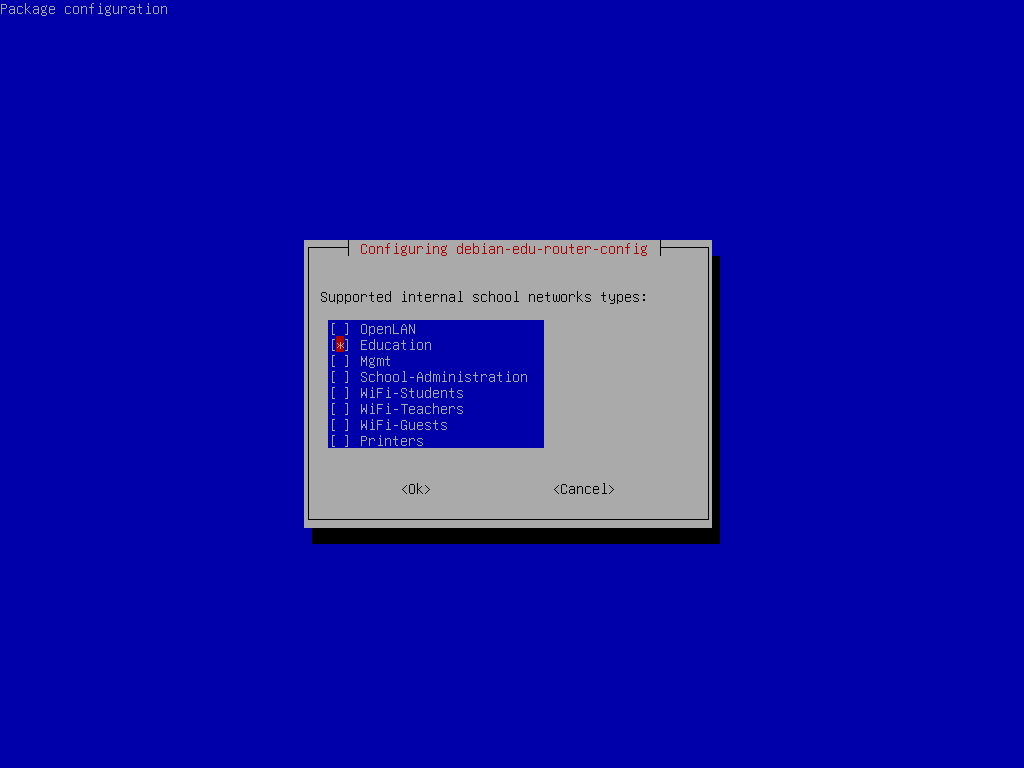
Select an internal network, in case you are unsure and simply want a single internal network select "Education" here.
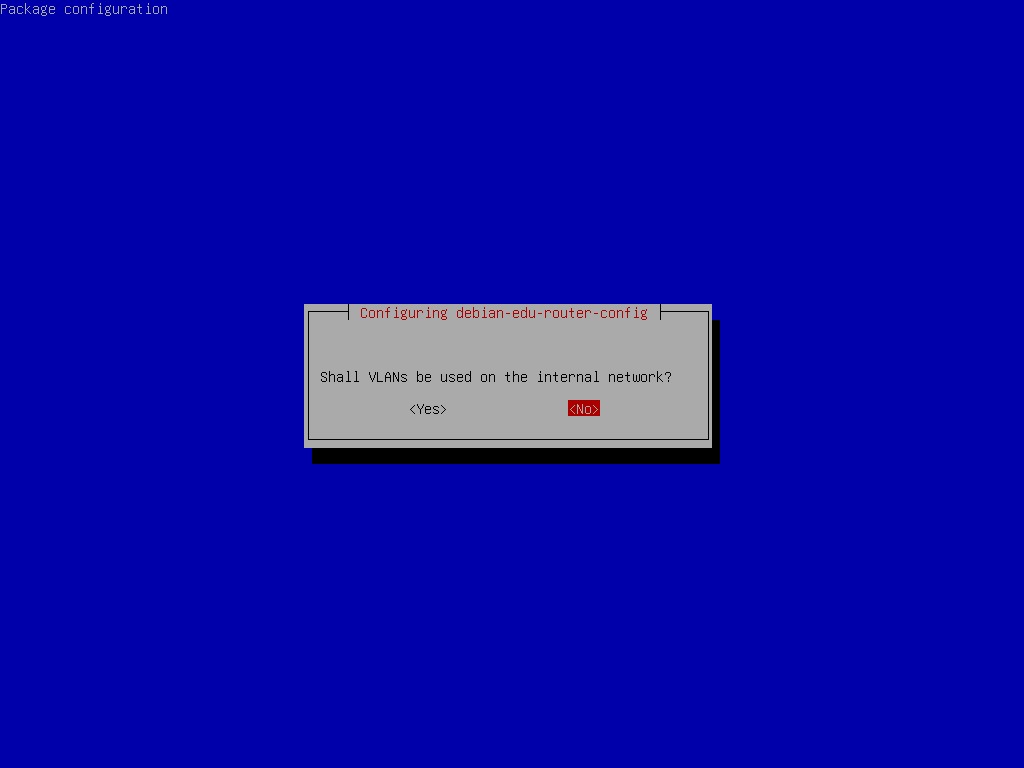
Select whether VLANs should be used for internal networks, if you are unsure select no here.
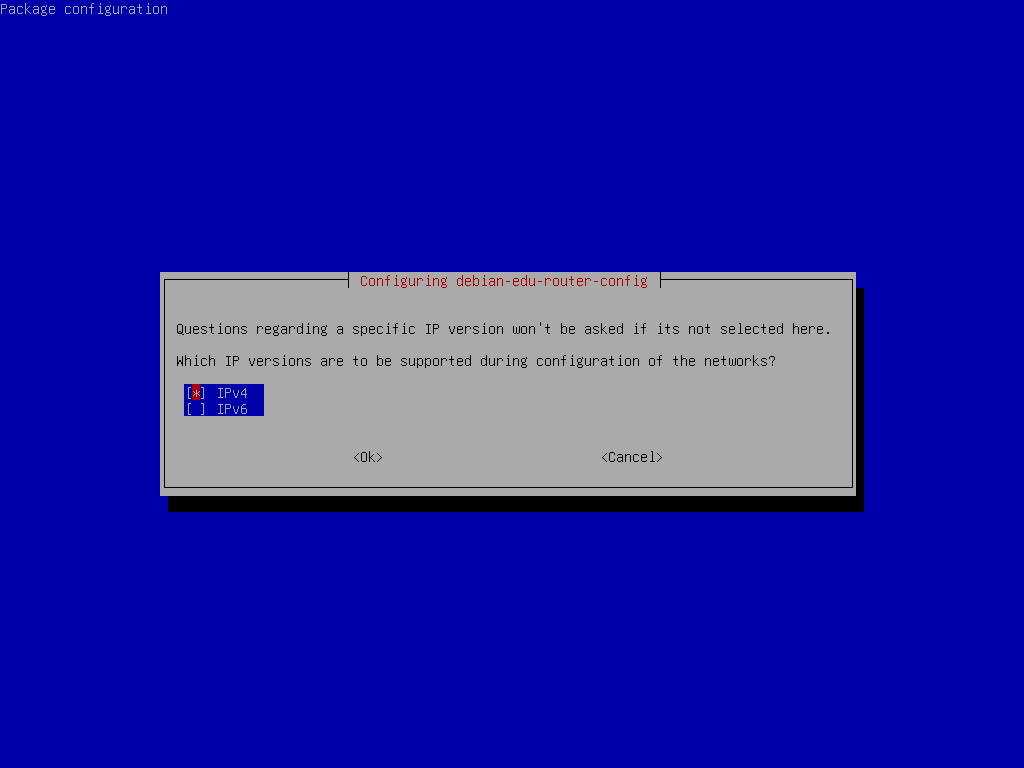
Select "IPv4" here.
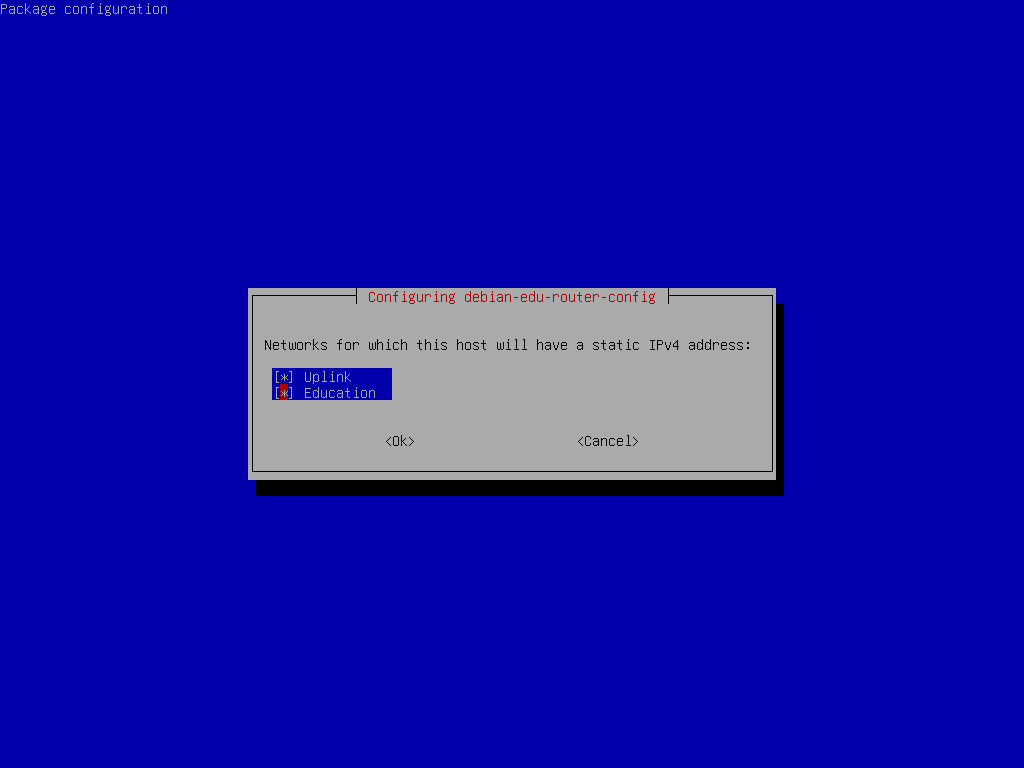
Select "Uplink" if your upstream network requires a static IP address and, if you followed the above suggestion on internal networks, "Education".
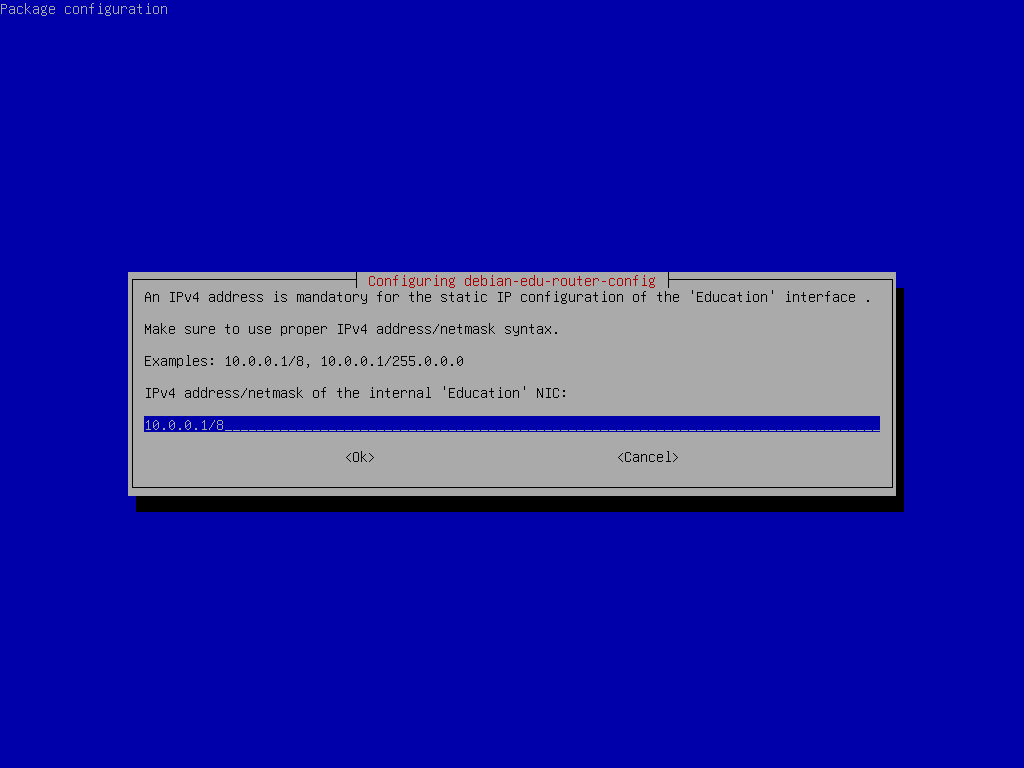
Set 10.0.0.1/8 as the static IP address for
the internal network "Education" if you followed the above suggestion on
internal networks.
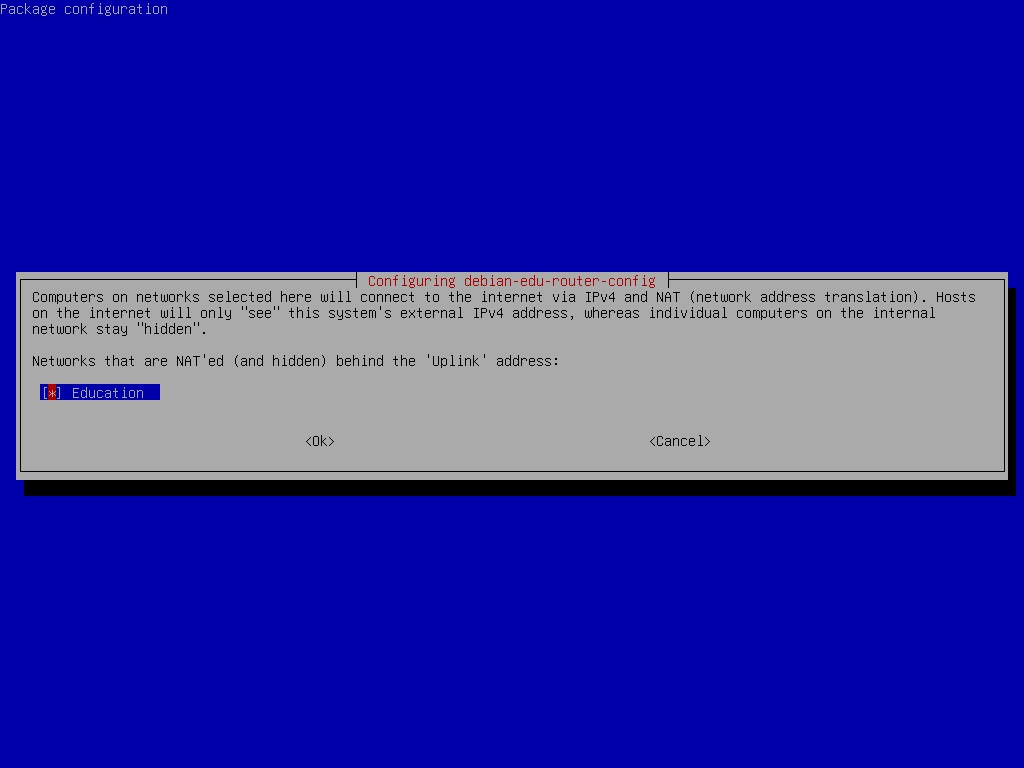
Enable NAT for the internal network.
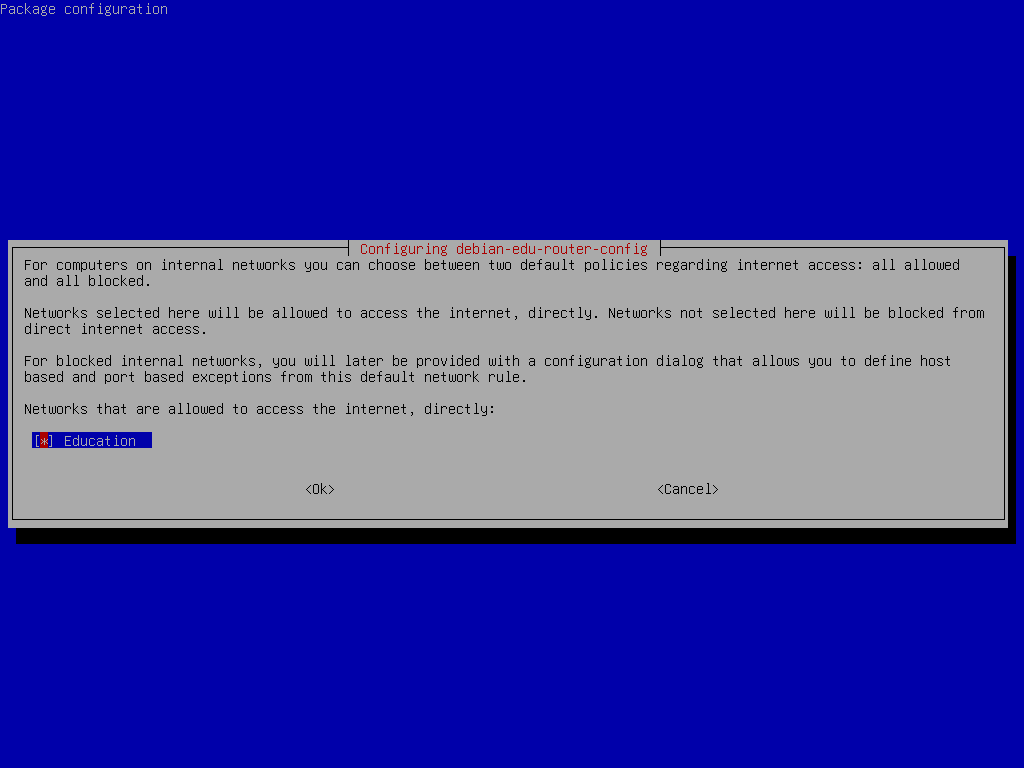
Enable internet access for internal networks.
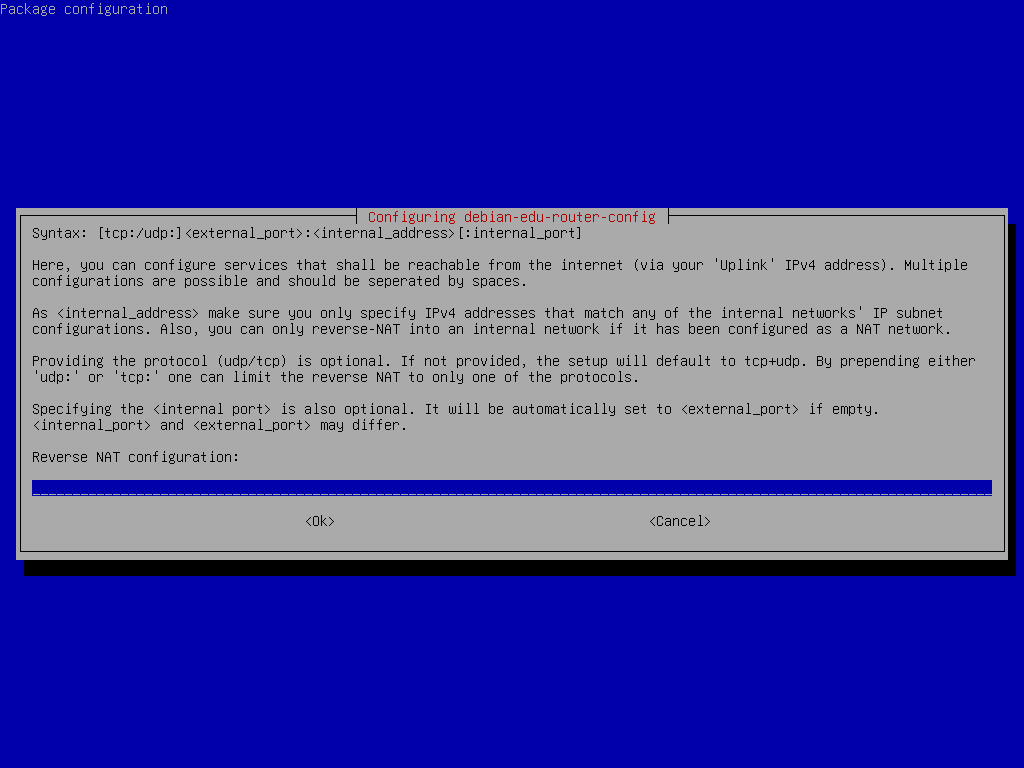
If you want to expose any internal services to the internet you can configure them using the described syntax. Note that SSH access to the gateway can be configured using the following dialog.
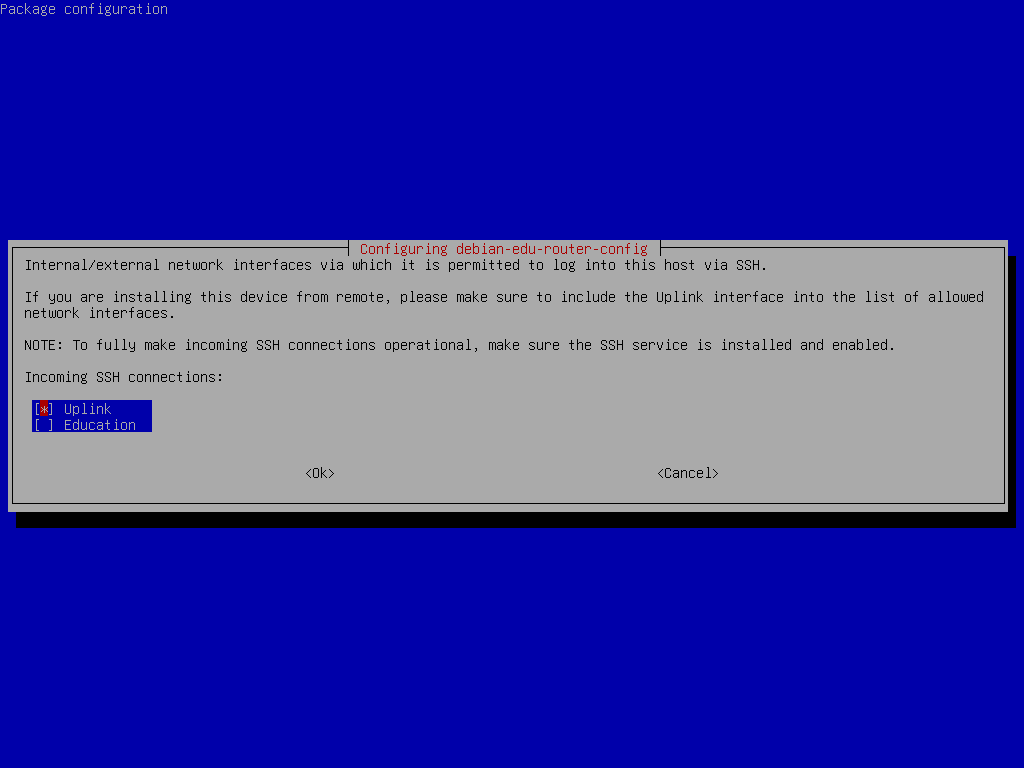
Decide from which networks you want to allow SSH access to the gateway.
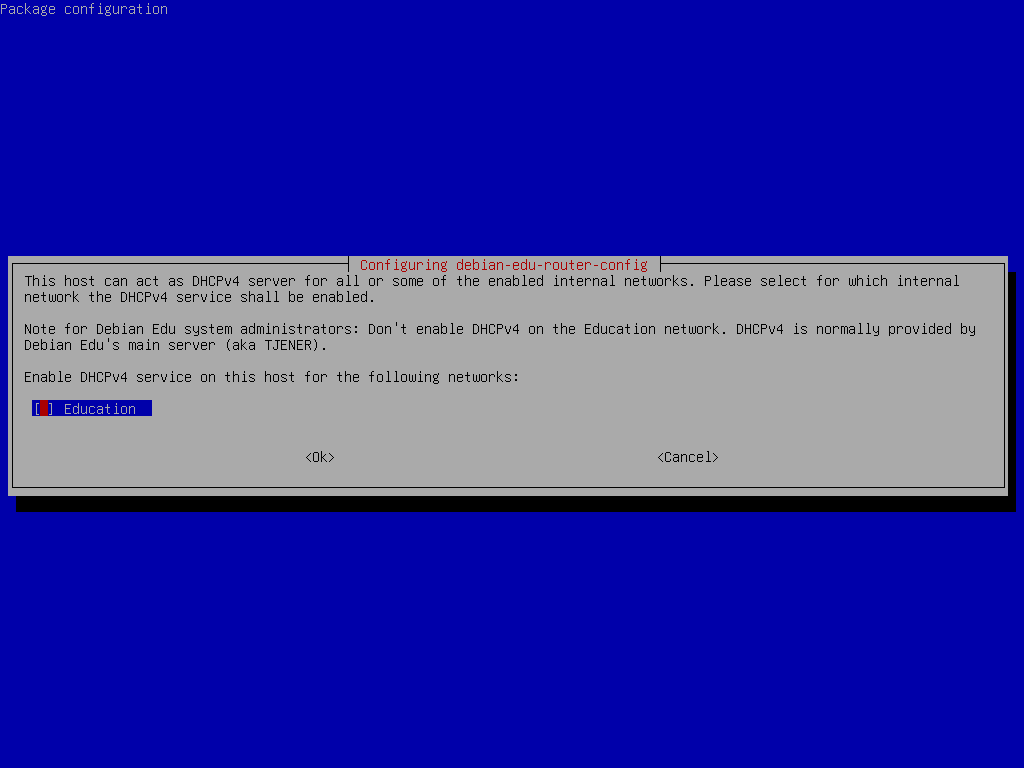
Do not enable DHCP for the internal networks, it will be offered by the Debian Edu main server.
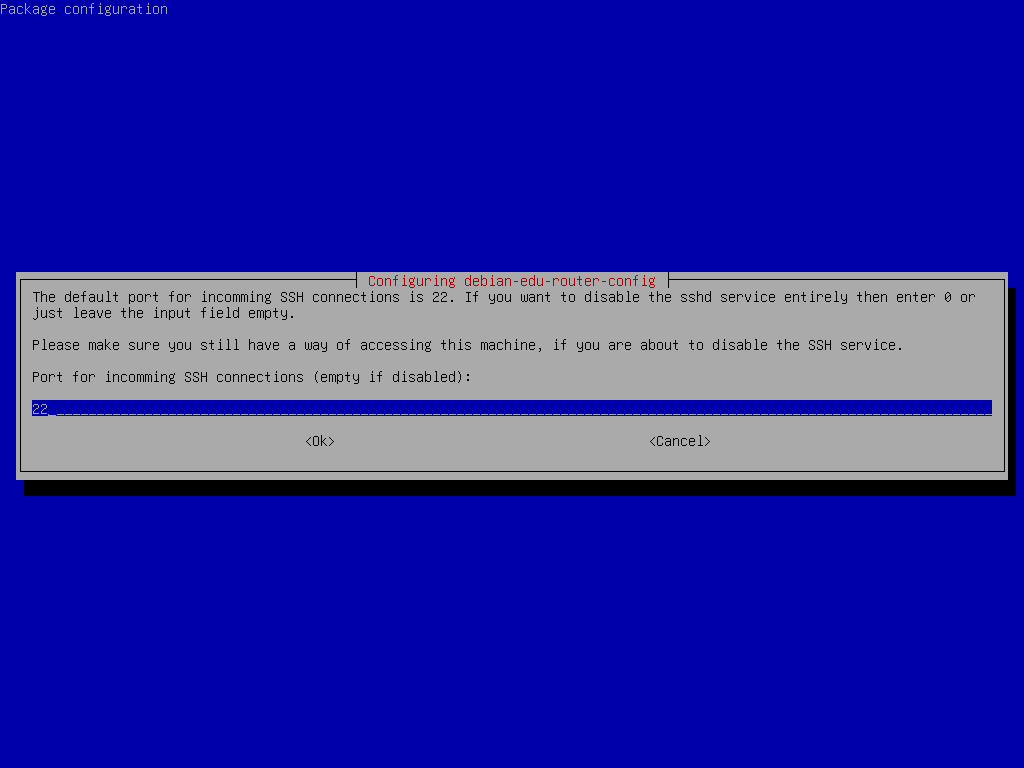
Configure the SSH port, this should be 22
if the configuration has not been changed.
Connect the network interfaces if you have not already done so and reboot the machine. Now, when you logging in as a root you should see Debian Edu Router Menu.
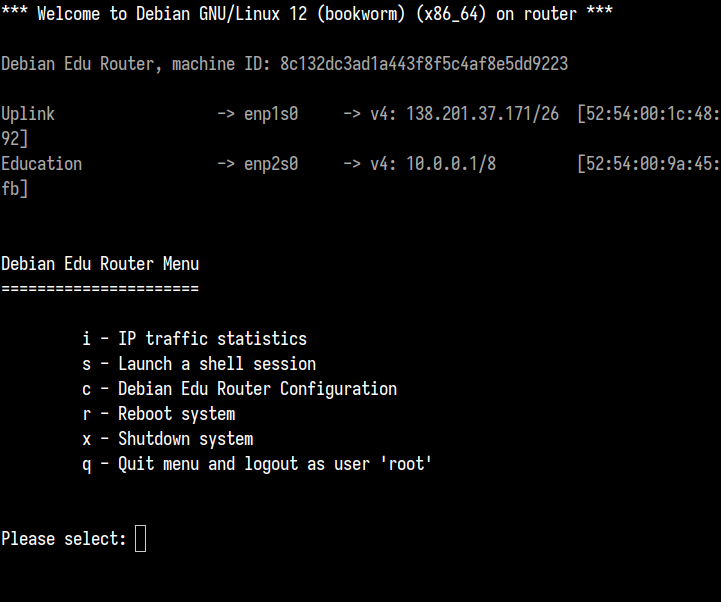
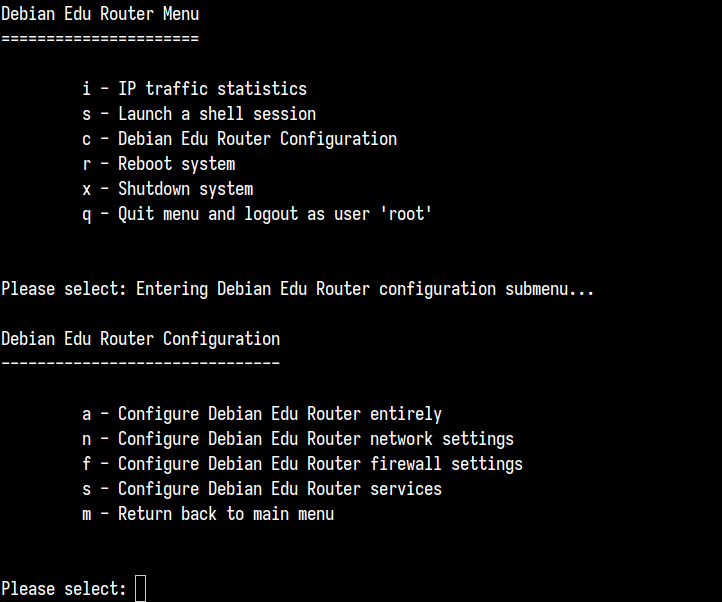
If SSH access has been enabled the gateway can be reconfigured remotely via
the menu offered when logging in as root. Pressing
c in the main menu switches to the
configuration menu from which all or parts of the configuration can be
changed using the same dialogue system which was used for the initial
configuration.
ほぼ確実に「ローミングワークステーション」プロファイル (上記参照) を利用するのが良いでしょう。ただしデータは全てローカルに保存されるので、バックアップに関して別途考慮が必要になります。またログイン資格情報もキャッシュされるため、パスワードを変更した後に新しいパスワードでネットワークにログインしていないノート PC では、古いパスワードでのログインが要求される可能性があります。
USBフラッシュドライブ / Blu-ray ディスクイメージからのインストール後の
/etc/apt/sources.list には、そのイメージからの
(アップデートやインストールに関する)
情報しか書かれていません。インターネット接続が使える場合には、セキュリティ更新のため以下の行をぜひ追加してください。
deb http://deb.debian.org/debian/ bookworm main
deb http://security.debian.org bookworm-security main
A netinst installation (which is the type of installation our CD provides) will fetch some packages from the CD and the rest from the net. The amount of packages fetched from the net varies from profile to profile but stays below a gigabyte (unless you choose to install all possible desktop environments). Once you have installed the main server (whether a pure main server or combi-server does not matter), further installation will use its proxy to avoid downloading the same package several times from the net.
It is possible to directly copy a CD/BD ISO image to USB flash drives (also known as "USB sticks") and boot from them. Simply execute a command like this, just adapting the file and device name to your needs:
sudo dd if=debian-edu-amd64-XXX.iso of=/dev/sdX bs=1M
デバイス名の X は、USB デバイスの挿入前後に次のコマンドを実行してご確認ください。
lsblk -p
書き込みにはかなりの時間を要することがあります。
選択したイメージにより、USB フラッシュドライブは CD や Blu-ray ディスクのように動作します。
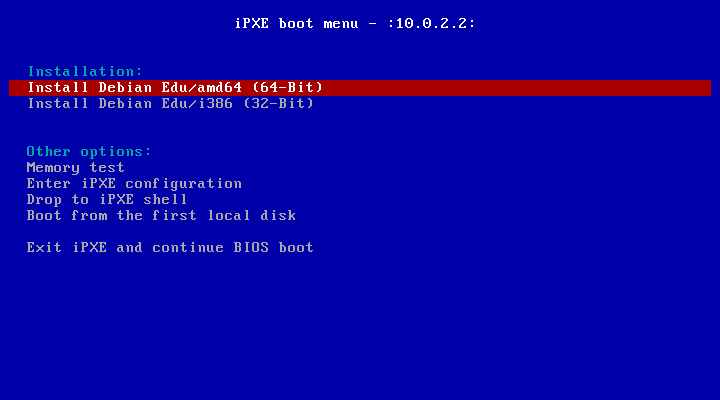
For this installation method it is required that you have a running main server. When clients boot via the network, an iPXE menu with installer and boot selection options is displayed. If PXE installation fails with an error message claiming a XXX.bin file is missing, then most probably the client's network card requires nonfree firmware. In this case the Debian Installer's initrd must be modified. This can be achieved by executing the command:
/usr/share/debian-edu-config/tools/pxe-addfirmware
on the server.
This is how the iPXE menu looks with the Main Server profile only:
「LTSP サーバー」プロファイルが含まれる場合には iPXE メニューはこうなります:
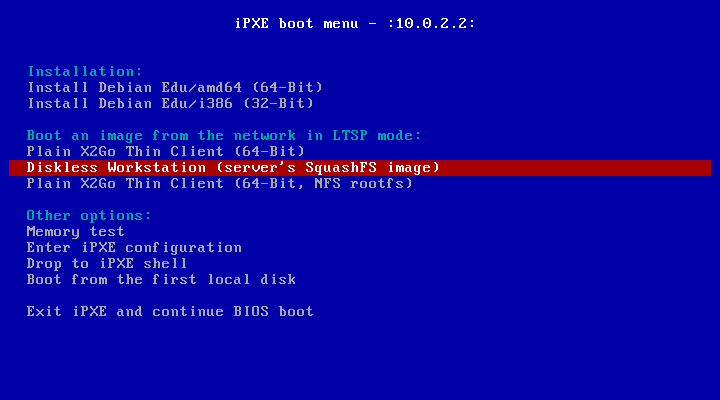
この設定では中心ネットワークでディスクレスワークステーションやシンクライアントのブートもできます。ワークステーションや独立した LTSP サーバーとは異なり、ディスクレスワークステーションは GOsa² を利用して LDAP に追加する必要はありません。
ネットワーククライアントについてのさらなる情報は ネットワーククライアント HowTo の章にあります。
PXE インストールでは debian-installer の preseed ファイルを利用しています。このファイルを変更することでパッケージをもっとインストールさせるようにできます。
以下のような行を次のファイルに追加してください:
tjener:/etc/debian-edu/www/debian-edu-install.dat
d-i pkgsel/include string my-extra-package(s)
The PXE installation uses the preseeding file
/etc/debian-edu/www/debian-edu-install.dat.
This file can be changed to adjust the preseeding used during installation,
to avoid more questions when installing over the net. Another way to achieve
this is to provide extra settings in
/etc/debian-edu/pxeinstall.conf and
/etc/debian-edu/www/debian-edu-install.dat.local
and to run /usr/sbin/debian-edu-pxeinstall
to update the generated files.
Further information can be found in the manual of the Debian Installer.
PXE を経由したインストールでプロキシを変更あるいは無効化するには
tjener:/etc/debian-edu/www/debian-edu-install.dat
中の
mirror/http/proxy、mirror/ftp/proxy、preseed/early_command
を含む行を変更する必要があります。インストール時にプロキシの利用を無効化するには最初の 2 行の冒頭に「#」を付加し、最後の行から
export http_proxy="http://webcache:3128";
の部分を削除します。
Some settings can not be preseeded because they are needed before the
preseeding file is downloaded. Language, keyboard layout and desktop
environment are examples of such settings. If you want to change the default
settings, edit the iPXE menu file
/srv/tftp/ltsp/ltsp.ipxe on the main
server.
CD、DVD、Blu-ray の独自ディスク作成は、モジュール設計の優れた Debian インストーラ を利用しているため簡単に行えます。Preseed で通常質問される項目の回答を事前に定義できます。
必要なことは preseed ファイルを作成して回答を設定 (これは Debian インストーラマニュアルの付録で説明されています) し、CD/DVD を作り直す だけです。
テキストモードとグラフィカルモードのインストールは機能的には同等です - 異なるのは見た目だけです。グラフィカルモードではマウスを使う機会があり、当然見た目もはるかに良くずっと現代的になります。ハードウェアに問題があってグラフィカルモードを使えないということでもなければこちらを使わない理由はありません。
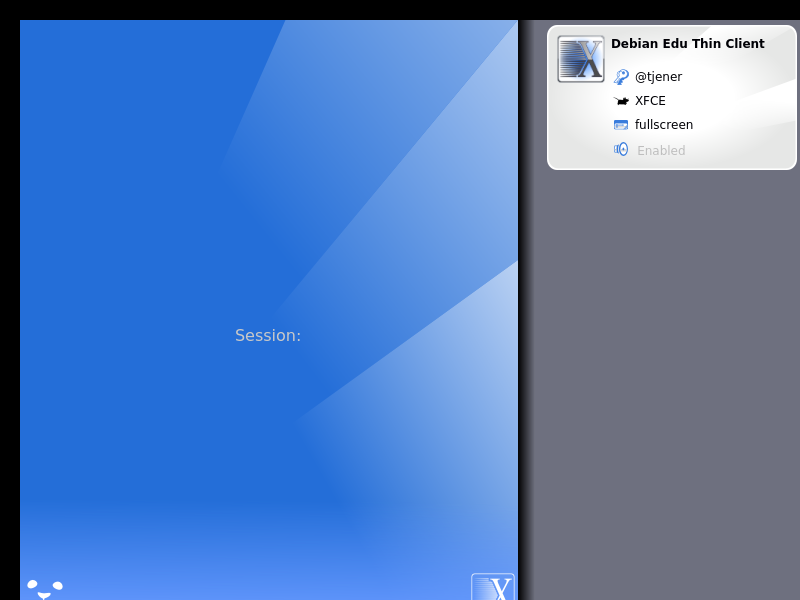
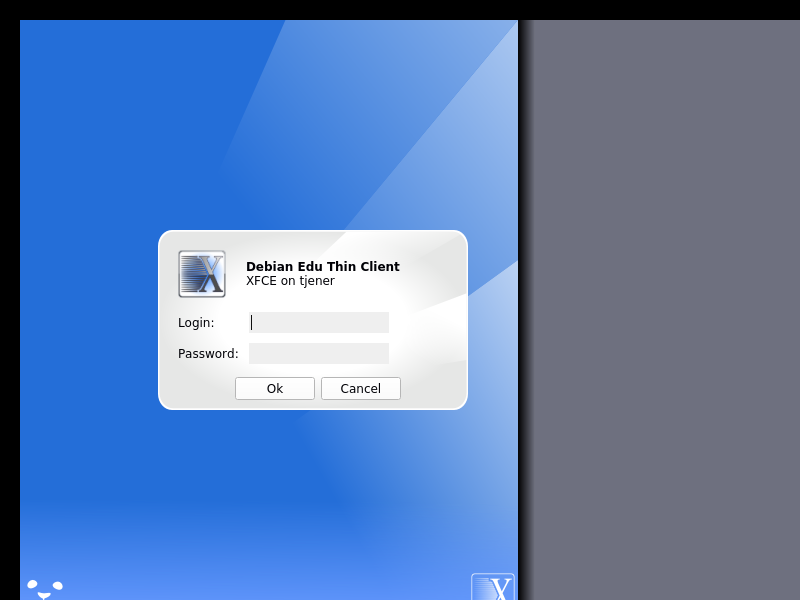
So here is a screenshot tour through a graphical 64-bit Main Server + Workstation + LTSP Server installation (in BIOS mode) and how it looks at the first boot of the main server and a PXE boot on the LTSP client network (thin client session screen - and login screen after the session on the right has been clicked).


主サーバーのインストール時に「最初のユーザーアカウント」を作成しました。以下の文ではこのアカウントを「最初のユーザー」とします。このアカウントは特別なアカウントです。ホームディレクトリ権限は
700 にセットされます (そのため個人のウェブページにアクセスできるようにするには chmod o+x
~ が必要です)。そして「最初のユーザー」は
sudo を使って root になれます。
ユーザーを追加する前に、 Debian Edu に特有の情報について ファイルシステムのアクセス設定 を読んでください。運用ポリシーに応じて設定は調整してください。
インストール後に「最初のユーザー」としてまずやらないといけないこと:
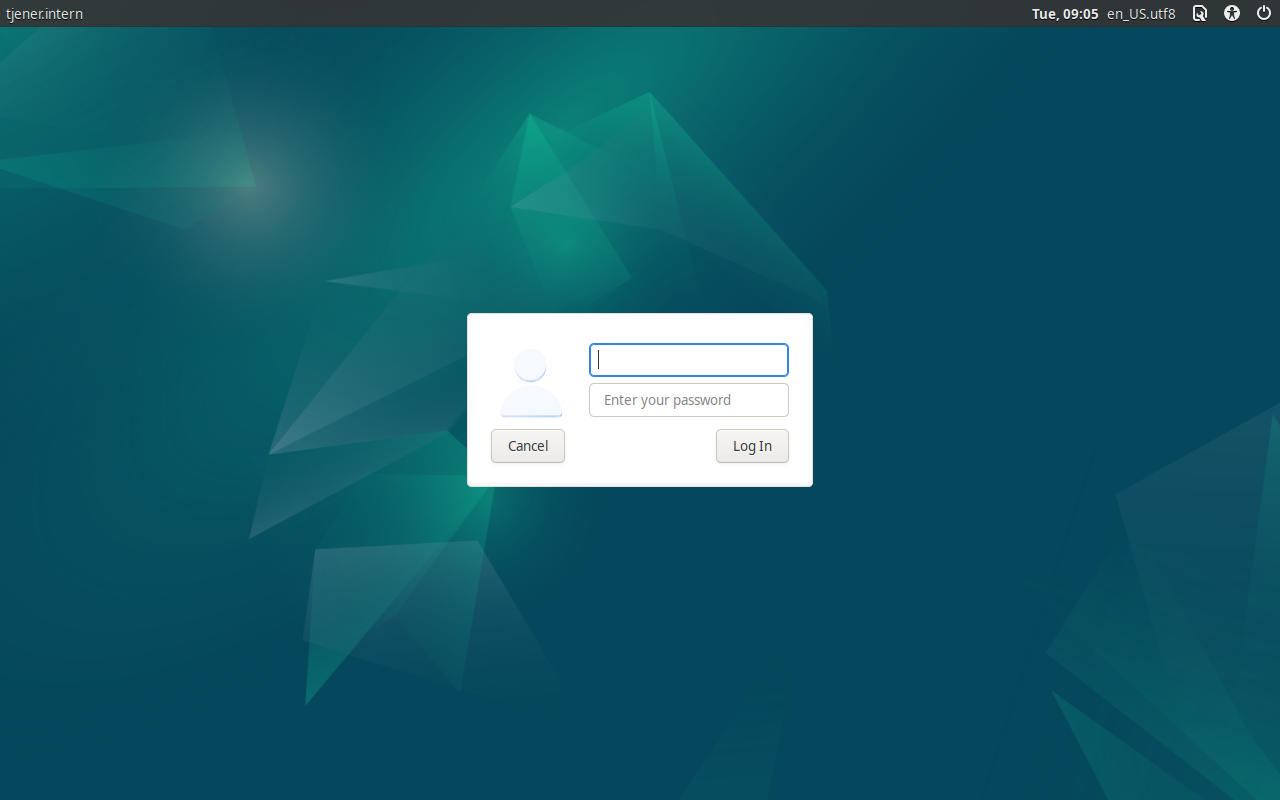
主サーバーにログインします。
GOsa² でユーザーを追加します。
GOsa² でワークステーションを追加します。
ユーザーやワークステーションの追加については以下で詳細に説明しています。この章は必ず、全て読んでください。最小限の手順を正しく行う方法や、ほとんどの場合で必要となるその他の事項についても触れています。
There is additional information available elsewhere in this manual: the New features in Bookworm chapter should be read by everyone who is familiar with previous releases. And for those upgrading from a previous release, make sure to read the Upgrades chapter.
もしも一般的な DNS 通信がブロックされているネットワークをご利用の場合には、インターネット上のホスト参照に特定の DNS
サーバーを利用せざるを得ないことがあります。その場合はその DNS サーバーに対して、このサーバーが「転送サーバー
(forwarder)」だということを通知する必要があります。/etc/bind/named.conf.options ファイルを編集して、利用する
DNS サーバーの IP アドレスを指定してください。
HowTo の章ではさらなるコツやヒント、そしてよくある質問への回答も記載しています。
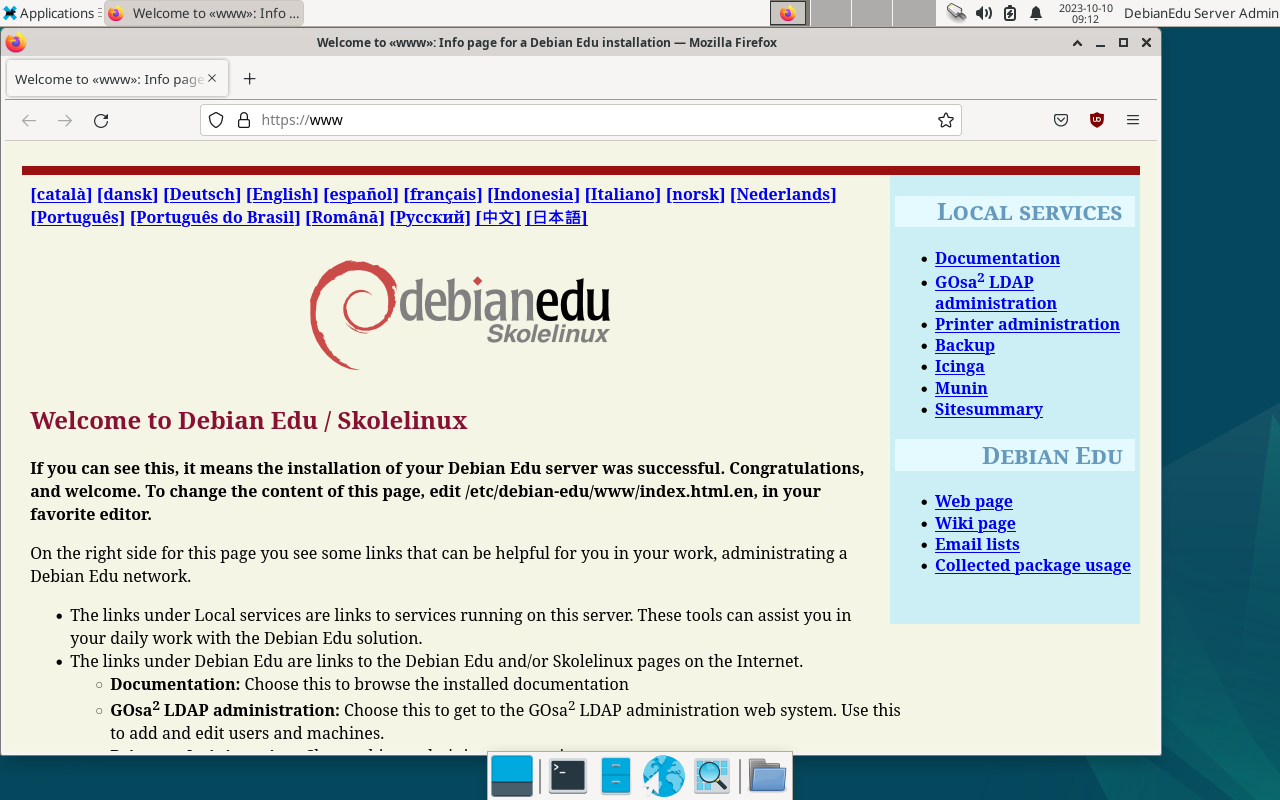
GOsa² はウェブベースの管理ツールで Debian Edu の基幹管理が可能です。GOsa² は次の主要項目の管理 (追加、変更、削除) ができます:
ユーザーの管理
グループ管理
NIS ネットグループ管理
マシンの管理
DNS 管理
DHCP 管理
GOsa² へのアクセスには Skolelinux の主サーバーと、ウェブブラウザがインストールされた (クライアント) システムが必要です。後者については複合サーバー (「主サーバー」と「 LTSP サーバー」と「ワークステーション」のプロファイル) としてインストールされた主サーバーならそれで大丈夫です。
If you (probably accidentally) installed a pure Main Server profile and don't have a client with a web-browser handy, it's easy to install a minimal desktop on the main server using this command sequence in a (non-graphical) shell as the user you created during the main server's installation (first user):
  $ sudo apt update
  $ sudo apt install task-desktop-xfce lightdm education-menus
  $ sudo service lightdm start
GOsa² へのアクセスにはウェブブラウザからURL https://www/gosa にアクセスし、「最初のユーザー」としてログインします。
If you are using a new Debian Edu Bookworm machine, the site certificate will be known by the browser.
そうでない場合は SSL 証明書が不正だというエラーメッセージが表示されます。ネットワークに第三者がいなくて信頼できる状態なら、エラーは無視してブラウザにその証明書を設定してください。
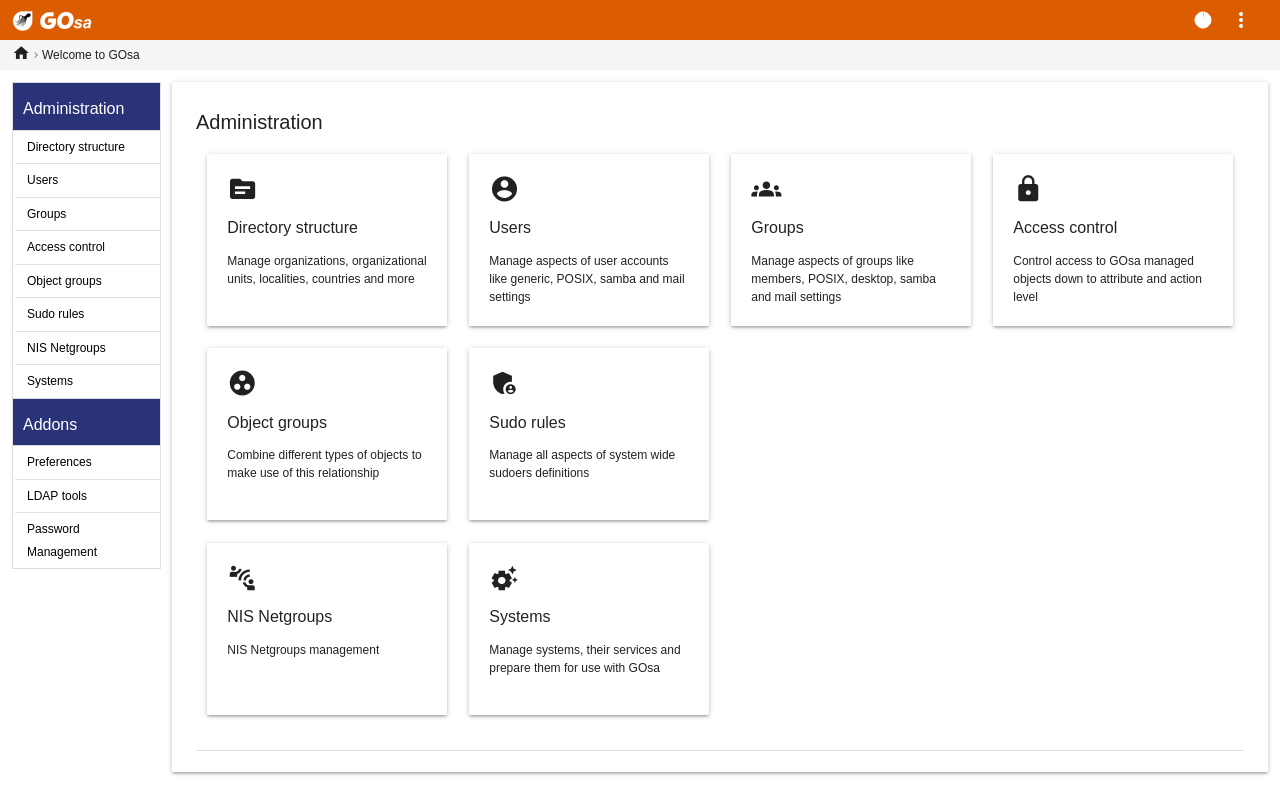
GOsa² へのログイン後、GOsa² の概観ページが表示されます。
タスクはメニュー選択したり、あるいは概要ページのタスクアイコンをクリックして選択できます。基本的には画面左側のメニューをお勧めします。GOsa² の全ての管理ページで利用できます。
Debian Edu ではアカウントやグループ、システム情報は LDAP ディレクトリに保存されています。このデータは主サーバーだけでなく、ネットワーク上の (ディスクレス) ワークステーションや LTSP サーバー、その他のマシンでも使用されます。生徒や教員等についてのアカウントも一度 LDAP に設定するだけで利用できます。 LDAP に設定された情報は Skolelinux ネットワーク全体の全てのシステムから利用できるようになります。
GOsa² は、部門 (department) などの階層構造の情報管理を LDAP の利用で実現しています。各「部門」毎にユーザーアカウントやグループ、システム、ネットグループ等を追加できます。個別の組織の構造次第ではありますが、GOsa²/LDAP の階層構造を使って貴校の組織構造を Debian Edu 主サーバーの LDAP データツリーに反映させることもできます。
デフォルトでインストールした場合、Debian Edu 主サーバーには教員 (Teachers) と生徒 (Students) の 2 つの部門と LDAP のベースツリーが設定されます。生徒のアカウントは「Students」部門に、教員は「Teachers」部門に追加することになります。システム (サーバー、Skolelinux ワークステーション、プリンタ等) は現在ベースレベルに追加することになります。この構成については学校に合う方法をご検討ください (例えば年次グループにユーザーを作成して各グループに共通のホームディレクトリを与える方法がこのマニュアルの HowTo/AdvancedAdministration にあります)。
処理したいタスク毎に (ユーザー管理、グループ管理、システム、管理等) GOsa² は選択されている部門 (やそのベースレベル) に応じた表示をします。
まず、左側のナビゲーションメニューにある「Users」をクリックします。画面の右側が「Students」や「Teachers」の部門フォルダーの表と GOsa² の Administrator (最初に作成したユーザー) のアカウントの表示に変わります。この表の上に Base というフィールドが表示されます。マウスをその部分に移動させると、ドロップダウンメニューがツリー構造状に表示されます。そこから行いたい操作 (例えば新しいユーザーの追加) の対象となるフォルダーを選択してください。
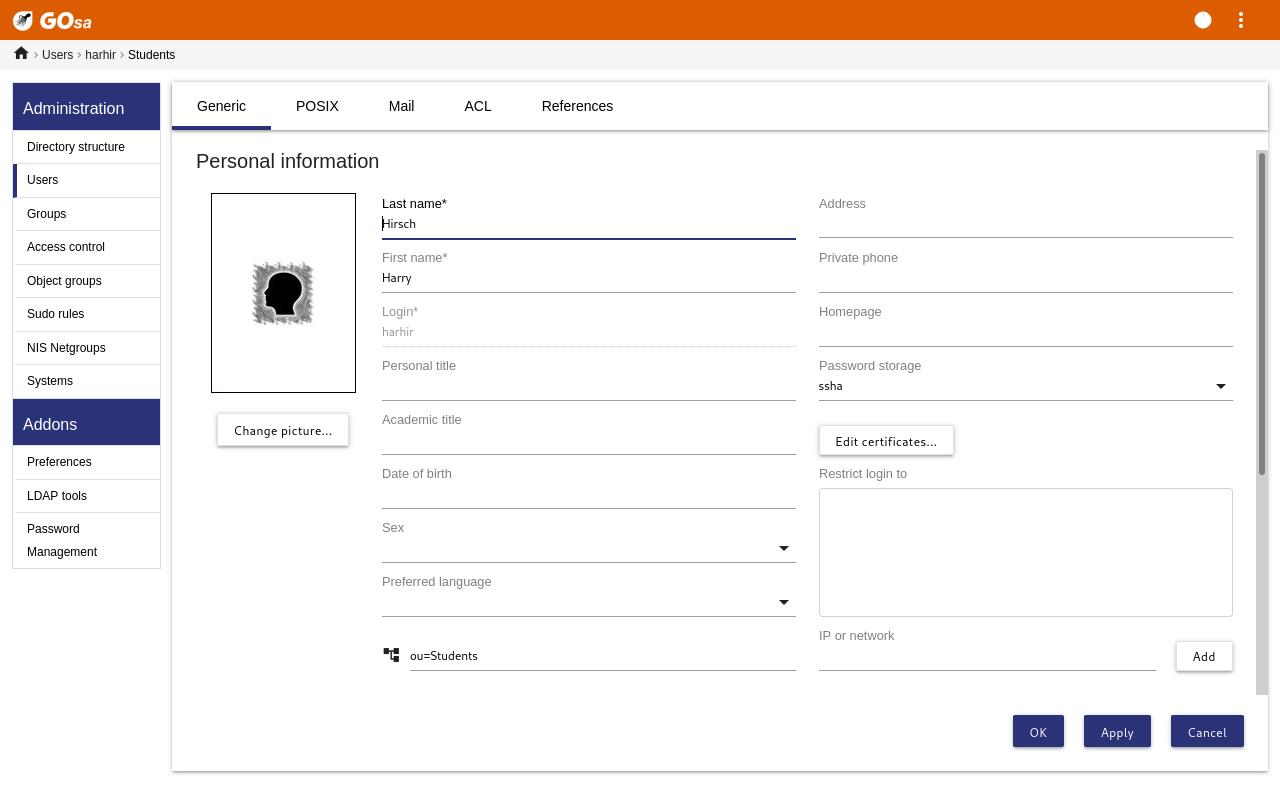
ツリーのナビゲーション項目の隣に「Actions」メニューが表示されます。マウスをこの項目の上に移動させると、画面にサブメニューが表示されます。「Create」を選んで、そして「User」を選択してください。ユーザー作成ウイザードに進みます。
ここで最も重要なのはテンプレート (newstudent や newteacher) とユーザーのフルネーム (画像参照) です。
ウイザードに従って進めると GOsa² は実名を基にしてユーザー名を自動生成します。まだ存在しないユーザー名ですら自動的に生成するため、フルネームが同一のユーザーが複数いても問題にはなりません。ただし、(日本人名のような) 非アスキー文字を含むフルネームでは GOsa² は無効なユーザー名を生成する可能性がありますので、ご注意ください。
生成されたユーザー名では不都合な場合は、ドロップダウンメニューで別のユーザー名候補を選択できますが、ウイザードではユーザー名を自由に設定することはできません。(提示されたユーザー名を変更するには、エディタで
/etc/gosa/gosa.confを開き、「location definition」の追加オプションとしてallowUIDProposalModification="true"を追加します。)ウイザードを完了させると、GOsa² は新しいユーザーの情報を表示します。上部のタブを使って内容を確認してください。
ユーザー作成後 (ウイザードで入力を促さなかった項目についてはこの段階で変更する必要はありません)、右下の隅にある「Ok」ボタンをクリックします。
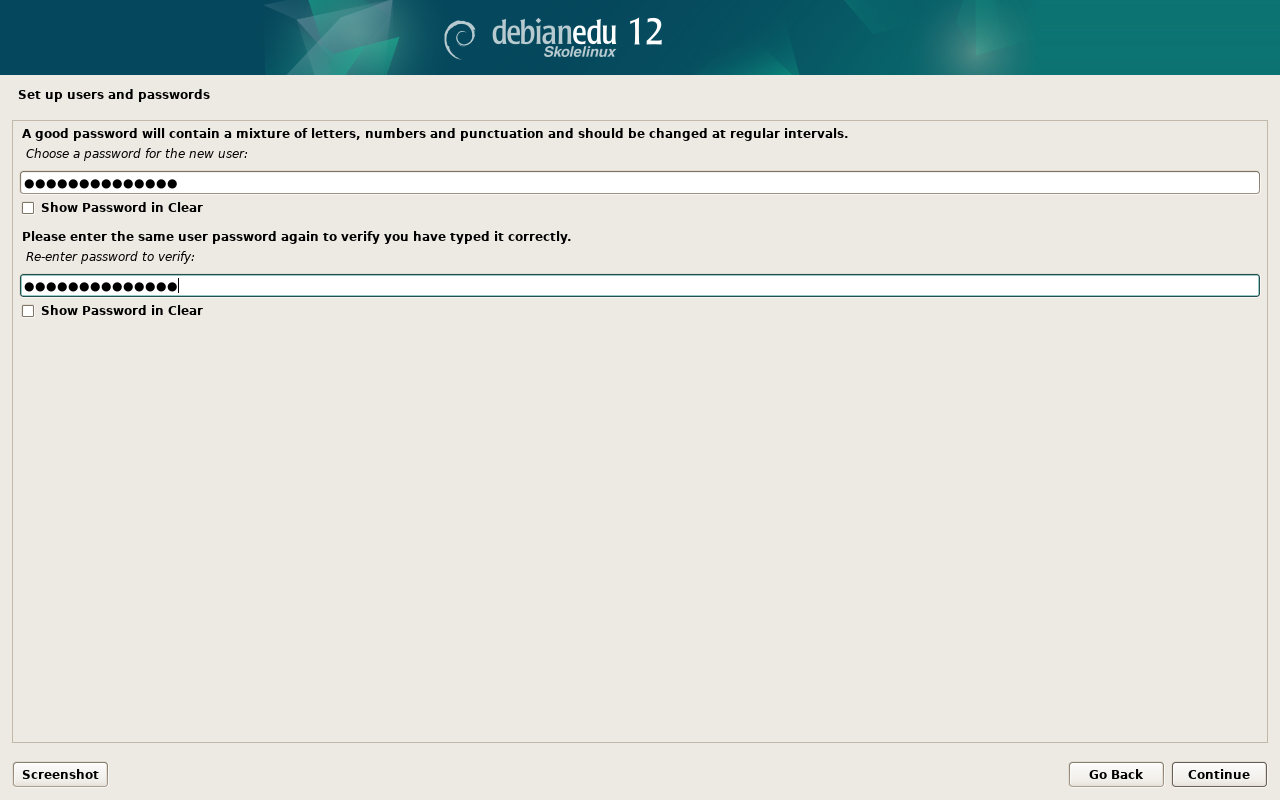
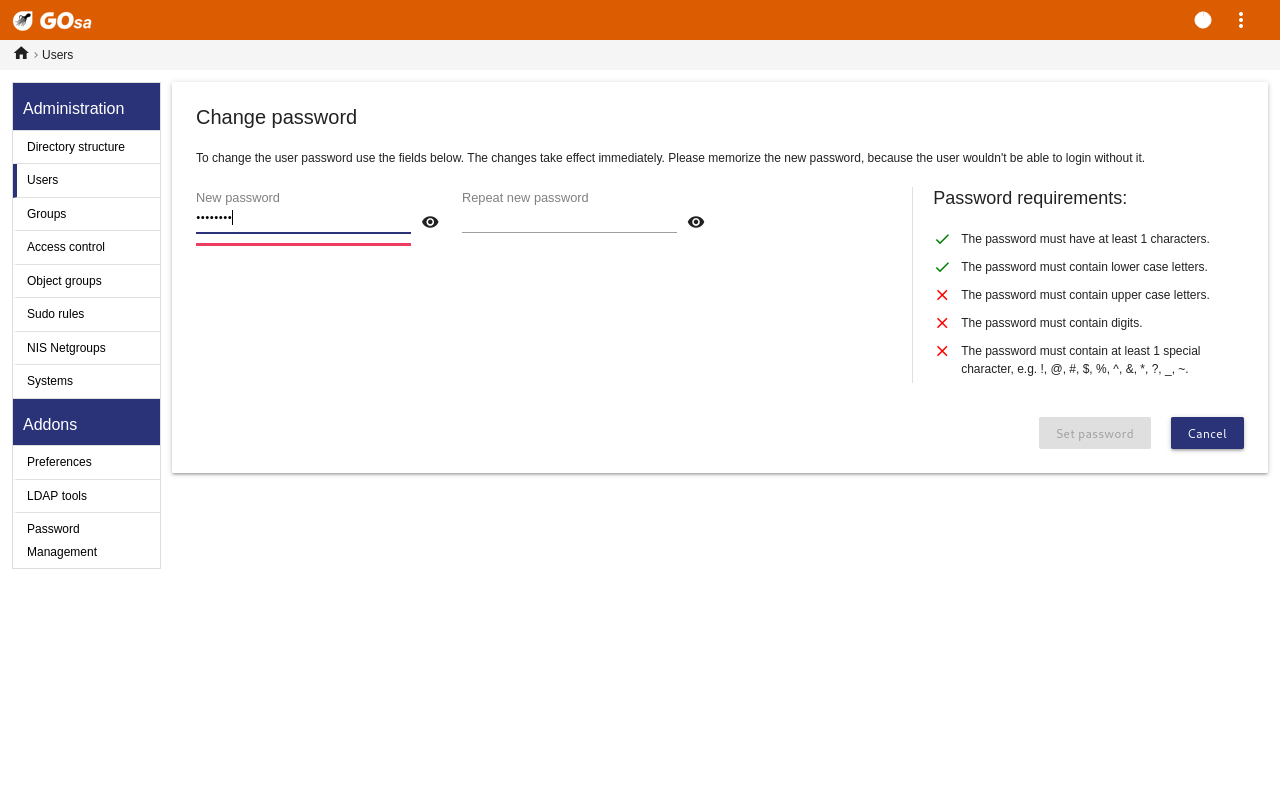
最終段階として GOsa² は新しいユーザーのパスワードを聞いてきます。2 回入力して右下の隅にある「Set
password」ボタンをクリックしてください。 パスワードには使えない文字があります。
問題が生じなければ、ユーザーの一覧表に新しいユーザーが表示され、そのネットワーク内の任意の Skolelinux マシンにそのユーザー名でログインできるようになっています。
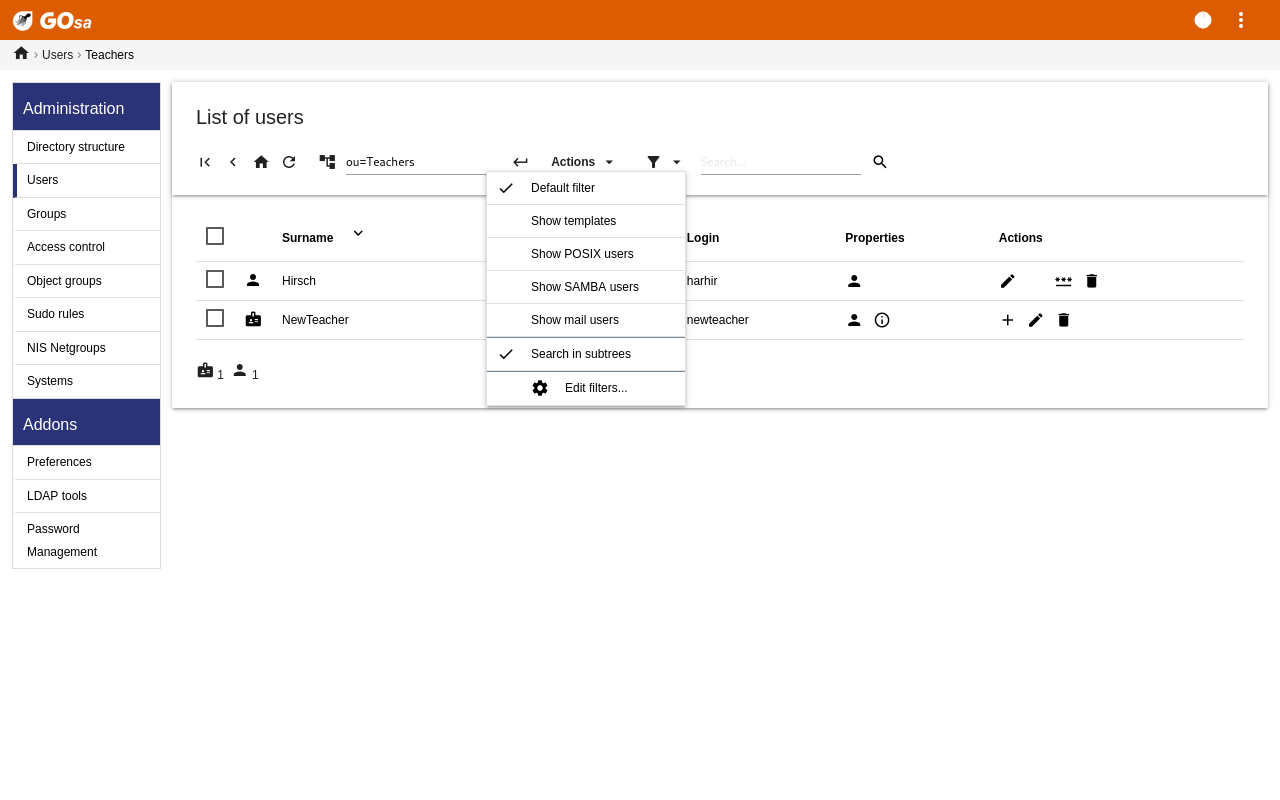
ユーザーを変更、削除するには GOsa² を使ってシステム上のユーザ一覧を表示します。画面中央辺りに「Filter」という枠があります。これは GOsa² が提供している検索ツールです。ユーザアカウントがツリーのどこにあるのかわからない場合は GOsa²/LDAP ツリーの Base レベルに移動させてから「Search in subtrees」オプションを使って検索します。
「Filter」枠を操作したら、すぐに表の一覧ビュー中央の表示に反映されます。各行に1つのユーザーアカウントを表示し、各行の一番右側にはユーザーの編集、アカウントのロック、パスワード設定、ユーザー削除といった操作のアイコンが並びます。
ユーザーに関する情報を直接変更できる新しいページが表示されます。ユーザーのパスワードを変更し、ユーザーの所属グループ一覧を変更します。
生徒は自分のユーザー名で GOsa² にログインして各自でパスワードを変更できます。GOsa² へのアクセスの利便のため、デスクトップのシステム (またはシステム設定) メニューに 「Gosa」 という項目があります。ログインした生徒に対しては最小限のバージョンの GOsa² が提示されます。生徒自身のアカウントデータとパスワード設定ダイアログへのアクセスだけができるようになっています。
GOsa² において、自身のユーザー名でログインした教員には、特別な権限があります。より権限のある GOsa² のビューが表示され、全生徒のアカウントのパスワードを変更できます。これは授業で非常に便利かもしれません。
管理作業でユーザーの新しいパスワードを設定するには、
上記で説明しているようにして変更するユーザーを検索し、
ユーザー名が表示されている行の最後辺りにある鍵の絵をクリックします。
次に表示されるページでそのユーザーの新しいパスワードを設定できます。
Be aware of security implications due to easy to guess passwords!
GOsa² では CSV ファイルを利用して、ユーザーを大量に作成することもできます。CSV ファイルは自分の使いやすいスプレッドシートソフトウェア
(例えば localc ) 等により作成できます。最低限必要な項目はユーザー
ID、姓、名、パスワードです。同一のユーザー ID が複数回出てこないことを確認してください。その際、既存の LDAP の uid
(これはコマンドラインで getent passwd | grep tjener/home | cut -d":"
-f1 を実行すれば取得できます) も必ず確認してください。
CSV ファイル等のデータ形式について指針があります (GOsa² はデータ形式についてはかなり厳しいです):
項目間の区切り文字には半角の「,」を使ってください。
引用符「"」は使わないでください。
CSV ファイルにヘッダ行 (通常、項目名などを記述している行) を含めては いけません 。
項目の順に指定はなく、GOsa² で大量インポートを行う際に定義できます。
大量インポートの手順:
左のナビゲーション項目にある「LDAP Manager」リンクをクリックします
画面右側にある「Import」タブをクリックします
インポートするユーザ一覧を収録している CSV ファイルをローカルディスクから選択します
ユーザーテンプレートから大量インポートに適用させるものを選択します ( NewTeacher や NewStudent 等)
右下の隅にある「Import」ボタンをクリックします
最初にいくらかテストをしておくと良いでしょう。架空のユーザーを使った CSV ファイルを使って、後で削除してください。
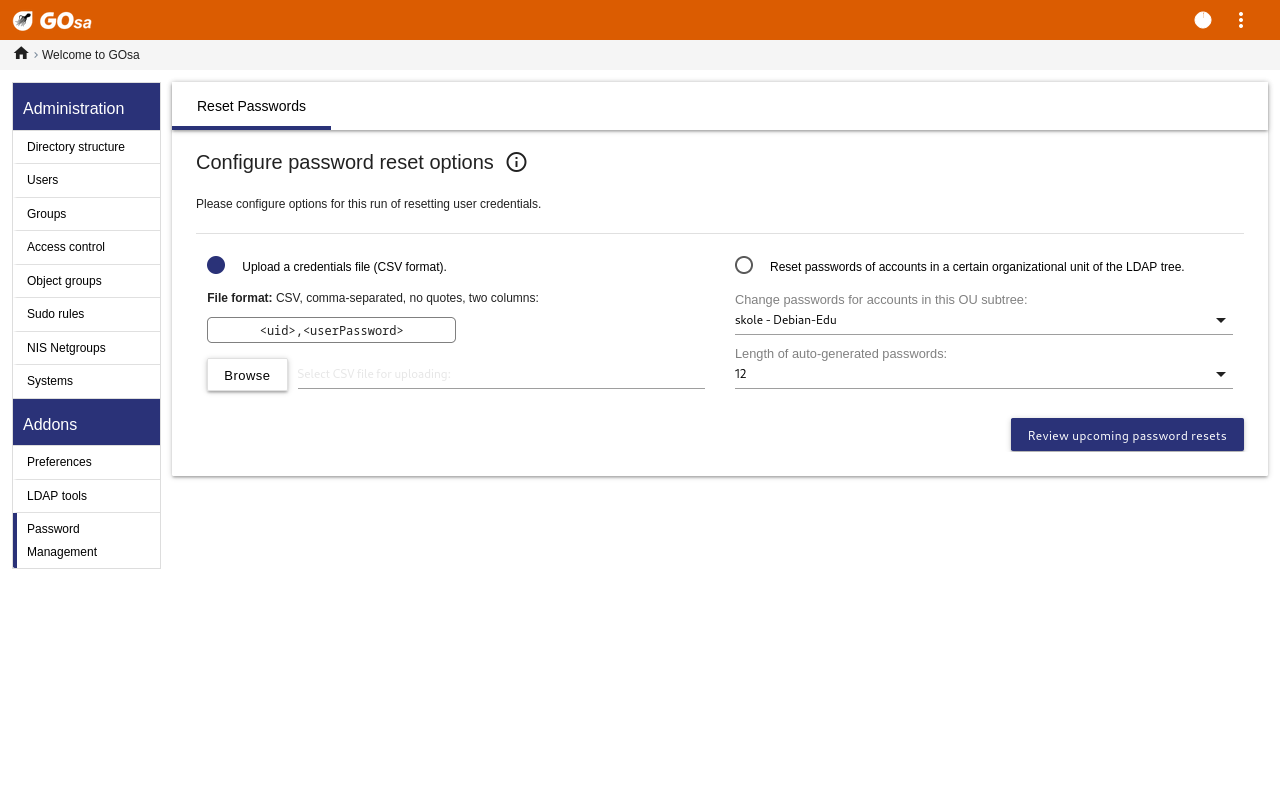
Same applies to the password management module, which allows one to reset a lot of passwords using a CSV file or to re-generate new passwords for users belonging to a special LDAP subtree.
User accounts can also be added from the command line using the
ldap-createuser-krb5 tool, see the
documentation in the Administration
HowTo
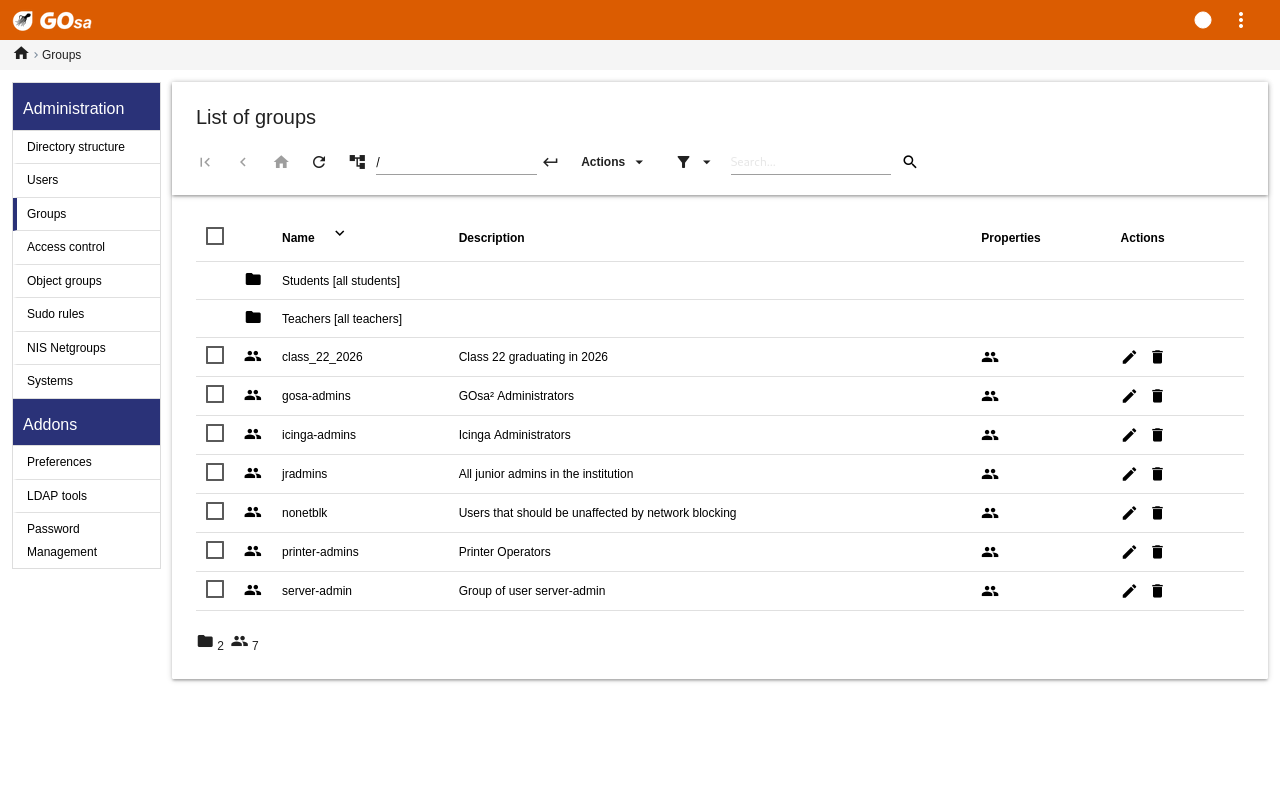
グループ管理はユーザー管理とかなり似ています。
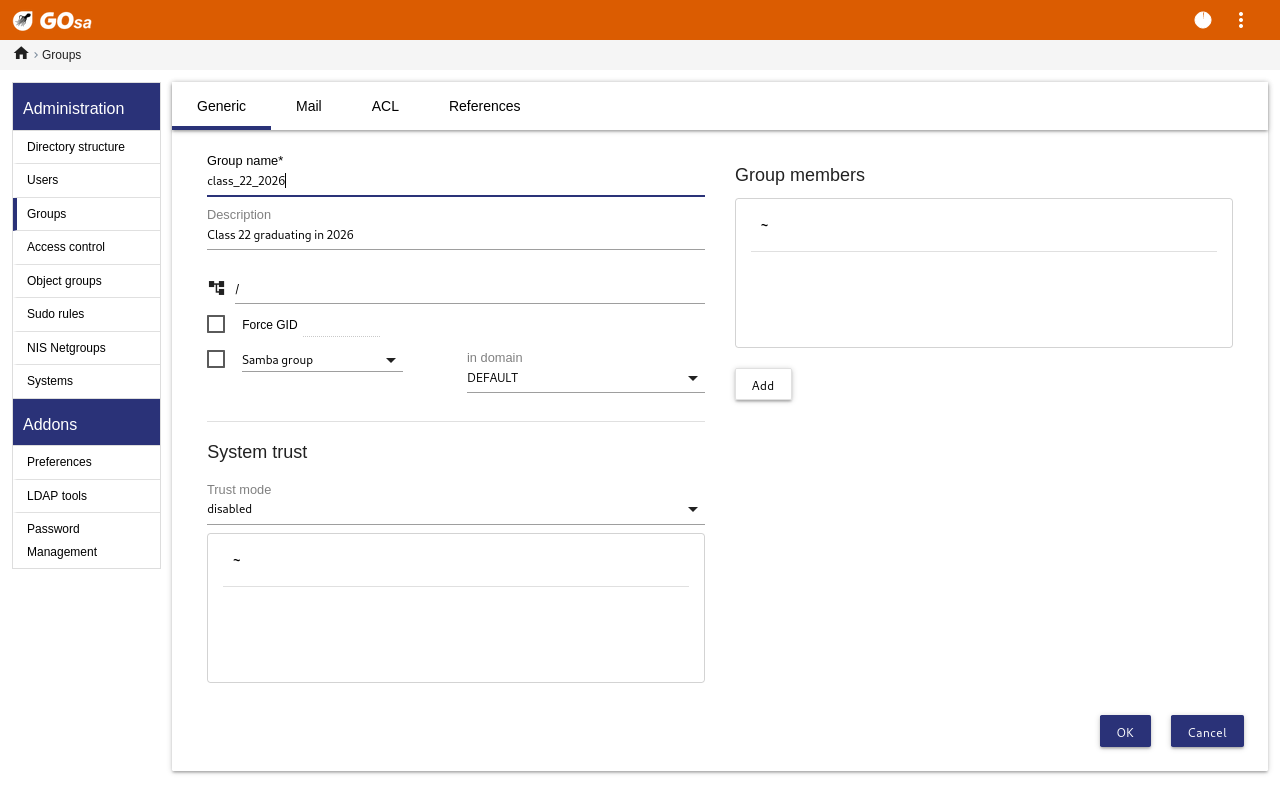
グループごとに名前と説明を入力できます。新しいグループを作成する際、LDAP ツリーの正しいレベルを選択していることを確認してください。
新しく作成したグループにユーザーを追加するには、ユーザーの一覧に戻ります。ほぼ確実に「filter」枠を使ってユーザーを探すのが良いでしょう。ここでも LDAP ツリーのレベルを確認してください。
グループ管理で入力したグループは通常の unix グループでもあります。そのため、ファイルの権限管理にも利用できます。
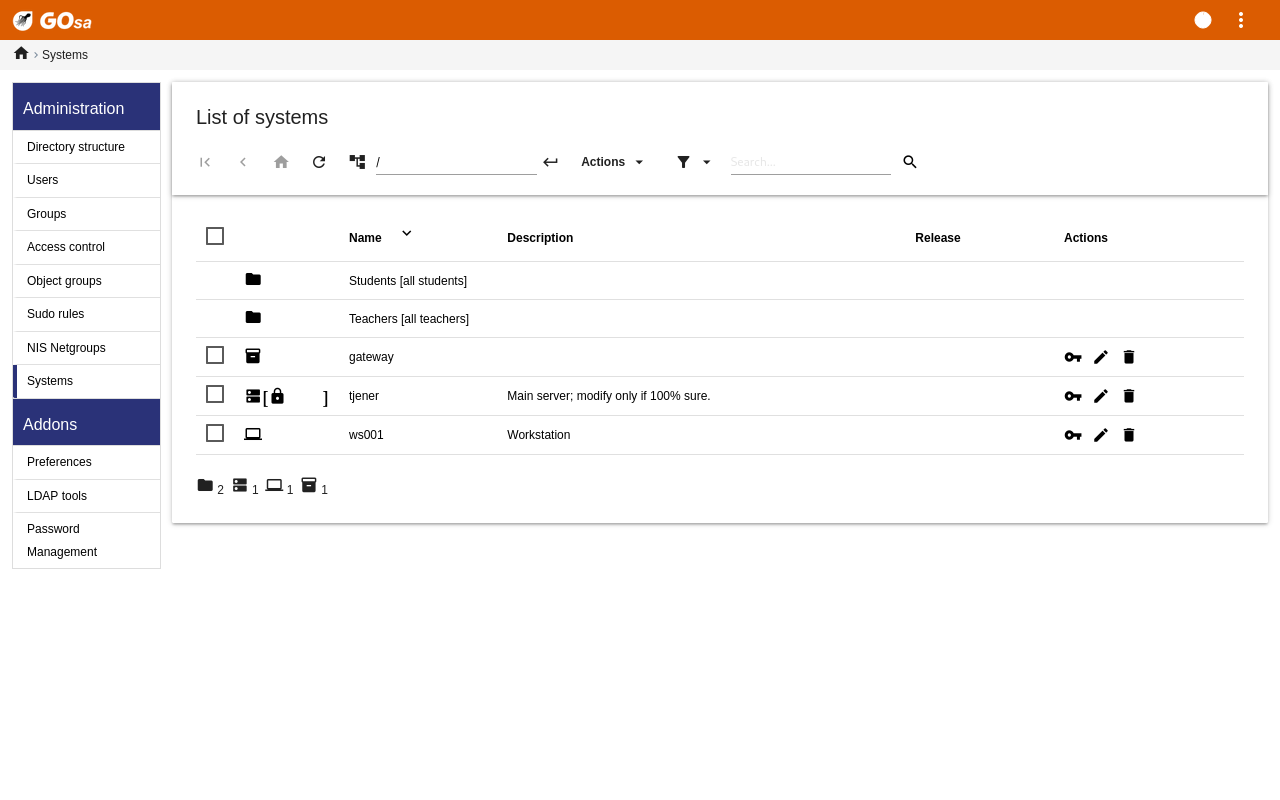
マシン管理では基本的に Debian Edu ネットワークに接続されている全てのマシンを管理できます。GOsa² を利用して LDAP ディレクトリに追加したマシンには全てにホスト名、IP アドレス、MAC アドレス、ドメイン名 (通常 "intern") が付加されます。Debian Edu 構成の全面的な説明についてはこのマニュアルの全体の構成の章を参照してください。
複合メインサーバー ではディスクレスワークステーションとシンクライアントはそのまま利用できます。
ディスク搭載ワークステーション (独立した LTSP サーバーを含む) は必ず
GOsa² で登録します。その過程でマシン固有の Kerberos プリンシパル (アカウント の類)
と関連する keytab ファイル (パスワード として利用される鍵情報を保持) が生成されます。keytab
ファイルはユーザーのホームディレクトリをマウントするためにワークステーション上に必要です。ファイルを設置後に再起動して root としてログインし
/usr/share/debian-edu-config/tools/copy-host-keytab
を実行します。
既に GOsa² で設定済み のシステム向けのプリンシパルと keytab を生成するには、主サーバーに root としてログインして以下を実行します。
/usr/share/debian-edu-config/tools/gosa-modify-host <hostname> <IP>
注意: ホストの keytab 生成が可能なシステムタイプは workstation、servers、そして terminal の形式のみで、netdevices は含みません。ネットワーククライアント HowTo に NFS 設定オプションを記載しています。
To add a machine, use the GOsa² main menu, systems, add. The name of the machine is expected to be a valid unqualified hostname, do not add the domain name here. You can use an IP address/hostname from the preconfigured address space 10.0.0.0/8. Currently there are only two predefined fixed addresses: 10.0.2.2 (tjener) and 10.0.0.1 (gateway). The addresses from 10.0.16.20 to 10.0.31.254 (roughly 10.0.16.0/20 or 4000 hosts) are reserved for DHCP and are assigned dynamically.
GOsa² で MAC アドレス 52:54:00:12:34:10 のホストに固定 IP アドレスを割り当てるには、MAC アドレス、ホスト名、IP
アドレスを設定する必要があります。Propose ip ボタンをクリックすると
10.0.0.0/8 の範囲内の最初の固定空きアドレスを表示します。この方法で初めてマシンを追加した場合は 10.0.0.2
のようなアドレスになるでしょう。まずネットワーク構成について考えておいてください: 例えば 10.0.0.x で x が 10 から 50
はサーバー用、100
以上はワークステーション用などです。追加したシステムの有効化を忘れないでください。そうすると主サーバーを例外として、他の全システムで適切なアイコンが表示されます。
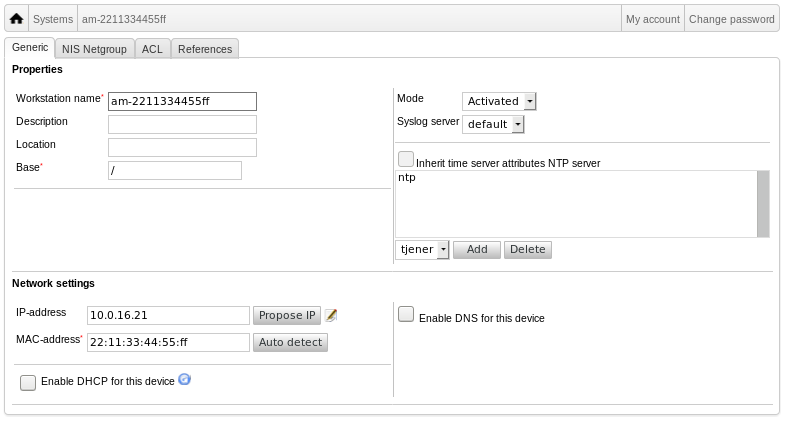
マシンがシンクライアント/ディスクレスワークステーションとしてブートされている場合や、ネットワークを利用するプロファイルを使ってインストールされた場合には、sitesummary2ldapdhcp
スクリプトを利用することでマシンを GOsa² に自動的に追加できます。単純な構成のマシンの場合はそのまま使えます。MAC
アドレスが複数あるマシンでは、実際にそのネットワークで使っているアドレスを選択してください。sitesummary2ldapdhcp
-h
で使い方に関して解説しています。sitesummary2ldapdhcp
の使用後に表示される IPアドレスは、動的に割り当てる (DHCP)
範囲内のアドレスであることを確認してください。システムは後でネットワーク構成に合わせ、新しいシステムの名前を変更したり、DHCP や DNS
を有効化したり、また必要に応じてネットグループ(以下のスクリーンショットをご参照ください)の追加などです。それらの操作後にはシステムを再起動してください。以下のスクリーンショットのような操作手順になります:
root@tjener:~# sitesummary2ldapdhcp -a -i ether-22:11:33:44:55:ff
info: Create GOsa machine for am-2211334455ff.intern [10.0.16.21] id ether-22:11:33:44:55:ff.

Enter password if you want to activate these changes, and ^c to abort.

Connecting to LDAP as cn=admin,ou=ldap-access,dc=skole,dc=skolelinux,dc=no
enter password: ********
root@tjener:~#
DNS を更新する cron ジョブは毎時動作します。su -c ldap2bind
を使うと手作業で更新させることもできます。
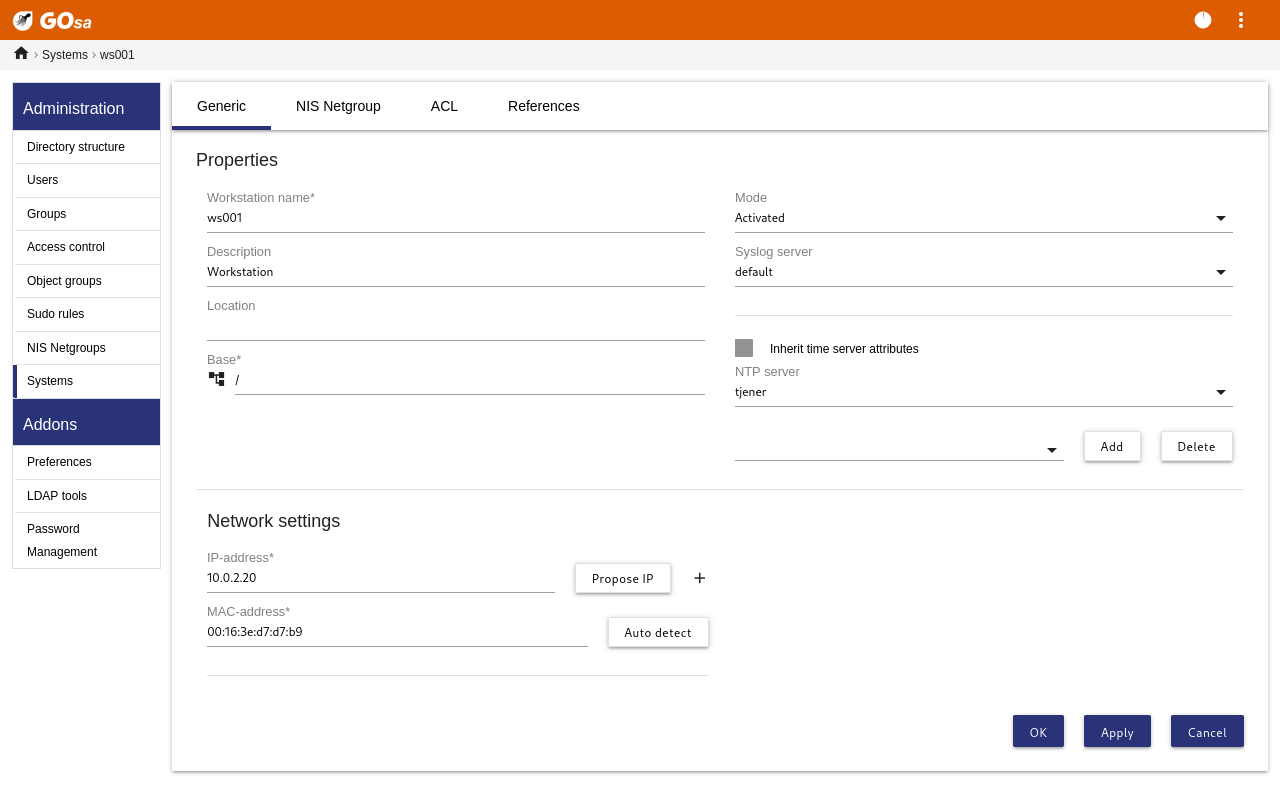
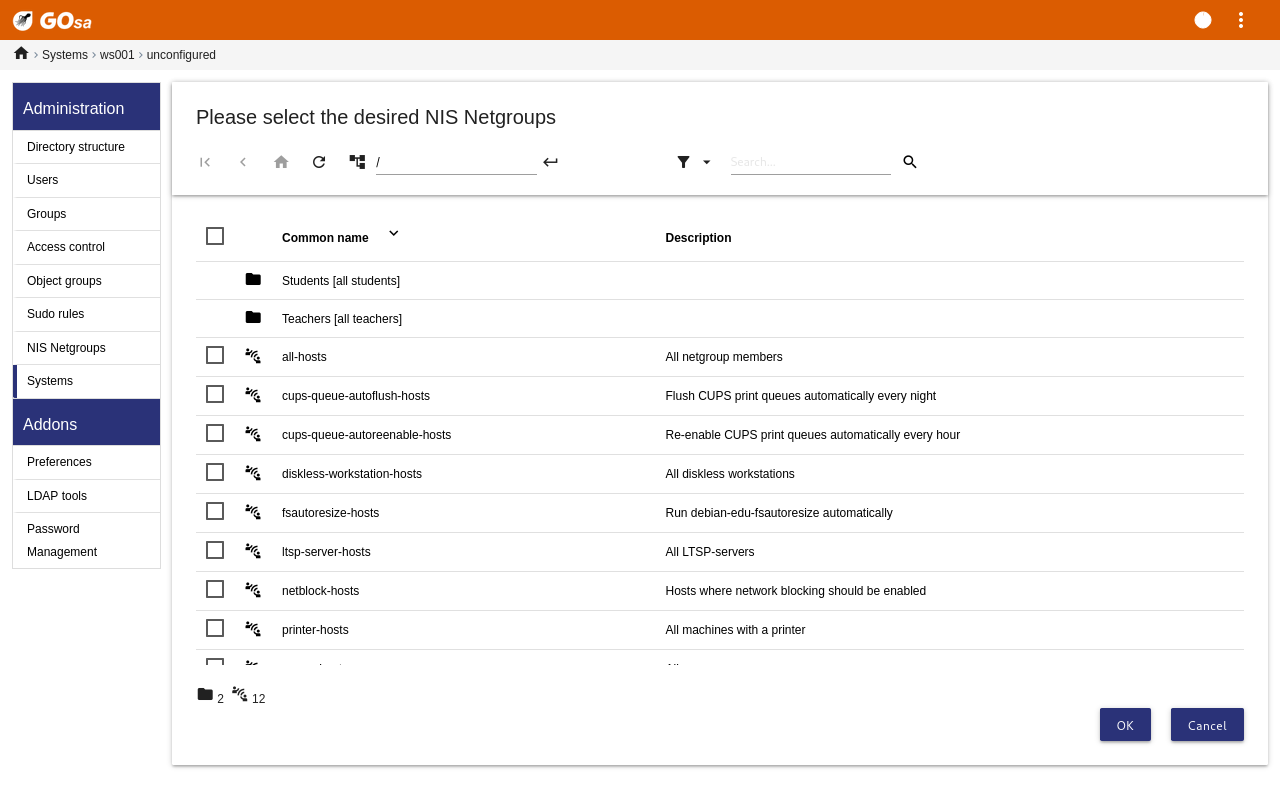
GOsa² を使って LDAP ツリーにマシンを追加した後、(ユーザーの管理と同様に) 検索機能を使ってマシン名をクリックするとマシンの属性を変更できます。
このシステム項目の構成は既に見てきたユーザー項目の変更と似ていますが、この文脈では別の意味になります。
For example, adding a machine to a NetGroup
does not modify the file access or command execution permissions for that
machine or the users logged in to that machine; instead it restricts the
services that machine can use on your main server.
デフォルトでインストールした環境の NetGroup
all-hosts
cups-queue-autoflush-hosts
cups-queue-autoreenable-hosts
fsautoresize-hosts
ltsp-server-hosts
netblock-hosts
printer-hosts
server-hosts
shutdown-at-night-hosts
shutdown-at-night-wakeup-hosts-blacklist
workstation-hosts
NetGroup 機能の現状の用途
パーティションサイズの変更 (fsautoresize-hosts)
このグループの Debian Edu マシンは LVM パーティションの容量が足りなくなると自動的にサイズを変更します。
夜間のマシンシャットダウン (shutdown-at-night-hosts と shutdown-at-night-wakeup-hosts-blacklist)
このグループの Debian Edu マシンは節電のため、夜間は自動的に電源を落とします。
プリンタの管理 (cups-queue-autoflush-hosts 及び cups-queue-autoreenable-hosts)
このグループの Debian Edu マシンは印刷キューを毎晩自動的に空にし、毎時無効化された印刷キューがあれば再有効化します。
インターネットアクセス制限 (netblock-hosts)
Debian Edu machines in this group will be allowed to connect to machines only on the local network. Combined with web proxy restrictions this might be used during exams.
プリンタの一元管理にはブラウザから https://www.intern:631 にアクセスしてください。一般的な
CUPS 管理画面と同様にプリンタの追加・削除・変更や印刷キューの掃除が可能です。デフォルトでは「最初のユーザー」のみが権限を持ちますが、GOsa²
でユーザーを printer-admins グループに登録することで調整できます。
p910nd はワークステーションのプロファイルを含めた場合、システムに自動的にインストールされているパッケージです。
/etc/default/p910ndを次のように編集します (USB 接続プリンターの場合):P910ND_OPTS="-f /dev/usb/lp0"
P910ND_START=1
主サーバーのウェブインターフェイス
https://www:631からプリンタを設定します。 (メーカーブランドや型番に関わらず) ネットワークプリンタのAppSocket/HP JetDirectを選択して、接続 URI にsocket://<ワークステーションのIPアドレス>:9100を設定してください。
The default configuration in Debian Edu is to keep the clocks on all machines synchronous but not necessarily correct. NTP is used to update the time. The clocks will be synchronised with an external source by default. This can cause machines to keep the external Internet connection open if it is created when used.
ダイヤルアップや ISDN による従量課金制の接続では、このデフォルト設定から変更したい場合があるかもしれません。
外部の時刻との同期を無効にするには主サーバーの /etc/ntp.conf
ファイルを編集します。server の項目の前に "#"
を加えてコメントアウトし、NTP サーバーを root で service ntp
restart を実行して再起動します。外部時刻ソースを使っているか確認するには
ntpq -c lpeer を実行してください。
自動パーティショニングに不具合がある場合などに、一部のパーティションでインストール後に空き容量が不足することがあります。そういったパーティションを拡張するには
root で debian-edu-fsautoresize -n
を実行します。さらなる情報については、管理一般 HowTo
の章の「パーティションサイズの変更」を見てください。
この節では apt full-upgrade の使い方を説明します。
apt の使い方は実に単純です。システムを更新するのに必要なのは root
でコマンドラインから 2 つのコマンド、apt update
(利用可能パッケージ一覧を更新) と apt full-upgrade
(アップグレードが利用できるようになったパッケージをアップグレード) を実行するだけです。
ロケールに "C" を使ってアップグレードし、英語での出力を確保しておくこともご検討ください。問題発生時の検索エンジン利用で役に立つことがあります。
LC_ALL=C apt full-upgrade -y
debian-edu-config の更新後は、Cfengine
の設定ファイルが変更されていることがあります。ls -ltr
/etc/cfengine3/debian-edu/ を実行してご確認ください。変更を反映する場合は、
LC_ALL=C cf-agent -D installation
を実行してください。
It is important to run debian-edu-ltsp-install
--diskless_workstation yes after LTSP server upgrades to
keep the SquashFS image for diskless clients in sync.
主サーバー か LTSP サーバー
プロファイルを含むシステムのリリースアップグレード時には
debian-edu-pxeinstall を実行して PXE
環境を更新する必要があります。
cron-apt と
apt-listchanges
をインストールしてご利用中のアドレスにメールを送るように設定することもできます。
cron-apt
は一日一度、アップグレードできるパッケージについてメールで通知します。アップグレードをインストールはしませんが (通常夜間に)
ダウンロードするため、apt full-upgrade
実行時の待ち時間を短縮できます。
自動で更新のインストールを行うことも簡単にできます。unattended-upgrades
パッケージをインストールして wiki.debian.org/UnattendedUpgrades
の説明に従って設定するだけです。
apt-listchanges で新しい changelog を電子メールに送ったり
apt 実行時に端末画面に表示させたりすることができます。
Running cron-apt as described above is a
good way to learn when security updates are available for installed
packages. Another way to stay informed about security updates is to
subscribe to the Debian
security-announce mailinglist, which has the benefit of also telling
you what the security update is about. The downside (compared to
cron-apt) is that it also includes
information about updates for packages which aren't installed.
バックアップを管理するにはブラウザで https://www/slbackup-php にアクセスします。このサイトへのアクセスには SSL を経由する必要があります。root パスワードを入力する必要があるためです。SSL 無しでのアクセスはできません。
Note: the site will only work if you temporarily allow SSH root login on the
backup server, which is the main server (tjener.intern) by default.
By default, backups of /skole/tjener/home0,
/etc/,
/root/.svk and LDAP are stored in the
/skole/backup/ directory which is managed as separate partition by LVM. If
you only want to have spare copies of things (in case you delete them) this
setup should be fine for you.
この方法ではハードドライブの物理的な故障に対するバックアップにはなりません。
データを外部サーバーやテープ機器、別のハードドライブにバックアップしたい場合には既存の設定を多少変更する必要があります。
フォルダー全体を復旧させたい場合はコマンドラインを利用するのが最善の選択となります:
$ sudo rdiff-backup -r <date> \ /skole/backup/tjener/skole/tjener/home0/user \ /skole/tjener/home0/user_<date>
これは <日付> の
/skole/tjener/home0/ユーザー名 の内容を
/skole/tjener/home0/ユーザー名_<日付>
フォルダーに残します。
復旧させたいのがファイル 1 つだけなら、ウェブインターフェイスからファイル (とバージョン) を選択してそのファイルだけをダウンロードできます。
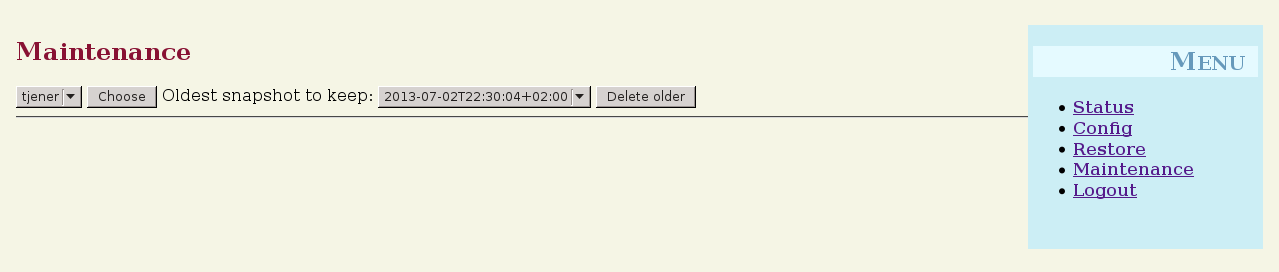
古いバックアップを消してしまいたい場合は、バックアップページのメニューから「Maintenance」を選択して残しておく最古のスナップショットを選択します:
https://www/munin/ から Munin 傾向報告システムを利用できます。システム状態の測定結果を日、週、月、年単位でグラフにして提供し、障害やシステム問題の原因を探しているシステム管理者を支援します。
Munin により監視されるマシン一覧は sitesummary に報告しているホスト一覧から自動的に生成されます。munin-node
パッケージがインストールされているホストは全て Munin による監視対象に登録されます。cron ジョブの実行順のため、導入されたマシンが Munin
の監視対象に入るまでに通常 1 日かかります。短縮するためには、sitesummary のサーバー (通常は主サーバー) で
sitesummary-update-munin を root
で実行します。/etc/munin/munin.conf ファイルが更新されます。
収集される測定結果は munin-node-configure
プログラムを利用している各マシンで自動的に生成します。このプログラムは
/usr/share/munin/plugins/ から利用できるプラグインから
/etc/munin/plugins/
に作成されたシンボリックリンクを探すようになっています。
Information about Munin is available from https://munin-monitoring.org/.
Icinga によるシステム及びサービス監視は https://www/icingaweb2/
から利用できます。監視対象のマシンやサービスは sitesummary システムが収集した情報から自動的に生成されます。主サーバーや LTSP
サーバーのプロファイルのマシンは完全な監視情報を受け取りますが、ワークステーションやシンクライアントのマシンが受け取るのは簡素な監視情報となります。ワークステーションでも完全な監視情報を受け取るようにするには
nagios-nrpe-server パッケージをインストールしてください。
デフォルトでは Icinga はメールを送りません。これは
/etc/icinga/sitesummary-template-contacts.cfg
ファイルの notify-by-nothing を
host-notify-by-email と
notify-by-email 置き換えることで変更できます。
利用される Icinga 設定ファイルは
/etc/icinga/sitesummary.cfg です。sitesummary
の cron ジョブは監視するホスト及びサービスの一覧を収録する
/var/lib/sitesummary/nagios-generated.cfg
を生成します。
ファイル
/var/lib/sitesummary/icinga-generated.cfg.post
に Icinga によるチェック対象を追加すると生成されるファイルに収録されています。
Icinga についての情報は http://www.icinga.com/ や
icinga-doc パッケージにあります。
Icinga の最も一般的な警告とその対処手順を示します。
当該パーティション (例では /usr/) の容量不足です。一般的な対処方法は 2 つあります: (1) ファイルをいくらか削除するか (2)
パーティションサイズを大きくするかです。パーティションが /var/ の場合は apt
clean を実行して APT のキャッシュファイルを削除できるかもしれません。LVM volume group
に空き容量がある場合は debian-edu-fsautoresize
を実行してパーティション拡張も可能です。当該ホストを
fsautoresize-hosts
ネットグループに追加するとこのプログラムを毎時自動的に実行させられます。
New package are available for upgrades. The critical ones are normally
security fixes. To upgrade, run apt upgrade && apt
full-upgrade as root in a terminal or log in via SSH to do
the same.
パッケージのアップグレードを手作業で行いたくなく、Debian
による新しいバージョンの作業を信頼する場合、unattended-upgrades
パッケージをインストールして自動的に毎晩全て新しいパッケージにアップグレードするように設定できます。これは LTSP chroot
のアップグレードは行いません。
実行中のカーネルが最新のインストール済みカーネルより古い状態です。最新のインストール済みカーネルを有効化するには再起動が必要です。Debian Edu では新しいカーネルは通常セキュリティ問題を修正するためのものなので、これは相応に緊急性があります。
各コンピュータでの情報収集と中央サーバへの送信に sitesummary を利用しています。収集した情報は
/var/lib/sitesummary/entries/
から利用できるようになっています。/usr/lib/sitesummary/
にあるスクリプトを利用して報告を生成できます。
A simple report from Sitesummary without any details is available from https://www/sitesummary/.
Some documentation on Sitesummary is available from https://wiki.debian.org/DebianEdu/HowTo/SiteSummary
システム管理者にとって有用となる Debian Edu のカスタム化に関しては次の章をご覧になってください: 管理一般 Howto の章 や 高度な管理 Howto の章
このアップグレードガイドを読む前に、実運用しているサーバーを稼働状態で更新するということはご自身の責任であることを確認してください。Debian Edu/Skolelinux は法で認められている最大範囲内で、一切の責任を負いません。
Please read this chapter and the New features in Bookworm chapter of this manual completely before attempting to upgrade.
Debian 自体をあるリリースから次のリリースにアップグレードするのは通常簡単なのですが、Debian Edu では設定ファイルに手を加えている都合上、残念ながら若干複雑になります (Debian バグ情報 311188 に Debian Edu ではどのようにすべきかの経緯などの情報があります)。
In general, upgrading the servers is more difficult than the workstations and the main server is the most difficult to upgrade.
アップグレード後に確実に全て以前と同じように動作するようにするには、テスト用システムか運用環境のマシンと同じように設定したシステムでアップグレードをテストすべきです。そうすることでリスク無くアップグレードをテストし、全て動作すべきように動作するか確認できます。
Debian stable リリース自体についても インストールマニュアル をかならずご一読ください。
なお oldstable での運用を何週間か延長してしばらく待つ選択肢もあります。その間に他の方がアップグレードを検証して何か問題があれば言及できるということになります。Debian Edu の oldstable リリースは次の stable リリース後もしばらくはサポートが続けられますが、Debian が oldstable のサポートを終了すると Debian Edu でもサポート終了となります。
Be prepared: make sure you have tested the upgrade from Bullseye in a test
environment or have backups ready to be able to go back.
Please note that the following recipe applies to a default Debian Edu main server installation (desktop=xfce, profiles Main Server, Workstation, LTSP Server). (For a general overview concerning Bullseye to Bookworm upgrade, see: https://www.debian.org/releases/bookworm/releasenotes)
X を使用せずに、仮想コンソールを使って root でログインしてください。
apt でエラーが生じた場合は、まず apt -f
install を実行してみて、apt -y
full-upgrade をもう一度実行してみてください。
まず、システムが最新版に更新されていることを確認します:
apt update apt full-upgrade
Prepare and start the upgrade to Bookworm:
sed -i 's/bullseye/bookworm/g' /etc/apt/sources.list export LC_ALL=C apt update apt upgrade --without-new-pkgs apt full-upgrade
apt-list-changes: 読むべき NEWS が大量に生じることを覚悟してください。ページャーのスクロールを進めるには <Enter> を、終了させるには <q> を押します。root アカウントにはすべての情報が送信されるので、後で読むこともできます。その場合は mailx や mutt などのメール閲覧ソフトを利用してください。
debconf の情報を全て注意深く読み、以下で特に言及していない限り「現在インストールされているローカルバージョンを維持 ('keep the local version currently installed')」を選択してください。ほとんどの場合「Enter」を押せばいいはずです。
restart services: Choose yes.
Samba server and utilities: 'keep the local version currently installed' を選択します。
openssh-server: 'keep the local version currently installed' を選択します。
設定の適用と調整:
cf-agent -v -D installation
アップグレードしたシステムが機能するか確認します:
再起動して「最初のユーザー」としてログインし、
GOsa² GUI が機能しているか、
LTSP クライアントやワークステーションに接続できるか、
システムのネットグループのメンバーを追加/削除できるか、
内部メールを送受信できるか、
プリンターを管理できるか、
その他サイト特有の事項について機能するかテストしてください。
To upgrade from any older release, you will need to upgrade to the Bullseye based Debian Edu release first, before you can follow the instructions provided above. Instructions are given in the Manual for Debian Edu Bullseye about how to upgrade to Bullseye from the previous release, Buster.
さあ始めよう と 保守 の章で、Debian Edu で最初にすべきことや基本的な保守作業の方法について説明しています。この章の HowTo ではより「高度な」ヒントや技をいくらか提示します。
etckeeper を使うと
/etc/ 以下の全ファイルを Git を使ってバージョン管理できます。
これにより、ファイルの削除や変更、削除がいつ行われたのか、そしてファイルがテキストファイルの場合はその変更点を確認できるようになります。git
リポジトリは /etc/.git/ に置かれます。
毎時、変更があれば自動的に記録され、設定の履歴を取り出して確認できます。
To look at the history, the command etckeeper vcs
log is used. To check the differences between two points in
time, a command like etckeeper vcs diff
can be used.
さらなる情報については man etckeeper の出力を見てください。
有用なコマンド一覧:
etckeeper vcs log etckeeper vcs status etckeeper vcs diff etckeeper vcs add . etckeeper vcs commit -a man etckeeper
Debian Edu では /boot/ パーティション以外のパーティションは全て
LVM 論理ボリュームです。Linux カーネルのバージョン 2.6.10
以降から、パーティションをマウントしたままサイズを拡張できるようになっています。パーティションの縮小についてはパーティションをマウントしていない状態で行う必要があります。
fsck
の実行時間と、バックアップから復旧が必要になった場合の所要時間の観点から、大きすぎるパーティション (例えば 20 GiB 超)
は作らないほうがよいでしょう。可能なかぎり、巨大なパーティションよりも小さなパーティションを複数作成する方が良いということです。
パーティション全体の拡張を容易にするために、補助スクリプト
debian-edu-fsautoresize があります。これを実行すると、
/usr/share/debian-edu-config/fsautoresizetab、
/site/etc/fsautoresizetab、
/etc/fsautoresizetab
から設定を読み込みます。ファイルから提供された規則をもとに、空き領域が少なすぎるパーティションの拡張を提案します。引数無しで実行すると何もせず、ファイルシステムを拡張するのに必要なコマンドを表示します。提示されたコマンドを実際に実行してファイルシステムを拡張する場合には、引数
-n が必要です。
このスクリプトは fsautoresize-hosts
ネットグループ一覧にある全クライアントでは毎時自動的に実行されます。
When the partition used by the Squid proxy is resized, the value for cache
size in etc/squid/squid.conf needs to be
updated as well. The helper script
/usr/share/debian-edu-config/tools/squid-update-cachedir
is provided to do this automatically, checking the current partition size of
/var/spool/squid/ and configuring Squid to
use 80% of this as its cache size.
ストレージを LVM (Logical Volume Management) で管理することでパーティション (論理ボリューム) のサイズ変更がマウントしたままでも可能です。詳細は LVM HowTo をご覧ください。
論理ボリュームを手動で拡張したい場合は、lvextend
コマンドで増やしたい大きさを指示してください。例えば「home0 のサイズを 30 GiB にする」にはコマンド:
lvextend -L30G /dev/vg_system/skole+tjener+home0 resize2fs /dev/vg_system/skole+tjener+home0
To extend home0 by additional 30GiB, you insert a '+' (-L+30G).
ldapvi はコマンドライン上で普通のテキストエディタを利用して LDAP データベースを編集するツールです。
以下を実行します:
ldapvi -ZD '(cn=admin)'
注意: ldapvi
はデフォルトに設定されているエディタを利用します。シェルプロンプトで export
EDITOR=vim を実行するとエディタに vi クローンを使う環境に設定できます。
警告: ldapvi は非常に強力なツールなので、不注意で LDAP
データベースを破壊しかねません。JXplorer についても同様です。
Using Kerberos for NFS to mount home directories is a security feature. Workstations and LTSP clients won't work without Kerberos. The levels krb5, krb5i and krb5p are supported (krb5 means Kerberos authentication, i stands for integrity check and p for privacy, i.e. encryption); the load on both server and workstation increases with the security level, krb5i is a good choice and has been chosen as default.
主サーバー
rootとしてログインする
ldapvi -ZD '(cn=admin)'を実行し sec=krb5i を検索して sec=krb5 や sec=krb5p に変更します。edit
/etc/exports.d/edu.exportsand adjust these entries accordingly:
/srv/nfs4 gss/krb5i(rw,sync,fsid=0,crossmnt,no_subtree_check) /srv/nfs4/home0 gss/krb5i(rw,sync,no_subtree_check)
run
exportfs -r.
このツールは使用場所やコンピューター、あるいはグループメンバーに基づいて規定のプリンターを設定します。詳細については
/usr/share/doc/standardskriver/README.md
をご覧ください。
設定ファイル /etc/standardskriver.cfg
を管理者が準備する必要があります。いくつかの例が
/usr/share/doc/standardskriver/examples/standardskriver.cfg
にありますので、参考にしてください。
LDAP データベースについて GUI で作業する方が良ければ jxplorer
パッケージについて調べてみてください。これはデフォルトでインストールされています。次のようにして書き込みできるように接続します:
host: ldap.intern port: 636 Security level: ssl + user + password User dn: cn=admin,ou=ldap-access,dc=skole,dc=skolelinux,dc=no
ldap-createuser-krb is a small command line
tool to create user accounts, it is invoked as follows:
ldap-createuser-krb5 [-u uid] [-g gid] [-G group[,group]...] [-d department] <username> <gecos>
All arguments except the username and GECOS field are optional, the latter
usually should contain the full name of the user. Unless specified the tool
will pick the next free UID and GID automatically and not assign any
additional groups to the user. If no department is given, it will pick the
first gosaDepartment from LDAP which is likely
skole and for regular users usually not what you want,
so you should pick an appropriate value for the user,
e.g. Teachers or Students. After
entering and confirming the password and entering the LDAP administrator
password, ldap-createuser-krb5 will create
the user account in LDAP, set the Kerberos password, create the home
directory, and add a corresponding Samba user. The following screenshot
shows an example invocation to create a user account named
harhir for a teacher whose full name is
"Harry Hirsch":
root@tjener:~# ldap-createuser-krb5 -d Teachers harhir "Harry Hirsch"
new user password:
confirm password:
dn: uid=harhir,ou=people,ou=Teachers,dc=skole,dc=skolelinux,dc=no
changetype: add
objectClass: top
objectClass: person
objectClass: organizationalPerson
objectClass: inetOrgPerson
objectClass: gosaAccount
objectClass: posixAccount
objectClass: shadowAccount
objectClass: krbPrincipalAux
objectClass: krbTicketPolicyAux
sn: Harry Hirsch
givenName: Harry Hirsch
uid: harhir
cn: Harry Hirsch
userPassword: {CRYPT}$y$j9T$TWnq55O1rvyLhjF.$oVf.t.RXC1v/4Y8FhV0umno629mo7bP7/YJyig6HET6
homeDirectory: /skole/tjener/home0/harhir
loginShell: /bin/bash
uidNumber: 1004
gidNumber: 1004
gecos: Harry Hirsch
shadowLastChange: 19641
shadowMin: 0
shadowMax: 99999
shadowWarning: 7
krbPwdPolicyReference: cn=users,cn=INTERN,cn=kerberos,dc=skole,dc=skolelinux,dc=no
krbPrincipalName: harhir@INTERN
ldap_initialize( <DEFAULT> )
Enter LDAP Password:
add objectClass:
top
person
organizationalPerson
inetOrgPerson
gosaAccount
posixAccount
shadowAccount
krbPrincipalAux
krbTicketPolicyAux
add sn:
Harry Hirsch
add givenName:
Harry Hirsch
add uid:
harhir
add cn:
Harry Hirsch
add userPassword:
{CRYPT}$y$j9T$TWnq55O1rvyLhjF.$oVf.t.RXC1v/4Y8FhV0umno629mo7bP7/YJyig6HET6
add homeDirectory:
/skole/tjener/home0/harhir
add loginShell:
/bin/bash
add uidNumber:
1004
add gidNumber:
1004
add gecos:
Harry Hirsch
add shadowLastChange:
19641
add shadowMin:
0
add shadowMax:
99999
add shadowWarning:
7
add krbPwdPolicyReference:
cn=users,cn=INTERN,cn=kerberos,dc=skole,dc=skolelinux,dc=no
add krbPrincipalName:
harhir@INTERN
adding new entry "uid=harhir,ou=people,ou=Teachers,dc=skole,dc=skolelinux,dc=no"
modify complete
Authenticating as principal root/admin@INTERN with password.
kadmin.local: change_password harhir@INTERN
Enter password for principal "harhir@INTERN":
Re-enter password for principal "harhir@INTERN":
Password for "harhir@INTERN" changed.
kadmin.local: lpcfg_do_global_parameter: WARNING: The "encrypt passwords" option is deprecated
Added user harhir.stable-updates を直接利用することもできますが、必須ではありません: stable-updates は stable ポイントリリースの際に取り込まれます。これは大体 2 か月ごとに行われます。
安定性のために Debian Edu を選択して頂けたなら、大変喜ばしく思います。ただし、問題が一つだけあります。ソフトウェアがご希望のものよりも少々古くなっていることがあることです。ここで backports の出番です。
backports で扱うのは Debian の testing (ほとんどの場合) や Debian の unstable (例えばセキュリティ更新等、一部の状況でのみ) のパッケージを再コンパイルしたものであるため、(それが可能な限り) 新しいライブラリを必要とせず Debian Edu 等の安定版 Debian ディストリビューションで動作します。利用可能なバックポートを全て使うのではなく、必要に応じて個々のバックポートだけをご利用されることを勧めます。
backports の利用は簡単です:
echo "deb http://deb.debian.org/debian/ bookworm-backports main" > /etc/apt/sources.list.d/bookworm-backports.sources.list apt update
この後はバックポートされたパッケージを簡単にインストールできます。以下のコマンドではバックポートされたバージョンの tuxtype をインストールします:
apt install tuxtype/bookworm-backports
backports のパッケージは他のパッケージと全く同じように (利用可能になれば) 自動的に更新されます。通常のアーカイブと同様 backports には main と contrib と non-free の 3 つのセクションがあります。
If you want to upgrade from one version to another (for example from Bookworm 12.1 to 12.2) but you do not have Internet connectivity, only physical media, follow these steps:
CD / DVD / Blu-ray ディスク / USB フラッシュドライブなどを差し込んでマウントし、apt-cdrom コマンドを実行します:
apt-cdrom add
apt-cdrom(8) man ページから引用:
apt-cdrom は利用可能な取得元として、APT のリストに新しい CD-ROM を追加するのに使用します。apt-cdrom は、ディスクの構造を測定します。また、焼き損じを可能な限り補正し、インデックスファイルの確認を行います。
APT システムに手作業で CD を追加するのは難しいため、apt-cdrom が必要になります。その上、複数の CD のディスクを 1 枚づつ、焼き損じを補正できるか評価しなければなりません。
それからコマンドを 2 つ実行し、システムをアップグレードします:
apt update apt full-upgrade
unattended-upgrades
はセキュリティその他の更新を自動的にインストールする Debian パッケージで、セキュリティ更新などをするように設定されます。自動更新時のログは
/var/log/unattended-upgrades/ で参照できます。もちろん
/var/log/dpkg.log と
/var/log/apt/ でも確認できます。
It is possible to save energy and money by automatically turning client
machines off at night and back on in the morning. The package
shutdown-at-night will try to turn off the
machine every hour on the hour from 16:00 in the afternoon, but will not
turn it off if it seems to have users. It will try to tell the BIOS to turn
on the machine around 07:00 in the morning, and the main server will try to
turn on machines from 06:30 by sending Wake-on-LAN packets. These times can
be changed in the crontabs of individual machines.
この設定にあたって留意しておくべき事項:
The clients should not be shut down when someone is using them. This is ensured by checking the output from
who, and as a special case, checking for the SSH connection command to work with X2Go thin clients.電源ブレーカーが落ちないように、全クライアントを同時に起動しないようにしてください。
There are two different methods available to wake up clients. One uses a BIOS feature and requires a working and correct hardware clock, as well as a motherboard and BIOS version supported by
nvram-wakeup; the other requires clients to have support for Wake-on-LAN, and the server to know about all the clients that need to be woken up.
On clients that should turn off at night, touch
/etc/shutdown-at-night/shutdown-at-night,
or add the hostname (that is, the output from 'uname
-n' on the client) to the netgroup
"shutdown-at-night-hosts". Adding hosts to the netgroup in LDAP can be done
using the GOsa² web tool. The clients might
need to have Wake-on-LAN configured in the BIOS. It is also important that
the switches and routers used between the Wake-on-LAN server and the clients
will pass the WOL packets to the clients even if the clients are turned
off. Some switches fail to pass on packets to clients that are missing in
the ARP table on the switch, and this blocks the WOL packets.
To enable Wake-on-LAN on the server, add the clients to
/etc/shutdown-at-night/clients, with one
line per client, IP address first, followed by MAC address (ethernet
address), separated by a space; or create a script
/etc/shutdown-at-night/clients-generator to
generate the list of clients on the fly.
sitesummary と併せて使う場合の
/etc/shutdown-at-night/clients-generator
の例です:
#!/bin/sh PATH=/usr/sbin:$PATH export PATH sitesummary-nodes -w
クライアントでネットグループを使って shutdown-at-night
を有効化している場合の代替として、ng-utils
パッケージのネットグループツールを利用するこのスクリプトがあります:
#!/bin/sh PATH=/usr/sbin:$PATH export PATH netgroup -h shutdown-at-night-hosts
インターネットからファイアウォールの先にあるマシンへアクセスするには autossh
パッケージのインストールを検討してください。これを利用して自分のアクセスできるインターネット上のマシンへの SSH
トンネルを用意できます。そのマシンから SSH トンネルを経由してファイアウォールの先のサーバにアクセスできます。
In the default installation, all services are running on the main server, hostname tjener. To simplify moving some to another machine, there is a minimal installation profile available. Installing with this profile will lead to a machine, which is part of the Debian Edu network, but which doesn't have any services running (yet).
一部のサービスでは、専用マシンを用意するのに必要となる手順があります。
choose the Minimal profile during installation
サービスを行うパッケージをインストールします。
サービスを設定します。
disable the service on the main server
update DNS (via LDAP/GOsa²) on the main server
FIXME: The HowTos from https://wiki.debian.org/DebianEdu/HowTo/ are either user- or developer-specific. Let's move the user-specific HowTos over here (and delete them over there)! (But first ask the authors (see the history of those pages to find them) if they are fine with moving the howto and putting it under the GPL.)
この章では高度な管理タスクについて説明します。
この例では年次別に共通のホームディレクトリ (home0/2024, home0/2026, 等) を持つ年次ユーザーを作成します。ユーザーは CSV のインポートで作成します。
(主サーバーの root で)
必要な年次グループのディレクトリを作成します。
mkdir /skole/tjener/home0/2024
(Gosa の「最初のユーザー」として)
部門 (Department)
メインメニュー: 「Directory structure」に移動し、「Students」部門をクリックします。「Base」欄には「/Students」が表示されているはずです。「Actions」ドロップボックスから「Create」「Department」を選択します。名前 (2024) と説明 (2024 年卒業の生徒) の値を埋め、「Base」欄はそのまま (「/Students」のはずです) にします。「Ok」をクリックして保存します。これで新しい部門 (2024) が「/Students」の下に表示されるようになったはずです。それをクリックします。
グループ
メインメニュー「Actions/Create/Group」から「Groups」を選択します。グループ名を入力して (「Base」はそのまま、「/Students/2024」とします) 「Ok」をクリックして保存します。
テンプレート
「users」をメインメニューで選択し、Base
欄を「Students」に変更します。新しい「NewStudent」エントリーが表示されるので、クリックしてください。これは「students」テンプレートで、実際のユーザーではありません。(CSV
ファイルでのインポートができるにように)
こういったテンプレートを作る必要があります。「Generic」と「POSIX」タブに表示される項目は新しいテンプレートを作るときにスクリーンショットを撮っておいてください。
次に Base 項目を「/Students/2024」にします。「Create/Template」を選んで、「Generic」タブの項目から値を設定し (「2024」グループを「Group Membersip」でも作ります) その後に POSIX アカウントを追加します。
ユーザーのインポート
CSV をインポートする際に新しいテンプレートを選択します。少数のユーザーを使ってテストしておくことを勧めます。
このスクリプトでは管理者が各ユーザーのホームディレクトリ内にディレクトリを作成してアクセス権限と所有権をセットできます。
group=teachers と permissions=2770 を指定する以下の例では、ユーザーはファイルを「assignment」ディレクトリに保存することでその課題を提出でき、教員側はそのディレクトリに書き込みアクセス権限が与えられているためコメントを加えることができます。
#!/bin/bash
home_path="/skole/tjener/home0"
shared_folder="assignments"
permissions="2770"
created_dir=0
for home in $(ls $home_path); do
if [ ! -d "$home_path/$home/$shared_folder" ]; then
mkdir $home_path/$home/$shared_folder
chmod $permissions $home_path/$home/$shared_folder
user=$home
group=teachers
chown $user:$group $home_path/$home/$shared_folder
((created_dir+=1))
else
echo -e "the folder $home_path/$home/$shared_folder already exists.\n"
fi
done
echo "$created_dir folders have been created"以下の手順でユーザーのホームディレクトリや他のデータを置ける、専用のストレージサーバーを設定できます。
新しいシステム区分の
serverを追加には、このマニュアルの さあ始めよう の章で説明しているように GOsa² を使います。この例では nas-server.intern をサーバー名としています。nas-server.intern の設定が出来たら、新しいストレージサーバーを指す NFS エクスポートが適切なサブネットやマシンにエクスポートされているか確認します:
root@tjener:~# showmount -e nas-server Export list for nas-server: /storage 10.0.0.0/8 root@tjener:~#この例ではバックボーンネットワークの全てが /storage エクスポートへのアクセスを許されています。(これは tjener:/etc/exports ファイルで行うのと同様にネットグループメンバー権や IP アドレスで制限することで NFS へのアクセスを限定できます。)
nas-server.intern についての自動マウント情報を LDAP に追加し、全クライアントからリクエストにより新しいエクスポートを自動的にマウントできるようにします。
これは GOsa² では自動マウント用モジュールが欠けているためできません。代わりに ldapvi を利用し、エディタを使って必要な LDAP 項目を追加します。
ldapvi --ldap-conf -ZD '(cn=admin)' -b ou=automount,dc=skole,dc=skolelinux,dc=noエディタが起動したら、ファイルの末尾に以下の LDAP 項目を追加します。 (最後の LDAP 項目の"/&" は全ての nas-server.intern エクスポートにマッチするワイルドカードで、これにより LDAP 中の個々のマウントポイントを列挙する必要がなくなります。)
add cn=nas-server,ou=auto.skole,ou=automount,dc=skole,dc=skolelinux,dc=no objectClass: automount cn: nas-server automountInformation: -fstype=autofs --timeout=60 ldap:ou=auto.nas-server,ou=automount,dc=skole,dc=skolelinux,dc=no add ou=auto.nas-server,ou=automount,dc=skole,dc=skolelinux,dc=no objectClass: top objectClass: automountMap ou: auto.nas-server add cn=/,ou=auto.nas-server,ou=automount,dc=skole,dc=skolelinux,dc=no objectClass: automount cn: / automountInformation: -fstype=nfs,tcp,rsize=32768,wsize=32768,rw,intr,hard,nodev,nosuid,noatime nas-server.intern:/&
tjener.intern はマウントのループを避けるため自動マウントを利用しないので、tjener.intern:/etc/fstab に関連する項目を追加します:
mkdirでマウントするディレクトリを作成し、/etc/fstab を適切に編集したらmount -aを実行して新しいリソースをマウントします。
これでユーザーは nas-server.intern 上のファイルに /tjener/nas-server/storage/ ディレクトリから任意のアプリケーションでアクセスが可能になります。ワークステーションか LTSP シンクライアントか LTSP サーバーかは不問です。
There are several ways to restrict SSH login, some are listed here.
LTSP クライアントを使っていない場合の簡単な方法は新しいグループ (例えば
sshusers) を作成してそのマシンの /etc/ssh/sshd_config
ファイルに 1 行追記します。sshusers
グループのメンバーだけが任意のマシンからの SSH 接続を許可されます。
GOsa で管理する方法はかなり簡単です:
Base レベル (既に
gosa-admins等、他のシステム管理関連のグループがあるはずです) にグループsshusersを作成します。新しいグループ
sshusersにユーザーを追加します。/etc/ssh/sshd_config に
AllowGroups sshusersを追加します。service ssh restartを実行します。
The default LTSP diskless client setup doesn't use SSH connections. Update the SquashFS image on the related LTSP server after the SSH setup has been changed is enough.
X2Go thin clients are using SSH connections to the related LTSP server. So a different approach using PAM is needed.
LTSP サーバの /etc/pam.d/sshd ファイルで pam_access.so を有効化します。
(例では) ユーザー alice、jane、bob、john はどこからでも、他のユーザーはすべて内部ネットワークからの接続だけを許すように /etc/security/access.conf を設定します:
+ : alice jane bob john : ALL + : ALL : 10.0.0.0/8 192.168.0.0/24 192.168.1.0/24 - : ALL : ALL #
If only dedicated LTSP servers are used, the 10.0.0.0/8 network could be dropped to disable internal SSH login access. Note: someone connecting his box to the dedicated LTSP client network(s) will gain SSH access to the LTSP server(s) as well.
If X2Go clients were attached to the backbone network 10.0.0.0/8, things would be even more complicated and maybe only a sophisticated DHCP setup (in LDAP) checking the vendor-class-identifier together with appropriate PAM configuration would allow to disable internal SSH login.
To support multiple languages these steps need to be done:
dpkg-reconfigure localesを root で実行し、必要な言語を選びます (UTF-8 のものにしてください).以下のコマンドを root で実行して必要なパッケージをインストールします:
apt update /usr/share/debian-edu-config/tools/install-task-pkgs /usr/share/debian-edu-config/tools/improve-desktop-l10n
Users will then be able to choose the language via the LightDM display
manager before logging in; this applies to Xfce, LXDE and LXQt. GNOME and
KDE both come with their own internal region and language configuration
tools, use these. MATE uses the Arctica greeter on top of LightDM whithout a
language chooser. Run apt purge
arctica-greeter to get the stock LightDM greeter.
ほとんどの商用 DVD の再生に libdvdcss が必要です。法的な理由からこれは Debian (Edu)
には収録されていません。これの利用を法的に許されている場合は libdvd-pkg
Debian パッケージを利用できます。/etc/apt/sources.list で
contrib が有効になっていることを確認してください。
apt update apt install libdvd-pkg
debconf の質問に答え、dpkg-reconfigure libdvd-pkg
を実行します。
シンクライアントとディスクレスワークステーションの両方を指す用語として LTSP クライアント を用います。
Starting with Bullseye, LTSP is quite different from the previous
versions. This concerns both setup and maintenance.
As one main difference, the SquashFS image for diskless workstations is now generated from the LTSP server file system by default. This happens on a combined server at first boot, taking some time.
Thin clients are no longer part of LTSP. Debian Edu uses X2Go to still support thin client usage.
In case of a separate or an additional LTSP server, required information for setting up the LTSP client environment isn't complete at installation time. Setup can be done once the system has been added with GOsa².
LTSP の一般的な情報は LTSP ホームページ
をご覧ください。LTSP server プロファイルを含むシステムに関しては
man ltsp で詳細をご確認ください。
Please note that the ltsp tool from LTSP has to be used
carefully. For example, ltsp image / would
fail to generate the SquashFS image in case of Debian machines (these have a
separate /boot partition by default), ltsp
ipxe would fail to generate the iPXE menu correctly (due to
Debian Edu's thin client support), and ltsp
initrd would mess up LTSP client boot completely.
The debian-edu-ltsp-install tool is a
wrapper script for ltsp image,
ltsp initrd and ltsp
ipxe. It is used to setup and configure diskless
workstation and thin client support (both 64-Bit and 32-Bit PC). See
man debian-edu-ltsp-install or the script
content to see how it works. All configuration is contained in the script
itself (HERE documents) to facilitate site specific adjustments.
Examples how to use the wrapper script debian-edu-ltsp-install:
debian-edu-ltsp-install --diskless_workstation yesupdates the diskless workstation SquashFS image (server filesystem).debian-edu-ltsp-install --diskless_workstation yes --thin_type barecreates diskless workstation and 64-bit thin client support.debian-edu-ltsp-install --arch i386 --thin_type barecreates additional 32-bit thin client support (chroot and SquashFS image).
bare (最小限のシンクライアント) オプション部位は display や desktop も指定できます。display はシャットダウンボタンを、desktop は Firefox ESR をキオスクモードでクライアント自体に実行させます (その分メモリと CPU が必要になりますが、サーバーの負担は減ります)。
The debian-edu-ltsp-ipxe tool is a
wrapper script for ltsp ipxe. It makes sure
that the /srv/tftp/ltsp/ltsp.ipxe file is Debian Edu specific. The command
needs to be run after iPXE menu related items (like menu timeout or default
boot settings) in the /etc/ltsp/ltsp.conf [server] section have been
modified.
The debian-edu-ltsp-initrd tool is a
wrapper script for ltsp initrd. It makes
sure that a use case specific initrd (/srv/tftp/ltsp/ltsp.img) is generated
and then moved to the use case related directory. The command needs to be
run after the /etc/ltsp/ltsp.conf [clients] section has been modified.
The debian-edu-ltsp-chroot tool is a replacement for the ltsp-chroot tool shipped with LTSP5. It is used to execute commands in a specified LTSP chroot (like e.g. install, upgrade and remove packages).
ディスクレスワークステーション
ディスクレスワークステーションはローカルで全てのソフトを動作させます。クライアントとして LTSP サーバーから自身のハードドライブなしで起動します。ソフトウェアの管理保守は LTSP サーバー上ですが、その実行はディスクレスワークステーション上です。ホームディレクトリとシステムの設定はサーバー上に保存します。ディスクレスワークステーションは古くてもパワフルなハードウェア資源をシンクライアント並の低い保守コストで運用するのに適しています。
ワークステーションとは異なり、ディスクレスワークステーションは GOsa² で追加する必要がありません。
シンクライアント
A thin client setup enables an ordinary PC to function as an (X-)terminal, where all software runs on the LTSP server. This means that this machine boots via PXE without using a local client hard drive and that the LTSP server needs to be a powerful machine.
Debian Edu はかなり古いハードウェアでのシンクライアントもサポートしています。
Since Thin clients use X2Go, users should disable compositing to avoid
display artefacts. In the default case (Xfce desktop environment): Settings
-> Window Manager Tweaks -> Compositor.
LTSP クライアントのファームウェア
クライアントのネットワークカードが non-free ファームウェアを必要とする場合は LTSP クライアントのブートは失敗します。マシンのネットワークブートに関わる問題の解決に PXE インストールを利用できます。XXX.bin ファイルが欠けていると Debian インストーラが訴えている場合、LTSP サーバーの initrd に non-free ファームウェアを追加することになります。
Proceed like this on the LTSP server:
First get information about firmware packages, run:
apt update && apt search ^firmware-
Decide which package has to be installed for the network interface(s), most probably this will be firmware-linux, run:
apt -y -q install firmware-linux
Update the SquashFS image for diskless workstations, run:
debian-edu-ltsp-install --diskless_workstation
yes
In case X2Go thin clients are used, run:
/usr/share/debian-edu-config/tools/ltsp-addfirmware -h
and proceed according to the usage information.
Then update the SquashFS image; e.g. for the /srv/ltsp/x2go-bare-amd64 chroot, run:
ltsp image x2go-bare-amd64
各 LTSP サーバーにはイーサネットインターフェイスが 2 つあります。1 つ目は中心側の 10.0.0.0/8 サブネット (主サーバーとつながっているネットワーク) で、もう 1 つは別のローカルサブネット (各 LTSP サーバーごとに分離されているサブネット) を構成します。
いずれからも ディスクレスワークステーション と シンクライアント を iPXE メニューで選択できます。5 秒のタイムアウト後にはディスクレスワークステーションとして起動します。
The default iPXE boot menu item and it's default timeout can both be
configured in /etc/ltsp/ltsp.conf. A
timeout value of -1 is used to hide the menu. Run
debian-edu-ltsp-ipxe for the changes to
take effect.
「LTSP サーバー」のプロファイルを使ってインストールしたマシンでは、デフォルトの LTSP クライアントネットワークは 192.168.0.0/24
になっています。LTSP クライアントを多数抱えている、あるいは異なる LTSP サーバーで i386 と amd64 の chroot
環境を両方とも提供する場合、もう 1 つの設定済みネットワーク 192.168.1.0/24 を同様に使うこともできます。ファイル
/etc/network/interfaces を編集して eth1
設定を適切に調整します。DNS や DHCP の設定を調べるには ldapvi
その他任意の LDAP エディタを利用できます。
To create chroot and SquashFS image, run:
debian-edu-ltsp-install --arch i386 --thin_type
bare
See man debian-edu-ltsp-install for details
about thin client types.
設定オプションについては man ltsp.conf
をご覧ください。オンラインでも参照できます: https://ltsp.org/man/ltsp.conf/
Add configuration items to the /etc/ltsp/ltsp.conf [clients] section. For the changes to take effect, run:
debian-edu-ltsp-initrd
LTSP シンクライアントはネットワークオーディオを利用してサーバーからクライアントにオーディオを配信します。
LTSP ディスクレスワークステーションは音声をローカルで扱います。
When users insert a USB drive or DVD / CD-ROM into a Diskless Workstation, a corresponding icon appears on the desktop, allowing access to the content as on a workstation.
When users insert a USB drive into an X2Go thin client of type bare (default combined server installation), the media is mounted as soon as the existing folder icon on the Xfce desktop is double-clicked. Depending on the media content it might take some time until the content shows up in the file manager.
PXE は Preboot eXecution Environment の意味で Debian Edu は iPXE 実装を使って LTSP 統合を行っています。
システムインストールに関する iPXE メニュー項目は
debian-edu-pxeinstall が生成します。いくつかの項目は
/etc/debian-edu/pxeinstall.conf
ファイルで上書きできます。
The PXE installation will inherit the language, keyboard layout and mirror
settings from the settings used when installing the main server, and the
other questions will be asked during installation (profile, popcon
participation, partitioning and root password). To avoid these questions,
the file
/etc/debian-edu/www/debian-edu-install.dat
can be modified to provide preselected answers to debconf values. Some
examples of available debconf values are already commented in
/etc/debian-edu/www/debian-edu-install.dat.
Your changes will be lost as soon as
debian-edu-pxeinstall is used to recreate
the PXE-installation environment. To append debconf values to
/etc/debian-edu/www/debian-edu-install.dat
during recreation with
debian-edu-pxeinstall, add the file
/etc/debian-edu/www/debian-edu-install.dat.local
with your additional debconf values.
PXE インストールの変更についての詳しい情報は インストール の章にあります。
独自リポジトリを追加するには以下のような行を
/etc/debian-edu/www/debian-edu-install.dat.local
に追加します:
d-i     apt-setup/local1/repository string      http://example.org/debian stable main contrib non-free
d-i     apt-setup/local1/comment string         Example Software Repository
d-i     apt-setup/local1/source boolean         true
d-i     apt-setup/local1/key    string          http://example.org/key.asc
それから /usr/sbin/debian-edu-pxeinstall
を一度実行します。
debian-edu-config パッケージには 10.0.0.0/8
から別のネットワークへの変更を支援するツールが付属しています。/usr/share/debian-edu-config/tools/subnet-change
をご覧になってください。これは主サーバーインストール直後に使うもので、サブネット変更目的に更新する必要がある LDAP やその他のファイルを調整します。
既に Debian Edu が利用しているサブネットへの変更はできません。192.168.0.0/24 と 192.168.1.0/24 は既に
LTSP
クライアントネットワーク用に使用しています。この範囲のネットワークに変更した場合は、設定ファイルを手作業で編集して重なった項目を削除する必要があります。
There is no easy way to change the DNS domain name. Changing it would require changes to both the LDAP structure and several files in the main server file system. There is also no easy way to change the host and DNS name of the main server (tjener.intern). To do so would also require changes to LDAP and files in the main server and client file system. In both cases the Kerberos setup would have to be changed, too.
「LTSPサーバー」プロファイルや複合サーバープロファイルは、xrdp と x2goserver パッケージもインストールします。
Xrdp パッケージは RDP (Remote Desktop Protocol) を利用して、リモートクライアントにグラフィカルなログイン画面を提供します。Microsoft Windows のユーザーは追加ソフトウェアをインストールすることなく xrdp の動作している LTSP サーバーに接続できます。 Windows マシンから Remote Desktop Connection を起動して接続するだけです。
さらに、xrdp は VNC サーバやその他の RDP サーバに接続できます。
Xrdp comes without sound support; to compile (or re-compile) the required modules this script could be used. Please note: The caller needs to be root or a member of the sudo group. Also, /etc/apt/sources.list must contain a valid deb-src line.
 #!/bin/bash
 set -e
  if [[ $UID -ne 0 ]] ; then
     if ! groups | egrep -q sudo ; then
         echo "ERROR: You need to be root or a sudo group member."
         exit 1
     fi
 fi
 if ! egrep -q  ^deb-src /etc/apt/sources.list ; then
     echo "ERROR: Make sure /etc/apt/sources.list contains a deb-src line."
     exit 1
 fi
 TMP=$(mktemp -d)
 PULSE_UPSTREAM_VERSION="$(dpkg-query -W -f='${source:Upstream-Version}' pulseaudio)"
 XRDP_UPSTREAM_VERSION="$(dpkg-query -W -f='${source:Upstream-Version}' xrdp)"
 sudo apt -q update
 sudo apt -q install dpkg-dev
 cd $TMP
 apt -q source pulseaudio xrdp
 sudo apt -q build-dep pulseaudio xrdp
 cd pulseaudio-$PULSE_UPSTREAM_VERSION/
 ./configure
 cd $TMP/xrdp-$XRDP_UPSTREAM_VERSION/sesman/chansrv/pulse/
 sed -i 's/^PULSE/#PULSE/' Makefile
 sed -i "/#PULSE_DIR/a \
 PULSE_DIR = $TMP/pulseaudio-$PULSE_UPSTREAM_VERSION" Makefile
 make
 sudo cp *.so /usr/lib/pulse-$PULSE_UPSTREAM_VERSION/modules/
 sudo chmod 644 /usr/lib/pulse-$PULSE_UPSTREAM_VERSION/modules/module-xrdp*
sudo service xrdp restartX2Go は LTSP サーバーへの GUI デスクトップアクセスソフトです。回線容量の大小は問いません。接続元としては Linux が動作している PC、Windows、macOS が使えます。ただしクライアント側でソフトの追加が必要になりますので、X2Go wiki をご覧になってください。
注意点として、X2Go を利用する場合には LTSP サーバーから killer
パッケージを削除すべきです。Debian バグ報告サイトで 890517 をご覧になってください。
freerdp-x11はデフォルトでインストールされ、RDP と VNC の機能を持っています。RDP - Windows ターミナルサーバにアクセスする最も簡単な方法です。代替クライアントのパッケージには
rdesktopがあります。VNC (Virtual Network Computer、仮想ネットワークコンピュータ) クライアントはリモートから Skolelinux にアクセスする手段を提供します。代替クライアントのパッケージには
xvncviewerがあります。
x2goclientは X2Go システム用の GUI クライアントです (デフォルトではインストールされません)。 既存のセッションへの接続と新しいセッションの接続に使えます。
The freeRADIUS server could be used to provide secure
network connections. For this to work, install the
freeradius and winbind packages on
the main server and run
/usr/share/debian-edu-config/tools/setup-freeradius-server
to generate a basic, site specific configuration. This way, both
EAP-TTLS/PAP and PEAP-MSCHAPV2 methods are enabled. All configuration is
contained in the script itself to facilitate site specific adjustments. See
the freeRADIUS homepage for
details.
加えて次の項目が要設定となります。
アクセスポイントでの 共通鍵 (shared secret) 接続の有効/無効 (/etc/freeradius/3.0/clients.conf).
LDAP グループを使った無線アクセスの許可/拒否 (/etc/freeradius/3.0/users).
アクセスポイントを専用のグループで管理 (/etc/freeradius/3.0/huntgroups)
End user devices need to be configured properly, these devices need to be
PIN protected for the use of EAP (802.1x) methods. Users should also be
educated to install the freeradius CA certificate on their devices to be
sure to connect to the right server. This way their password can't be
catched in case of a malicious server. The site specific certificate is
available on the internal network.
https://www.intern/freeradius-ca.pem (Linux 端末用)
https://www.intern/freeradius-ca.crt (Linux や Android)
https://www.intern/freeradius-ca.der (macOS や iOS や iPadOS や Windows 用)
機器が多種多様であるため、こういったユーザー端末での設定は困難を伴います。Windows 向けにはインストールスクリプト、Apple のデバイス向けには mobileconfig ファイルが生成可能で、共に freeRADIUS CA 証明書を統合できますが、個別の OS でのツール利用が必要になります。
To have an ability to use pGina (or any else 3rd party auth-service-application) you should have a special user account used in search inside of LDAP.
Add a special user, eg pguser with password pwd.777, on https://www/gosa website.
Download and install pGina 3.9.9.12 as usual software. Take an attention that LDAP plugin persists in pGina plugin folder:
C:\Program Files\pGina.fork\Plugins\pGina.Plugin.Ldap.dll
Considering to Debian Edu settings the connection to LDAP uses SSL by port 636.
So necessary settings in a pGina LDAP plugin are below
(these are stored in HKEY_LOCAL_MACHINE\SOFTWARE\pGina3.fork\Plugins\0f52390b-c781-43ae-bd62-553c77fa4cf7).
LDAP Host(s): 10.0.2.2 (or any else with "space" as a separator)
LDAP Port: 636 (for SSL connection)
Timeout: 10
Use SSL: YES (tick checkbox)
Start TLS: NO (don't tick checkbox)
Validate Server Certificate: NO (don't tick checkbox)
Search DN: uid=pguser,ou=people,ou=Students,dc=skole,dc=skolelinux,dc=no
("pguser" is a user to authenticate in LDAP to search users in a login session)
Search Password: pwd.777 (this is the "pguser" password)
Bind Tab:
Allow Empty Passwords: NO
Search for DN: YES (tick checkbox)
Search Filter: (&(uid=%u)(objectClass=person))
Default: Allow
Deny when LDAP authentication fails: YES (tick checkbox)
Allow when server is unreachable: NO (don't tick checkbox, optional)
LDAP: Authentication [v], Authorization [v], Gateway[v], Change Password [_]
Local Machine: Authentication [v], Gateway [v] (tick only two checkboxes)
Authentication: LDAP, Local Machine
Gateway: LDAP, Local Machine
Sources:
Samba は スタンドアロンサーバー (standalone server) として SMB2/SMB3
対応になりユーザー共有機能 (usershare) が有効になっています。
/etc/samba/smb-debian-edu.conf
を主サーバーでご確認ください。管理者でないユーザーでも share モードが利用できます。
設定にはまず /usr/share/debian-edu-config/smb.conf.edu-site ファイルを /etc/samba ディレクトリにコピーしてください。smb.conf.edu-site 内の設定項目が smb-debian-edu.conf の内容を上書きします。
注意:
デフォルトではホームディレクトリは読み取り専用です。これを変更する場合は /etc/samba/smb.conf.edu-site で設定してください。
Samba パスワードは
smbpasswdで保存管理され GOsa² でパスワード変更時に更新されます。一時的にユーザーの Samba アカウントを停止する場合は
smbpasswd -d <username>を、再開するにはsmbpasswd -e <username>を実行してください。主サーバーで
chown root:teachers
/var/lib/samba/usershares
とすれば 'students' でのユーザー共有機能 (usershare) を無効にできます。
Connections to a user's home directory and to additional site specific shares (if configured) are possible for devices running Linux, Android, macOS, iOS, iPadOS, Chrome OS or Windows. For example, Android based devices require a file manager with SMB2/SMB3 support, also known as LAN access. X-plore or Total Commander with LAN plugin might be a good choice.
ホームディレクトリへのアクセスには \\tjener\<username>
か smb://tjener/<username> を用います。
この節で説明している Debian パッケージは全て (root で) apt install
<パッケージ> を実行することでインストールできます。
stable/education-development は無数のプログラミングソフトをインストールするためのメタパッケージです。ディスク空き容量として 2 GiB は必要になることを前提としてください。詳細については (あるいは一部のパッケージのみをインストールしたい場合などは) Debian Edu Development packages をご覧ください。
警告:
貴校の法務管轄においてコンピューターユーザーの活動を監視したり制限したりすることに関するので、必ず法務の確認をしてください。
生徒の監視に Epoptes や Veyon を使用している学校もあるとのことです。Epoptes Homepage と Veyon Homepage をご参照ください。[訳注: 日本国内法規などを確認してはおりません。専門家にご確認ください。]
Squidguard や e2guardian でインターネットアクセス制限は (技術的には) 可能です。[訳注: 日本国内法規などを確認してはおりません。専門家にご確認ください。]
ユーザーパスワードの変更には GOsa² を使ってください。ブラウザを使って
https://www/gosa/ にアクセスします。
Using GOsa² to change the password ensures that passwords for Kerberos (krbPrincipalKey), LDAP (userPassword) and Samba are the same.
PAM や GDM ログインプロンプトでのパスワード変更もできますが、その場合 Kerberos パスワードだけが更新され、Samba と GOsa² (LDAP) のパスワードは以前のままです。そのため、ログインプロンプトでパスワードを変更した場合は GOsa² での変更も必ず行うようにしてください。
ユーザーは学校内ネットワーク内では全員が電子メールの送受信ができます。セキュリティ確保のため TLS
で接続されます。そのためのデジタル証明証も提供されます。学内ネットワークの外へも電子メールを許可する場合は、管理者は
exim4
メールサーバーを適切な設定にする必要があります。その際はdpkg-reconfigure
exim4-config の実行からまず行ってください。
Thunderbird を使いたいユーザーは以下のように設定する必要があります。ユーザー名が jdoe のユーザーの内部メールアドレスは jdoe@postoffice.intern となります。
Most of the time, the developer mailing list is our main medium for communication, though we also have #debian-edu on irc.debian.org and even, sometimes, real gatherings, where we meet each other in person.
Debian Eduの開発状況などを知るには debian-edu-commits メーリングリスト に参加していただくのがよいでしょう。
Debian Edu uses the Debian Bug Tracking System (BTS). View existing bug reports and feature requests or create new ones. Please report all bugs against the package debian-edu-config. Take a look at How To Report Bugs for more information on bug reporting in Debian Edu.
この文書には支援が必要です! 最も重要なのはまだ完成していないということです: 読んでみると文中に FIXME がいくつもあることがわかるでしょう。説明する必要があるのは何なのか (少しでも) わかってしまったなら、知識の共有を検討してください。
The source of the text is a wiki and can be edited with a simple webbrowser. Just go to https://wiki.debian.org/DebianEdu/Documentation/Bookworm/ and you can contribute easily. Note: a user account is needed to edit the pages; you may need to create a wiki user account first.
ユーザー支援と貢献の別の手段としてはソフトウェア及び文書の翻訳が挙がります。翻訳についての情報はこの文書の 翻訳の章 にあります。翻訳へのご支援をご検討頂ければ幸いです。
https://lists.debian.org/debian-edu - サポートメーリングリスト
#debian-edu on irc.debian.org - IRC channel, mostly development related; do not expect real time support even though it frequently happens.
https://lists.debian.org/debian-edu-german - support mailing list
irc.debian.org の #skolelinux.de - ドイツ語ユーザーサポート用 IRC チャネル
https://lists.debian.org/debian-edu-french - support mailing list
Lists of companies providing professional support are available from https://wiki.debian.org/DebianEdu/Help/ProfessionalHelp.
New version of Debian Installer from Debian bookworm, see its installation manual for more details,
including information on
non-free-firmware, which is a new section in addition to the well knownmain,contribandnon-freesections.
New artwork based on the Emerald theme, the default artwork for Debian 12 bookworm.
Everything which is new in Debian 12 bookworm, eg:
Linux kernel 6.1
Desktop environments KDE Plasma 5.27, GNOME 43, Xfce 4.18, LXDE 11, MATE 1.26
LibreOffice 7.4
GOsa² 2.8
Educational toolbox GCompris 3.1
Music creator Rosegarden 22.12
LTSP 23.01
Debian Bookworm includes more than 64000 packages available for installation.
More information about Debian 12 Bookworm is provided in the release notes and the installation manual.
インストーラーではプロファイル選択までは 29 カ国語の翻訳があり、22 カ国語で完全に翻訳されています。
The Debian Edu Bookworm Manual is translated to Simplified Chinese, Danish, Dutch, French, German, Italian, Japanese, Norwegian (Bokmål), Brazilian Portuguese, European Portuguese, Spanish, Romanian and Ukrainian.
This document is written and copyrighted by Holger Levsen (2007-2024), Petter Reinholdtsen (2001, 2002, 2003, 2004, 2007, 2008, 2009, 2010, 2012, 2014), Daniel Heß (2007), Patrick Winnertz (2007), Knut Yrvin (2007), Ralf Gesellensetter (2007), Ronny Aasen (2007), Morten Werner Forsbring (2007), Bjarne Nielsen (2007, 2008), Nigel Barker (2007), José L. Redrejo Rodríguez (2007), John Bildoy (2007), Joakim Seeberg (2008), Jürgen Leibner (2009, 2010, 2011, 2012, 2014), Oded Naveh (2009), Philipp Hübner (2009, 2010), Andreas Mundt (2010), Olivier Vitrat (2010, 2012), Vagrant Cascadian (2010), Mike Gabriel (2011), Justin B Rye (2012), David Prévot (2012), Wolfgang Schweer (2012-2024), Bernhard Hammes (2012), Joe Hansen (2015), Serhii Horichenko (2022) and Guido Berhörster (2023) and is released under the GPL2 or any later version. Enjoy!
追加する内容は自分で書いたものだけにしてください。同一条件の下でリリースする必要があります! それから自分の名前を追加し、「v2 以降の任意のバージョンの GPL」ライセンスの下でリリースしてください。
There is an online overview of packaged translations, updated frequently.
As in many free software projects, translations of this document are kept in
PO files. More information about the process can be found in
/usr/share/doc/debian-edu-doc/README.debian-edu-bookworm-manual-translations.
Most language teams have decided to translate via Weblate. See https://hosted.weblate.org/projects/debian-edu-documentation/bookworm-manual/ for more information.
どんな問題でも報告して頂ければ幸いです。
Copyright (C) 2007-2021 Holger Levsen < holger@layer-acht.org > and others, see the Copyright for the full list of copyright owners.
This program is free software; you can redistribute it and/or modify it under the terms of the GNU General Public License as published by the Free Software Foundation; either version 2 of the License, or (at your option) any later version.
This program is distributed in the hope that it will be useful, but WITHOUT ANY WARRANTY; without even the implied warranty of MERCHANTABILITY or FITNESS FOR A PARTICULAR PURPOSE. See the GNU General Public License for more details.
Version 2, June 1991
Copyright (C) 1989, 1991 Free Software Foundation, Inc. 51 Franklin Street, Fifth Floor, Boston, MA 02110-1301, USA. Everyone is permitted to copy and distribute verbatim copies of this license document, but changing it is not allowed.
0. This License applies to any program or other work which contains a notice placed by the copyright holder saying it may be distributed under the terms of this General Public License. The "Program", below, refers to any such program or work, and a "work based on the Program" means either the Program or any derivative work under copyright law: that is to say, a work containing the Program or a portion of it, either verbatim or with modifications and/or translated into another language. (Hereinafter, translation is included without limitation in the term "modification".) Each licensee is addressed as "you".
Activities other than copying, distribution and modification are not covered by this License; they are outside its scope. The act of running the Program is not restricted, and the output from the Program is covered only if its contents constitute a work based on the Program (independent of having been made by running the Program). Whether that is true depends on what the Program does.
1. You may copy and distribute verbatim copies of the Program's source code as you receive it, in any medium, provided that you conspicuously and appropriately publish on each copy an appropriate copyright notice and disclaimer of warranty; keep intact all the notices that refer to this License and to the absence of any warranty; and give any other recipients of the Program a copy of this License along with the Program.
You may charge a fee for the physical act of transferring a copy, and you may at your option offer warranty protection in exchange for a fee.
2. You may modify your copy or copies of the Program or any portion of it, thus forming a work based on the Program, and copy and distribute such modifications or work under the terms of Section 1 above, provided that you also meet all of these conditions:
a) You must cause the modified files to carry prominent notices stating that you changed the files and the date of any change.
b) You must cause any work that you distribute or publish, that in whole or in part contains or is derived from the Program or any part thereof, to be licensed as a whole at no charge to all third parties under the terms of this License.
c) If the modified program normally reads commands interactively when run, you must cause it, when started running for such interactive use in the most ordinary way, to print or display an announcement including an appropriate copyright notice and a notice that there is no warranty (or else, saying that you provide a warranty) and that users may redistribute the program under these conditions, and telling the user how to view a copy of this License. (Exception: if the Program itself is interactive but does not normally print such an announcement, your work based on the Program is not required to print an announcement.)
These requirements apply to the modified work as a whole. If identifiable sections of that work are not derived from the Program, and can be reasonably considered independent and separate works in themselves, then this License, and its terms, do not apply to those sections when you distribute them as separate works. But when you distribute the same sections as part of a whole which is a work based on the Program, the distribution of the whole must be on the terms of this License, whose permissions for other licensees extend to the entire whole, and thus to each and every part regardless of who wrote it.
Thus, it is not the intent of this section to claim rights or contest your rights to work written entirely by you; rather, the intent is to exercise the right to control the distribution of derivative or collective works based on the Program.
In addition, mere aggregation of another work not based on the Program with the Program (or with a work based on the Program) on a volume of a storage or distribution medium does not bring the other work under the scope of this License.
3. You may copy and distribute the Program (or a work based on it, under Section 2) in object code or executable form under the terms of Sections 1 and 2 above provided that you also do one of the following:
a) Accompany it with the complete corresponding machine-readable source code, which must be distributed under the terms of Sections 1 and 2 above on a medium customarily used for software interchange; or,
b) Accompany it with a written offer, valid for at least three years, to give any third party, for a charge no more than your cost of physically performing source distribution, a complete machine-readable copy of the corresponding source code, to be distributed under the terms of Sections 1 and 2 above on a medium customarily used for software interchange; or,
c) Accompany it with the information you received as to the offer to distribute corresponding source code. (This alternative is allowed only for noncommercial distribution and only if you received the program in object code or executable form with such an offer, in accord with Subsection b above.)
The source code for a work means the preferred form of the work for making modifications to it. For an executable work, complete source code means all the source code for all modules it contains, plus any associated interface definition files, plus the scripts used to control compilation and installation of the executable. However, as a special exception, the source code distributed need not include anything that is normally distributed (in either source or binary form) with the major components (compiler, kernel, and so on) of the operating system on which the executable runs, unless that component itself accompanies the executable.
If distribution of executable or object code is made by offering access to copy from a designated place, then offering equivalent access to copy the source code from the same place counts as distribution of the source code, even though third parties are not compelled to copy the source along with the object code.
4. You may not copy, modify, sublicense, or distribute the Program except as expressly provided under this License. Any attempt otherwise to copy, modify, sublicense or distribute the Program is void, and will automatically terminate your rights under this License. However, parties who have received copies, or rights, from you under this License will not have their licenses terminated so long as such parties remain in full compliance.
5. You are not required to accept this License, since you have not signed it. However, nothing else grants you permission to modify or distribute the Program or its derivative works. These actions are prohibited by law if you do not accept this License. Therefore, by modifying or distributing the Program (or any work based on the Program), you indicate your acceptance of this License to do so, and all its terms and conditions for copying, distributing or modifying the Program or works based on it.
6. Each time you redistribute the Program (or any work based on the Program), the recipient automatically receives a license from the original licensor to copy, distribute or modify the Program subject to these terms and conditions. You may not impose any further restrictions on the recipients' exercise of the rights granted herein. You are not responsible for enforcing compliance by third parties to this License.
7. If, as a consequence of a court judgment or allegation of patent infringement or for any other reason (not limited to patent issues), conditions are imposed on you (whether by court order, agreement or otherwise) that contradict the conditions of this License, they do not excuse you from the conditions of this License. If you cannot distribute so as to satisfy simultaneously your obligations under this License and any other pertinent obligations, then as a consequence you may not distribute the Program at all. For example, if a patent license would not permit royalty-free redistribution of the Program by all those who receive copies directly or indirectly through you, then the only way you could satisfy both it and this License would be to refrain entirely from distribution of the Program.
If any portion of this section is held invalid or unenforceable under any particular circumstance, the balance of the section is intended to apply and the section as a whole is intended to apply in other circumstances.
It is not the purpose of this section to induce you to infringe any patents or other property right claims or to contest validity of any such claims; this section has the sole purpose of protecting the integrity of the free software distribution system, which is implemented by public license practices. Many people have made generous contributions to the wide range of software distributed through that system in reliance on consistent application of that system; it is up to the author/donor to decide if he or she is willing to distribute software through any other system and a licensee cannot impose that choice.
This section is intended to make thoroughly clear what is believed to be a consequence of the rest of this License.
8. If the distribution and/or use of the Program is restricted in certain countries either by patents or by copyrighted interfaces, the original copyright holder who places the Program under this License may add an explicit geographical distribution limitation excluding those countries, so that distribution is permitted only in or among countries not thus excluded. In such case, this License incorporates the limitation as if written in the body of this License.
9. The Free Software Foundation may publish revised and/or new versions of the General Public License from time to time. Such new versions will be similar in spirit to the present version, but may differ in detail to address new problems or concerns.
Each version is given a distinguishing version number. If the Program specifies a version number of this License which applies to it and "any later version", you have the option of following the terms and conditions either of that version or of any later version published by the Free Software Foundation. If the Program does not specify a version number of this License, you may choose any version ever published by the Free Software Foundation.
10. If you wish to incorporate parts of the Program into other free programs whose distribution conditions are different, write to the author to ask for permission. For software which is copyrighted by the Free Software Foundation, write to the Free Software Foundation; we sometimes make exceptions for this. Our decision will be guided by the two goals of preserving the free status of all derivatives of our free software and of promoting the sharing and reuse of software generally.
NO WARRANTY
11. BECAUSE THE PROGRAM IS LICENSED FREE OF CHARGE, THERE IS NO WARRANTY FOR THE PROGRAM, TO THE EXTENT PERMITTED BY APPLICABLE LAW. EXCEPT WHEN OTHERWISE STATED IN WRITING THE COPYRIGHT HOLDERS AND/OR OTHER PARTIES PROVIDE THE PROGRAM "AS IS" WITHOUT WARRANTY OF ANY KIND, EITHER EXPRESSED OR IMPLIED, INCLUDING, BUT NOT LIMITED TO, THE IMPLIED WARRANTIES OF MERCHANTABILITY AND FITNESS FOR A PARTICULAR PURPOSE. THE ENTIRE RISK AS TO THE QUALITY AND PERFORMANCE OF THE PROGRAM IS WITH YOU. SHOULD THE PROGRAM PROVE DEFECTIVE, YOU ASSUME THE COST OF ALL NECESSARY SERVICING, REPAIR OR CORRECTION.
12. IN NO EVENT UNLESS REQUIRED BY APPLICABLE LAW OR AGREED TO IN WRITING WILL ANY COPYRIGHT HOLDER, OR ANY OTHER PARTY WHO MAY MODIFY AND/OR REDISTRIBUTE THE PROGRAM AS PERMITTED ABOVE, BE LIABLE TO YOU FOR DAMAGES, INCLUDING ANY GENERAL, SPECIAL, INCIDENTAL OR CONSEQUENTIAL DAMAGES ARISING OUT OF THE USE OR INABILITY TO USE THE PROGRAM (INCLUDING BUT NOT LIMITED TO LOSS OF DATA OR DATA BEING RENDERED INACCURATE OR LOSSES SUSTAINED BY YOU OR THIRD PARTIES OR A FAILURE OF THE PROGRAM TO OPERATE WITH ANY OTHER PROGRAMS), EVEN IF SUCH HOLDER OR OTHER PARTY HAS BEEN ADVISED OF THE POSSIBILITY OF SUCH DAMAGES.
END OF TERMS AND CONDITIONS
New version of Debian Installer from Debian bullseye, see its installation manual for more details.
New artwork based on the Homeworld theme, the default artwork for Debian 11 (bullseye).
Debian インストーラーは LTSP chroot をサポートしなくなりました。複合サーバーのインストール ('Main server' + 'LTSP server' プロファイル) においてはシンクライアント対応 (X2Go に変更しています) が最終段階で生じます。ディスクレスワークステーション用の SquashFS イメージの生成 (サーバーのファイルシステムを元にするようになりました) は初回起動時に実行されます。
分離 LTSP サーバーでは両方とも学校ネットワーク内での初回起動後、主サーバーから必要な情報が揃ってから実行されます。
Debian 11 bullseye での更新:
Linux カーネル 5.10
デスクトップ環境: KDE Plasma 5.20、GNOME 3.38、Xfce 4.16、LXDE 11、MATE 1.24
LibreOffice 7.0
教育用ツール集 GCompris 1.0
音楽作成ツール Rosegarden 20.12
LTSP 21.01
Debian Bullseye では 59,000 以上ものパッケージが利用できます。
More information about Debian 11 bullseye is provided in the release notes and the installation manual.
インストーラーではプロファイル選択までは 29 カ国語の翻訳があり、22 カ国語で完全に翻訳されています。
Debian Edu Bullseye のマニュアル はオランダ語、フランス語、ドイツ語、イタリア語、日本語、ノルウェー語 (ボークモール) 、ポルトガル語、簡体字中国語に翻訳されています。
デンマーク語とスペイン語の部分的な翻訳版もあります。
Improved TLS/SSL support on the internal network. On clients, the root certificate for the Debian Edu-CA is located inside the certificate bundle for the whole system.
New LTSP, re-written from scratch, dropping thin client support. Thin clients are now supported using X2Go.
Netboot is provided using iPXE instead of PXELINUX to be compliant with LTSP.
The /srv/tftp directory is now used as netboot base instead of /var/lib/tftpboot.
主サーバー か LTSP サーバー プロファイルを含むシステムのリリースアップグレード時には
debian-edu-pxeinstallを実行して PXE 環境を更新する必要があります。DuckDuckGo is used as default search provider for both Firefox ESR and Chromium.
Chromium uses the internal website instead of Google as default startpage.
On diskless workstations, the Kerberos TGT is available after login automatically.
New tool added to set up freeRADIUS with support for both EAP-TTLS/PAP and PEAP-MSCHAPV2 methods.
Samba is configured as 'standalone server' with support for SMB2/SMB3; domain joining is gone.
The GOsa² web interface doesn't show Samba related entries because Samba account data are no longer stored in LDAP.
Debian Installer's graphical mode is used for PXE installations (instead of text mode).
Central CUPS print server ipp.intern, users belonging to the printer-admins group are allowed to administrate CUPS.
Icinga administration via the web interface is restricted to the first user.
以下の Debian Edu はかなり古いリリースです:
Debian Edu 10+edu0 Codename Buster released 2019-07-06.
Debian Edu 9+edu0 Codename Stretch released 2017-06-17.
Debian Edu 8+edu0 Codename Jessie released 2016-07-02.
Debian Edu 7.1+edu0 Codename Wheezy released 2013-09-28.
2013年3月3日にリリースされた Debian Edu 6.0.7+r1 コード名 Squeeze。
2012年3月11日にリリースされた Debian Edu 6.0.4+r0 コード名 Squeeze。
2010年10月5日にリリースされた Debian Edu 5.0.6+edu1 コード名 Lenny 。
2010年2月8日にリリースされた Debian Edu 5.0.4+edu0 コード名 Lenny 。
2007年12月5日にリリースされた Debian Edu 3.0r1 Terra。
2007年4月8日にリリースされた Debian 4.0 Etch を元に、2007年7月22日にリリースされた Debian Edu 「3.0r0 Terra」。
2005年6月6日にリリースされた Debian 3.1 Sargeを ベースに、2006年3月14日にリリースされた Debian Edu 2.0。
2002年7月19日にリリースされた Debian 3.0 Woody ベースに、2004年6月20日にリリースされた Debian Edu 1.0 Venus。
以前のリリースの完全な詳細情報ページは Appendix C of the Jessie manual にあります。あるいは リリースマニュアル で関連しているものをご覧ください。