Table of Contents
- 1. Rosegarden manual
- 2. Before you start
- 3. How to make the midi and audio record work
- 4. Rosegarden Audio/Midi Sequencer introductions
- 4.1. Instrumental index.
- 4.2. Midi setup
- 4.3. how to change bank select.
- 4.4. How to make rosegarden to automatically put controller and program change in the start of your segment, for exported midi
- 4.5. how to add a new midi device
- 4.6. Placing your audio file for your new project
- 4.7. How to sign your melody
- 4.8. How to use Score editor to set controllers
- 5. how to change, edit, improve a recorded midi segment
- 6. Quantize
- 6.1. Grid Quantize
- 6.2. Legato Quantizer
- 6.3. Heuristic notation quantizer
- 7. Note edit
- 7.1. howto get specifications in the notations editor
- 7.2. how to change clef
- 7.3. How to change key
- 7.4. how to change note volume on a recorded segment.
- 7.5. How to make the note play after your inserted marks in score editor
- 7.6. How to split segment for grand staff
- 7.7. Setting notes manually, and step recording
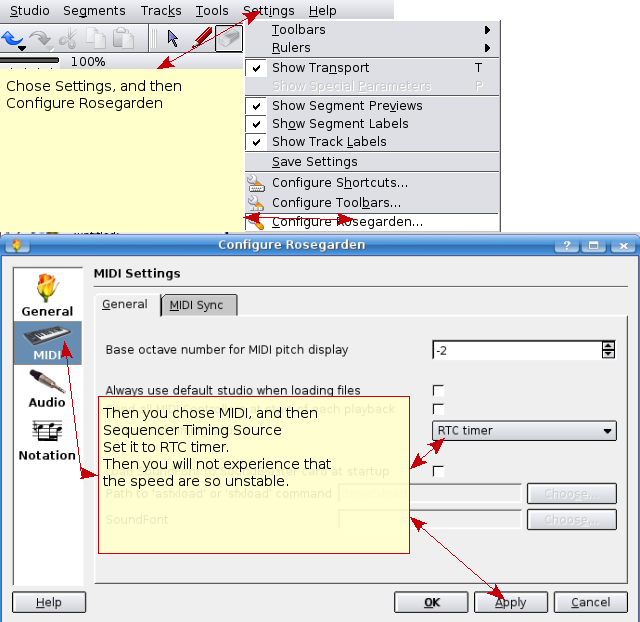
- 8. Rosegarden timer is unstable
- 9. how to change tempo in Rosegarden
- 10. Sound creation for your music project
- 10.1. Configuring Swami to use Jack
- 10.2. How to make a sound
- 10.3. Sample Tuning for Advanced Users
- 11. Copyright and authors
- 12. Appendix A - The GNU Public License
This is a manual for rosegarden, based on the 1:1.4.0-1 version from the Debian Edu Etch 3.0 release.
The version at http://wiki.debian.org/DebianEdu/Documentation/Manuals/Rosegarden is a wiki and updated frequently.
Translations are part of the debian-edu-doc package, which can be installed on a webserver, and is available online.
Before you start with rosegarden. Be sure you have gone trough the documentations how to get jackd running smoothly. That is the technical part that has to be in place so rosegarden can work as it should.
I recommend that you get installed a Real Time kernel, this way you get better latency on jack, and you will not experience to much lag on the softsynth when you are playing.
To make only the midi to work in Linux, I recommend you to buy an USB midi interface from Roland Edirol series.
If you only want midi, you can buy Roland UM-1EX, you can also only search for "um-1ex" on your favorite search engine, or just buy it on your favorite music store. This USB device supports only midi, there is no driver to think about, you just plug it in, and it will automatically be detected by your system. Click on the link to see how the device looks like:
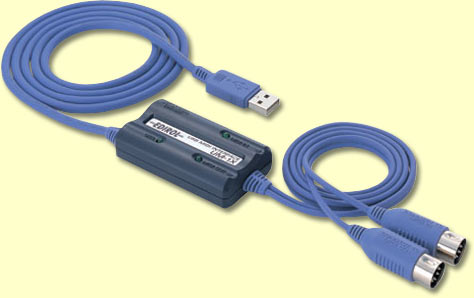
Under Rosegarden you probably have to choose this device.
If you want to use rosegarden fully, with sound record, I also recommend Roland's Edirol UA-25. That device can record high quality sound through the USB port, and again, you don't have to think about drivers, you just plug it in, and Linux will automatically detect it.
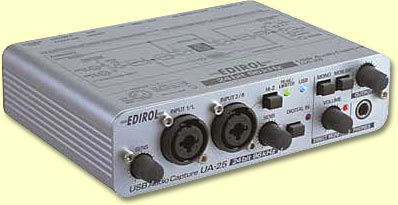
This device also has a midi interface, so you get the full package on the same device, but of course this device is more expensive than um-1ex.
This device has some features that you should keep in mind, on the setting 48,44 kHz you can use playback and record at the same time on the device, but if you set the device to 96 kHz, the device only work as a playback, or a record device. So if you want to hear what you play while you record on the 96 kHz setting, you have to configure jack to use the integrated sound card as playback device, and UA25 as a record device, but this can give you problems with Xrun.
To set up this device you can use jackd, that you find under -> Multimedia --> jack control. if you do not find jackd on your menu just install "aptitude install qjackctl"
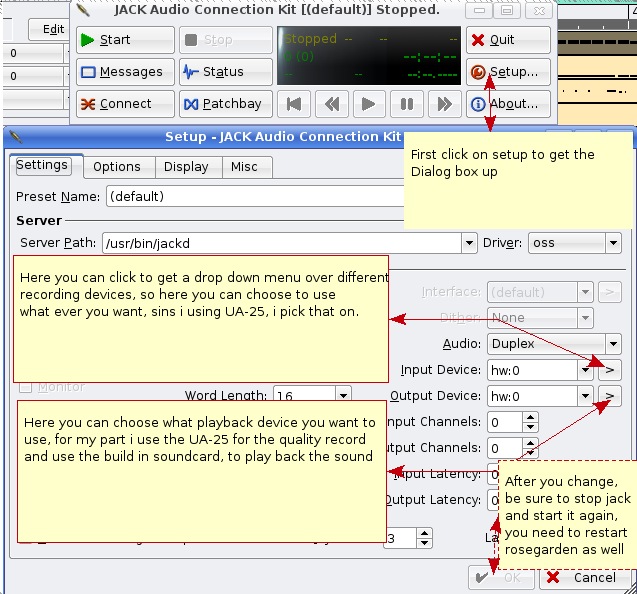
Lets take an example, the first thing you want to record, is the midi segments, (plug in right and left audio channel from your synth to UA25) then you have to remember to shut down the metronome click, you don't want that on your recorded wav file. And after you have done this, you can then mute all midi segment, and only listen to the wav file you made, then you simply unplug the synth, and plug in your guitar, Mic, and easy record guitars, Vocal, and so on to your masterpiece.
If you get alsa_pcm: xrun problem, take a look at the messages in the start how the device been start up. There are many reasons that this not wanna work as it should. If your integrated card does not handle 24 bit, you will get into some problem, and you have to turn the advance mode OFF on the UA-25 device, so it goes down to 16Bit with the integrated sound-card (but then the midi will not work on UA25). If ALSA still gives you problems, try to run the OSS instead. If your integrated sound card does not support 48.000, you have to turn UA-25 down to 44.100. Remember that you have to unplug usb, and do the change on device, and then plug in the usb again before the changes take effect. This is some thing you could try to get alsa running smooth. Try activate the RT in Jackd, and if you cannot activate the RT (real time) in jack you have to add this followings line in
/etc/security/limits.conf file
I have experienced that some devices don't like the RT options activated and runs better with RT off in jack.
@audio - rtprio 99
@audio - memlock 500000
@audio - nice -10
This options can be dangerous because it can cause the kernel to dead lock, due to priority problems.
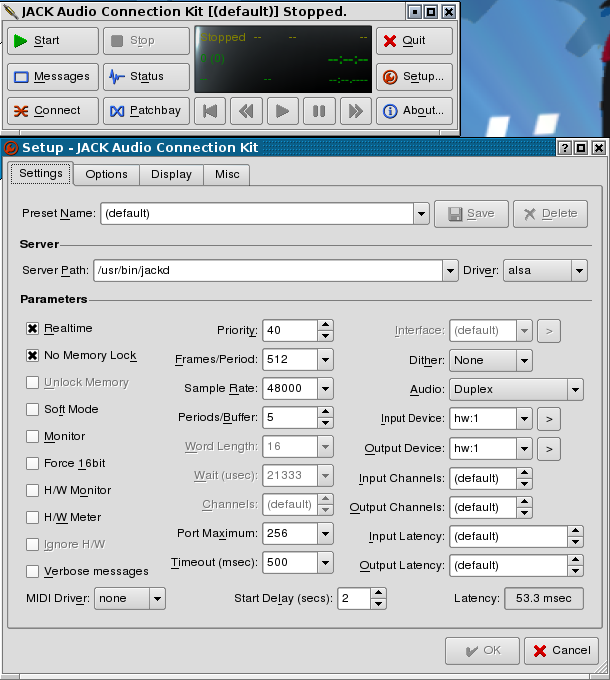
You see the latency is about 53.3 ms, that is the lowest I can get on my laptop without jackd starting to complain about Xrun problem. You have several ways to change the latency for the best optical way for your computer, and that is
Frames/periodes (16-4096)
Periodes/buffer (1-xxx)
Take in use Audacity, I have made a documentation that help you to get started. First you just double click on the audio segment, and audacity should start automatically and load the segment you have chosen.
http://wiki.debian.org/DebianEdu/Documentation/Manuals/Audacity
MARK!
When you have done the changes on the audio file, remember to save it with the same name, and then you have to save the project in rosegarden, and reopen your project. This way you will get the changes you did in audacity applied onto rosegarden.
For those who don't have a keyboard/synth can use qsynth to get midi sound on rosegarden. You can download soundfont from here: ftp://ftp.no.debian.org/debian/pool/main/f/fluid-soundfont/fluid-soundfont-gm_3.1-1_all.deb and use <gdebi> to install it.
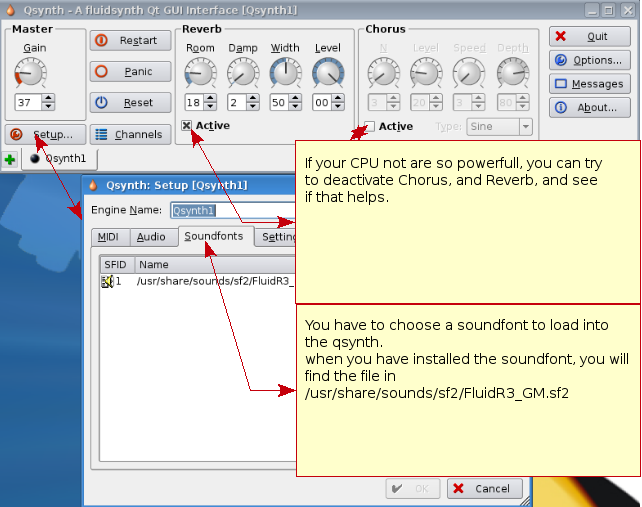
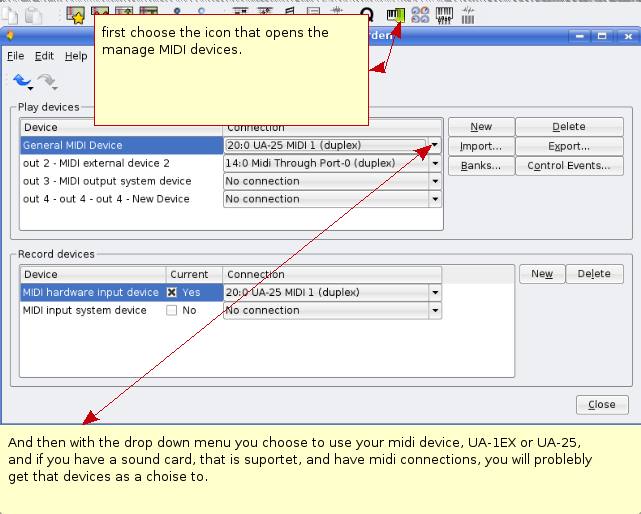
Do not forget to choose that you want to use the qsynth in the device manager on rosegarden if not rosegarden automatically have chosen this.
There is a list of plugins you want in rosegarden when you don't have a gm keyboard/synth, but only a keyboard that send midi, use the aptitude command to get it.
|
** synth plugins ** |
|
wsynth-dssi |
|
xsynth-dssi |
|
nekobee |
|
ll-scope |
|
cmt |
|
hexter |
|
fluidsynth-dssi |
|
tap-plugins |
|
sineshaper |
fixme: set inn synth plugins you have good experience with
|
** audio Plugins ** |
|
swh-plugins |
|
mcp-plugins |
|
terminatorx |
fixme: put on some audio plugin you have experience with
These have been tested with skolelinux 3, kubuntu 7.10, kubuntu 8.04 and with kernel 2.6.22.16, and 2.6.24.18
|
Device |
extra install, needs depends |
|
Roland edirol UA-25 |
Works without any problem |
|
Roland edirol UA-25EX |
Does not work with Advance modus on, switch it to off. Mark! The MIDI part will not work, only audio with advance off. So go for UM-1 to communicate with your MIDI device instead for example |
|
Yamaha MM6 Synth |
The MIDI usb, work without any problem on Linux systems |
|
Roland edirol um-1 |
Same as Ediro UA-25 |
|
Roland edirol Um-3ex |
Usb To Midi |
|
Roland edirol Studio Canvas, SD-20 |
Gm/xg lite Midi sound-module |
|
M-Audio Midispor 4 |
Midi-USB 2x IN 4x OUT |
|
M-Audio Key stations 49e |
usb-midi keyboard |
|
M-Audio Axiom 25 |
Usb Midi Keyboard |
|
M-Audio Trigger Finger |
Usb Drum pattern |
|
M-Audio Fast Track Pro |
Usb, Midi And Audio |
|
Samson Gtrack (GM1U) |
Usb Mic |
|
Zoom, ZFX, plug-in |
Audio Record, no Midi |
|
Edirol Midi Keyboard Controller PCR-300, 500, 800 |
Usb Midi Keyboard |
|
Roland FP-5 (digital piano) |
Usb Works, and the piano also have midi inn/out |
Thanks to Mario Music for allowing me to be in their store testing this equipment.
Fixme: add devices you have experienced to work with out any problem.
Devices that have been found not working for now:
|
Devices |
Problem |
|
Echo Audiofire 2, 4, 8, and 12 |
Fireware card. Detected but they where not cooperative, as jackd failed to start them. |
|
Tone Port Ux2 (line6) |
Did not work. |
|
Audio Control 1 |
Jackd discovers the card, but the card does not work as is should. |
|
Roland UA-4FX |
Jackd also discovers this one, but there is some trouble. |
|
Mbox2 |
jackd discovers this, and it works, but there are a lot of Xruns produced. |
|
Yamaha KX |
USB MIDI keyboard does not work via USB, but MIDI in and out is working as it should. |
If everything works, it's time to take a look at the rosegarden documentation here: http://wiki.debian.org/DebianEdu/Documentation/Manuals/Rosegarden
url:http://rosegardenmusic.com/
Rosegarden Audio/Midi Sequencer. Music creations without limit. Midi (Musical Instrument Digital Interface), Is a perfect way to build up music instrument by instrument. The Important of building up the midi song with structure are important because when you try to export the midi file to other then rosegarden, will make the chance for the midi file to work on others computer, synth/keyboards and so on much bigger. With Rosegarden follows it a easy way to do this as you can see below:
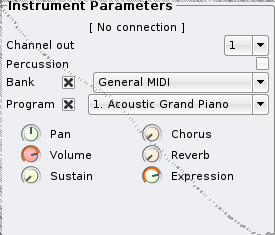
That is okay to use, IF you held your project to Rosegarden, My experience with this is when you try to export your midi to other applications, something will not work as you attend to.
This can sound difficult and time consumed, but if you are bit structured, and made the setup file at hand, you have everything ready for your next project without any delay. I have made ready one file like this for you, just download it(you find it below) I have also made a guide how to use this. With structure on your midi I mean the following thing: You set the standard for every midi file you make where you put your instruments. The example that follows on my file is:
Track 1 = piano
Track 2 = Bass
Track 3 = Guitar (muted, clean and so on)
Track 4 = Melody
Track 5 = second voice
Track 6-9 = here you can set up, strings, clarinet, oboe, sax, and so on.
Track 10 = Drum, this is always drums, this is standard in GM setup.
Track 11-16 = same as 6-9.
If you follows this setup on your every midi sound, there will not be any problem to made new melody.
|
No. |
Instruments |
No. |
Instruments |
No. |
Instruments |
No. |
Instruments |
|
1 |
Ac. Grand Piano |
34 |
El. Bass finger |
67 |
Tenor Sax |
100 |
FX 4 (atmosphere) |
|
2 |
Bright Ac. Piano |
35 |
El. Bass pick |
68 |
Baritone Sax |
101 |
FX 5 (brightness) |
|
3 |
El. Grand Piano |
36 |
Fretless Bass |
69 |
Oboe |
102 |
FX 6 (goblins) |
|
4 |
Honky-tonk Piano |
37 |
Slap Bass 1 |
70 |
English Horn |
103 |
FX 7 (echoes) |
|
5 |
El. Piano 1 |
38 |
Slap Bass 2 |
71 |
Bassoon |
104 |
FX 8 (sci-fi) |
|
6 |
El. Piano 2 |
39 |
Synth Bass 1 |
72 |
Clarinet |
105 |
Sitar |
|
7 |
Harpsichord |
40 |
Synth Bass 2 |
73 |
Piccolo |
106 |
Banjo |
|
8 |
Clavi |
41 |
Violin |
74 |
Flute |
107 |
Shamisen |
|
9 |
Celesta |
42 |
Viola |
75 |
Recorder |
108 |
Koto |
|
10 |
Glockenspiel |
43 |
Cello |
76 |
Pan Flute |
109 |
Kalimba |
|
11 |
Music Box |
44 |
Contrabass |
77 |
Blow Bottle |
110 |
Bag Pipe |
|
12 |
Vibraphone |
45 |
Tremolo Strings |
78 |
Shakuhachi |
111 |
Fiddle |
|
13 |
Marimba |
46 |
Pizz. Strings |
79 |
Whistle |
112 |
Shanai |
|
14 |
Xylophone |
47 |
Orch Harp |
80 |
Ocarina |
113 |
Tinkle Bell |
|
15 |
Tubular Bells |
48 |
Timpani |
81 |
Lead 1 (square) |
114 |
Agogo |
|
16 |
Dulcimer |
49 |
String Ens 1 |
82 |
Lead 2 (sawtooth) |
115 |
Steel Drums |
|
17 |
Drawbar Organ |
50 |
String Ens 2 |
83 |
Lead 3 (calliope) |
116 |
Woodblock |
|
18 |
Perc. Organ |
51 |
Synthstrings 1 |
84 |
Lead 4 (chiff) |
117 |
Taiko Drum |
|
19 |
Rock Organ |
52 |
Synthstrings 2 |
85 |
Lead 5 (charang) |
118 |
Melodic Tom |
|
20 |
Church Organ |
53 |
Choir Aahs |
86 |
Lead 6 (voice) |
119 |
Synth Drum |
|
21 |
Reed Organ |
54 |
Choir Oohs |
87 |
Lead 7 (fifths) |
120 |
Reverse Cymbal |
|
22 |
Accordion |
55 |
Synth Voice |
88 |
Lead 8 (bass+lead) |
121 |
Fret Noise |
|
23 |
Harmonica |
56 |
Orchestra hit |
89 |
Pad 1 (new age) |
122 |
Breath Noise |
|
24 |
Tango Accordion |
57 |
Trumpet |
90 |
Pad 2 (warm) |
123 |
Seashore |
|
25 |
Ac. guitar nylon |
58 |
Trombone |
91 |
Pad 3 (polysynth) |
124 |
Bird Tweet |
|
26 |
Ac. guitar steel |
59 |
Tuba |
92 |
Pad 4 (choir) |
125 |
Telephone Ring |
|
27 |
El. guitar jazz |
60 |
Muted Trumpet |
93 |
Pad 5 (bowed) |
126 |
Helicopter |
|
28 |
El. guitar clean |
61 |
French Horn |
94 |
Pad 6 (metallic) |
127 |
Applause |
|
29 |
El. guitar muted |
62 |
Brass Section |
95 |
Pad 7 (halo) |
128 |
Gunshot |
|
30 |
OverDr. Guitar |
63 |
SynthBrass 1 |
96 |
Pad 8 (sweep) | ||
|
31 |
Dist. Guitar |
64 |
SynthBrass 2 |
97 |
FX 1 (rain) | ||
|
32 |
Guitar harmonics |
65 |
Soprano Sax |
98 |
FX 2 (soundtrack) | ||
|
33 |
Acoustic Bass |
66 |
Alto Sax |
99 |
FX 3 (crystal) |
And that was the index of the instrument, below you have the index overt the Percussive instruments (drums)
|
No. |
DrumKit |
Uses |
|
1 |
Standard GM kit 1 |
Everything |
|
2 |
Standard GM kit 2 |
Same as 1 |
|
10 |
Rom Kit |
Pop Ballads |
|
17 |
Power Set |
Rock, hard rock |
|
25 |
Electronic kit |
Ballads |
|
26 |
Analog kit |
Also used in ballads |
|
27 |
Dance Kit |
Uses in Dance, Teckno |
|
28 |
Dance Kit 2 |
Same As 27 |
|
33 |
Standard GM kit 3 |
Same as 1,2 and 74,75 |
|
41 |
Brush/jazz kit |
Uses in jazz, or ballads |
|
49 |
Orchestral Kit |
Uses in classical music |
|
57 |
Effects Kit |
Uses to make effects around your melody |
|
65 |
Percussion kit 1 | |
|
66 |
Percussion kit 2 | |
|
74 |
Standard Gm Kit 4 | |
|
75 |
Standard Gm Kit 5 |
No.: representing the Programchange
Midi setup, in this case midisetup.rg file will I show you how to change settings. I will introduce you to some controllers that you will find usefully to your midi setup
|
No. |
Controller |
What does the controller do |
|
7 |
Volume |
This sets the volume on the midi track 0 if lowest setting, 127 is the loudest setting |
|
10 |
Balance |
This controls sett the balance on the midi track, 0 is for the left side, and 127 is right, 65 is center |
|
32 |
Bank Select |
This controller select the different sound banks on your synth/keyboard "LSB" (fine) bank select |
|
0 |
Bank Select |
This controller is the MSB (coarse) bank change |
|
91 |
reverb |
This sets the room size on the midi track, 0 is for no acoustics, and 127 for max acoustics |
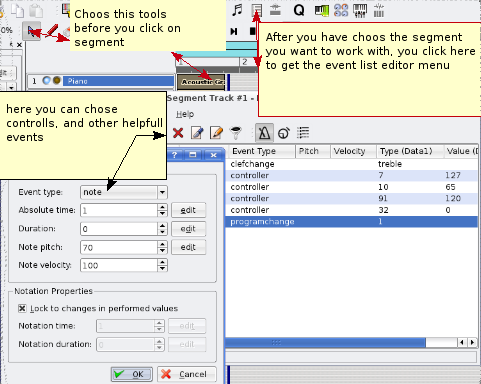
With this out of the way, you have setup a structured setup of the midi segment that tells your synth/keyboard what it should do. And then you simply can export the midi to any devices you want, even mobile phone.(if the mobile supports polyphonic midi)
here you can download the finish setup file
Sometime you wish to use different sounds on your Synth/keyboard that not belong in the GM standard, then you have to use controller that take care of this. Controller 0 and 32.
This functions are taken in use if you also want drums on other tracks then 10. Example percussion effects on tracks 16, that my favorite tracks to use for this functions. Then with controller 32 on data1, and number 4 on data2, changes what track 16 should do, in this case drums. And then with program change 57, will that track change to effect kit.
Controller 0 and 32, with number 0, is gm standard, use it on tracks 1-9, 11-16
Controller 0 and 32, with number 1-127 are those different banks, used on track 1-9, 11-16
Controller 32, with number 4, are for mine synth drums, that is use for standard on track 10, and on special need on any track you to your liking.
Yamaha keyboard with Gm2/Xg have some more options, I recommend you to read the manual that gives you the complete overview of the instrument on your keyboard, and there also says what banks the instrument exist on.
Let me take one example for you:
my keyboard have a instrument on controller 0(MSB) on value 8, and in controller 32(LSB) on value 1, and last on program change 3.
so the following is,
controller 0 with value 8
controller 32 with value 1
and last the program change with value 3
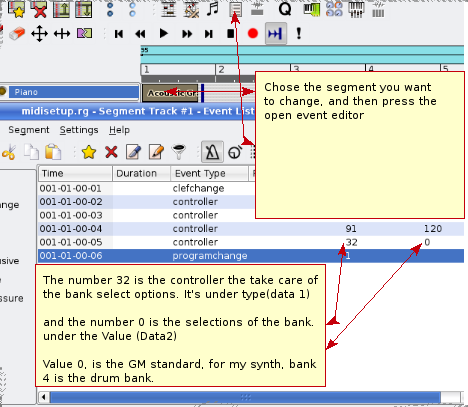
the order on when controller 0 and 32 and program change comes are important
remember that controller 0 and 32, have to come BEFORE program change.
i have included this in the standardupsetfile.
This is actually something I just found out. You use the instrument parameter to have the reverb, volume you want, and then the trick is to press a key on your keyboard when rosegarden count up for you, so you actually get one note in the count in before record. You can do this on every segment. And when you export the song to midi, the info will automatically be put inn. The only thing is, that you have to import the new midi file you made, and remove the note you don't need and save it again.
As I said, this is not necessary if you just held your project as a rosegarden file.
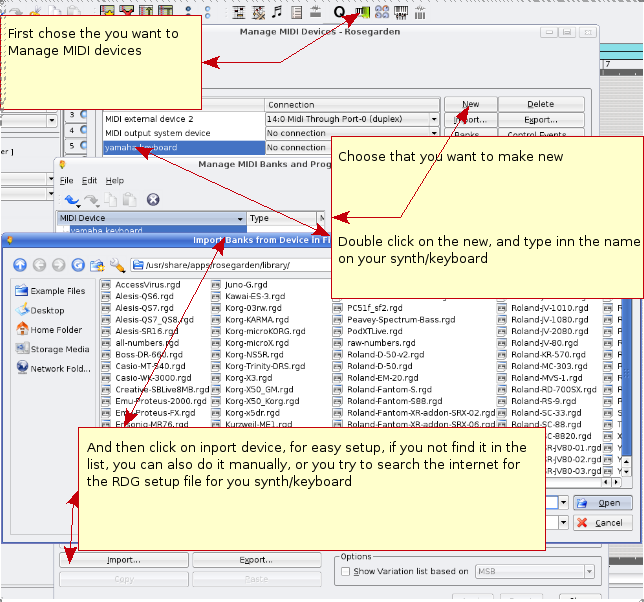
All synth have many sounds, and you will not get to all the sound that are available with the GM only on the "quick instrument parameter pick". So if you follow this way you can try to add your synth/keyboard as your default device, and take in use all sound that lives in your keyboard/synth. New devices are added on new releases of rosegarden, so if you not find your own device here, you can just wait to see if it show up, or you can help the rosegarden project and make the instrument indexing your self, and simply send the *.rgd file to them, and at the same time join the rosegarden list: http://rosegardenmusic.com/support/lists/
It's very important to be strict when there comes to where you placing your recording live instruments, vocals. Because without that you will after a wile get problem to find what files you are working on. it's not impossible, but without any structure on it, you will use allot of time find it. So lets say you have made your self a new midi melody "shallala", and you want to record your vocal on it, then you just remember to make a director that has the same name as your melody, and place your recorded audio in there.
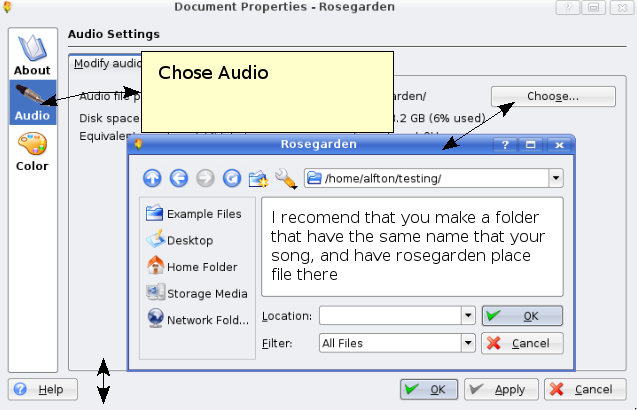
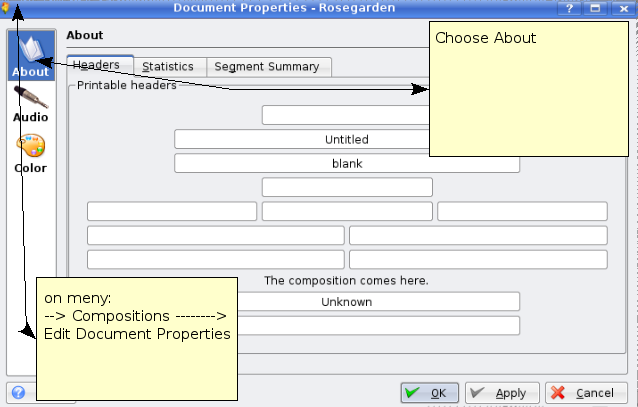
Choose --> "composition" ---> and then "edit document properties"
You want to tell everybody the you have made this tune, so belove you see how you can add what the song name is, who has composed it
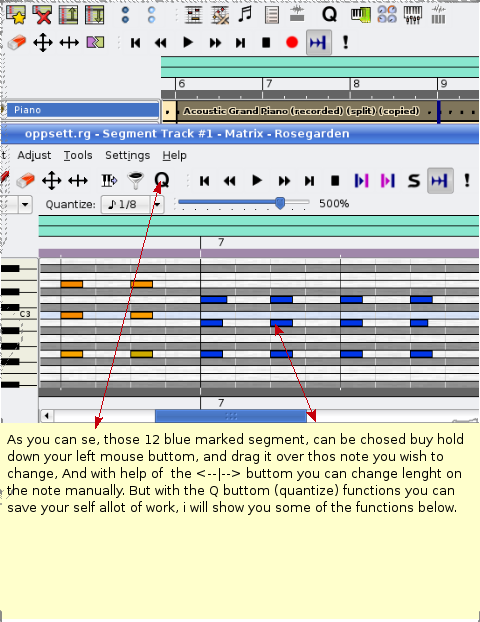
When you have play some part in the segment, will there always be something you want to correct up. So instead of play everything from start again, you have many possibility to change and edit everything to the better. First I'm gonna introduce you to the use of the Matrix Editor.
This functions have several possibility, after a played segment you sometime miss the beat, here is where the Grid Quantize comes in the picture. It's usefully to get note right on the beat automatically.
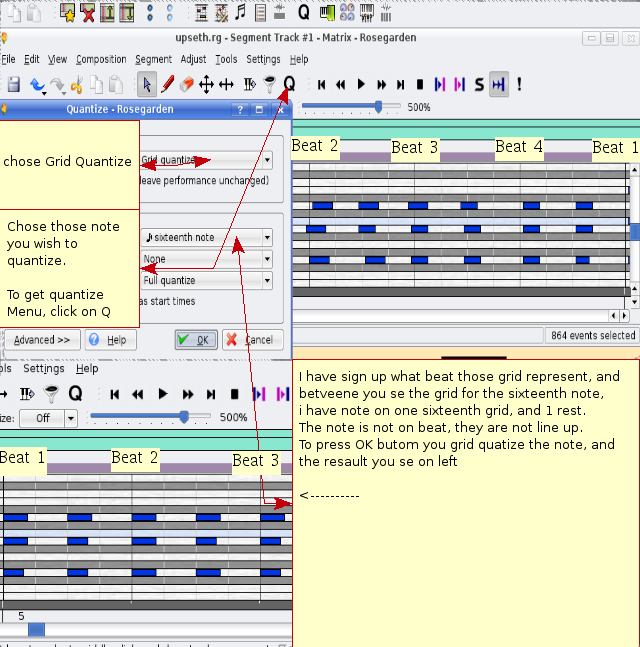
To use this the right way, can save you from a lot of work. You have to try out different way, there are always the possibility to undo the quantize if not goes as intended. So there is only just to try again with a different setting on the base grid unit. You have to try out different setting, and you will find one that fits you needs best. There are many possibility.
and other Quantizer that you will find usefully are heuristic notation quantizer. This help you to make your played note to the right length. This is mostly used to fixing up on the notations preview. And make the note more easy to read for the musician.
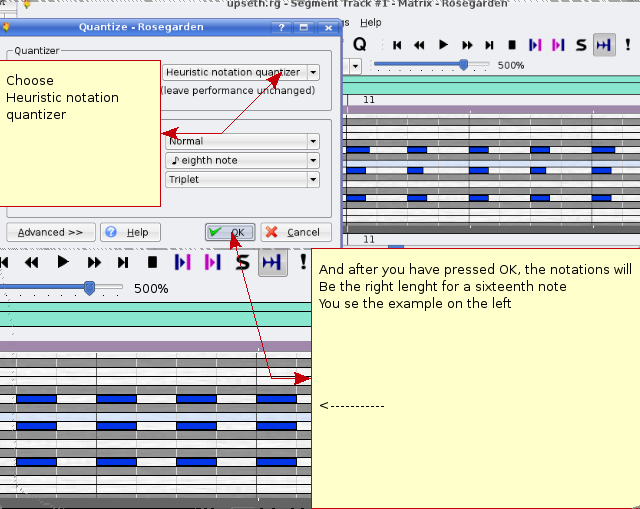
As you can see have this method, changed the length on the note to right length for and 16 note, and that should be played staccato. And that will changed notations to the better in the Score Editor.
Number 1 show you how the notations was before Quantize, and number 2 is after. Number 2 are more easy for the musician to read then number 1. And at the same time is number 1 more confusing with 32 quanted notes, and some different rest note. Number 2 is more clean, and will at mostly be played the way I intended it to be played. There is one thing that it's sound great on midi, but if you want public your notations to orchestra, band, you have to take you time and clean up your notes. That was and short introductions to use of Matrix edit.

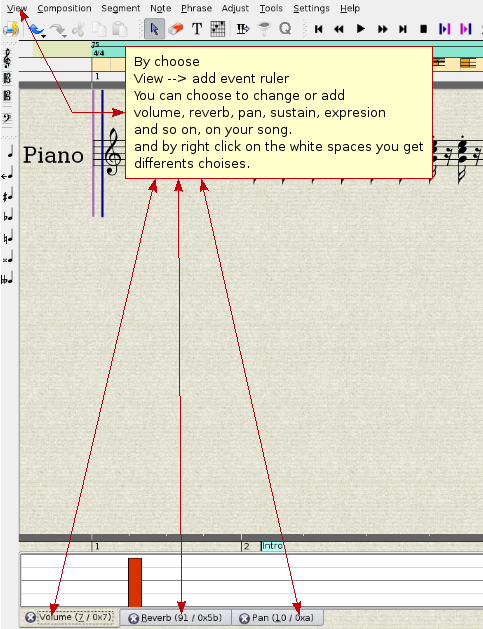
Note edit are a powerful edit tool to make you notations ready for pianist, orchestra, band, you have the tool to make different marks thats tell the musician what he should do, how fast, how hard, how soft, tempo changes and more. I gonna introduce you to some of the features with the note edit. The fist picture is before:
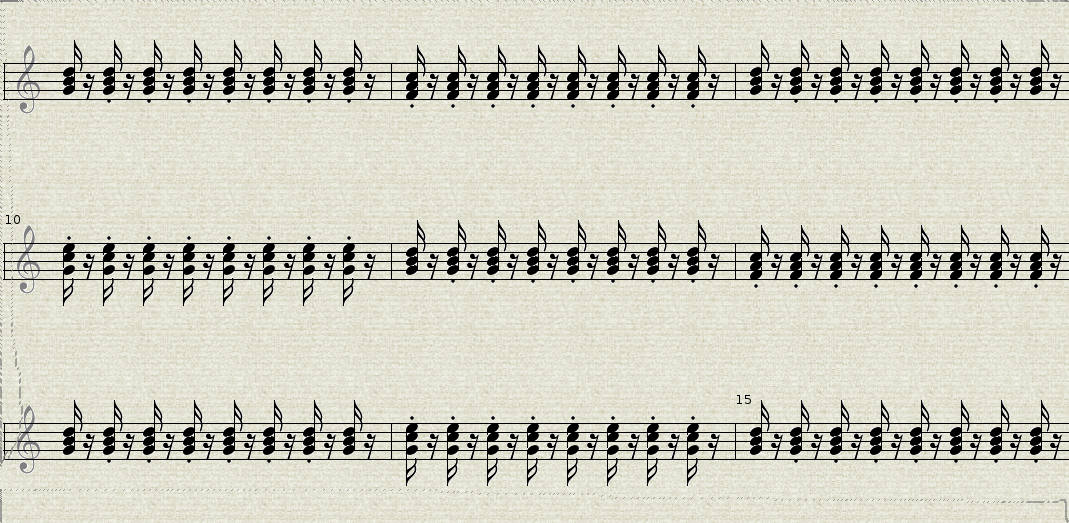
you see a clean notations, there is noting that tells what you want how the notes should be played. After I have worked with the notations, here is the result:
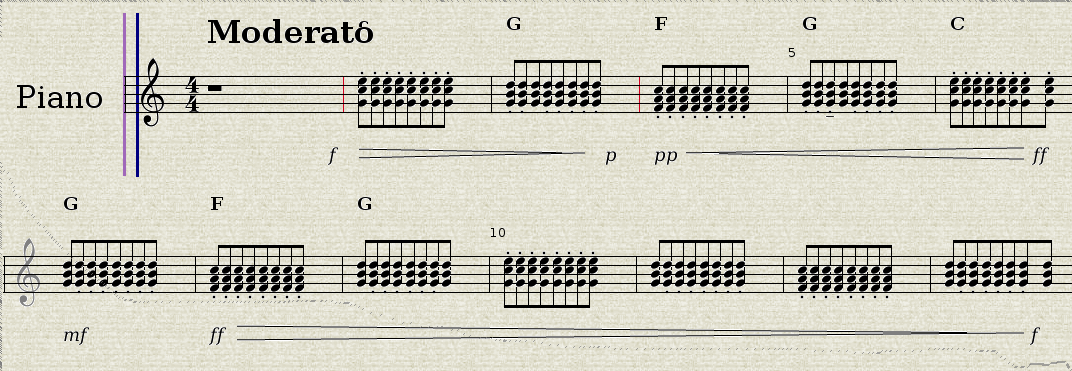
Now I have got what speed, hardiness the notations should be played with. At the same time I have change the note to bind together, I also change the note length in the matrix editor to eight-note, so it would be easier for the pianist to read, but the piece will still actually be played as I want it to with a better success, and the notations take less space. Let us see closer how I got this marks in the notations.
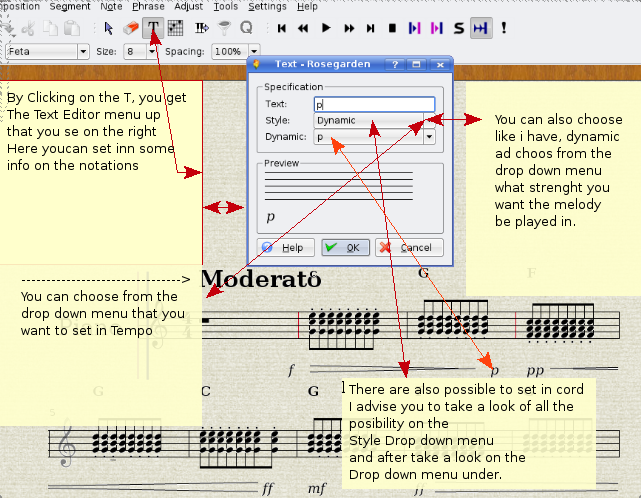
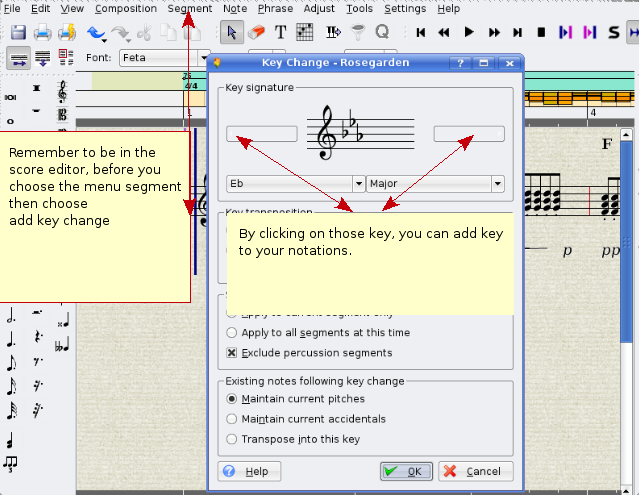
This guide show you how to set in usefully informations to the musician how you compositions should be played, Tempo, volume and what accord. That only a part of this tool, there are still much more. The picture show you how to make the note bind together, and how to put a crescendo, decrescendo on the notations.
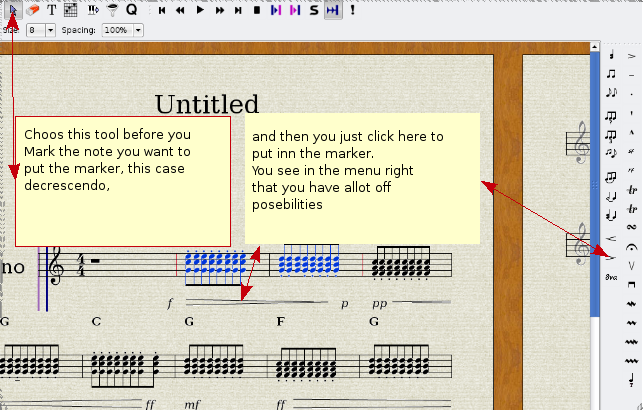
If you look at the right menu, there are many possibility to improve the informations on the notations, the only thing you have to remember is to mark those note this info should be apart of.
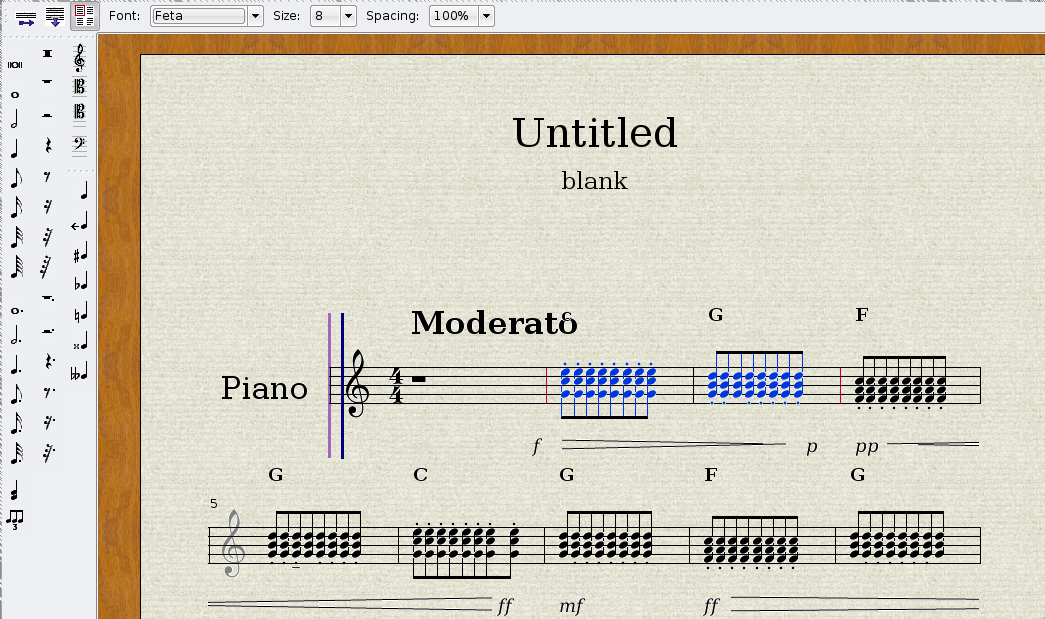
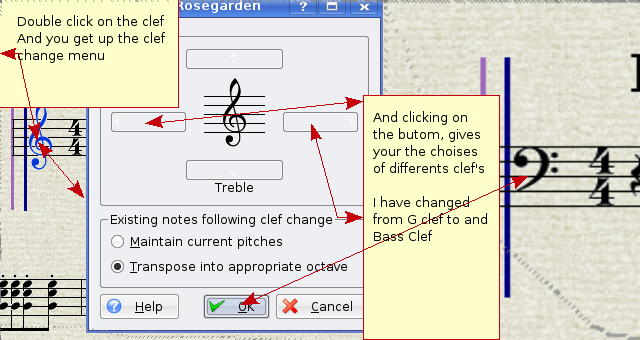
If you look on the left menu, you can put manually note, rest on you notations, you can also change the clef on the notations, below you see how.
Take in use the Interpret functions
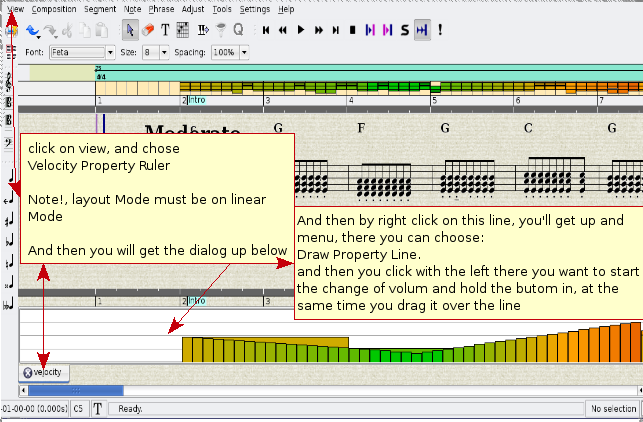
when you play on the synth/keyboard, specially when you want to play in a low volume (piano) this are not always easy, have the same note hardiness on your accord, or you just want the music to play piano where it is piano, and forte where there is forte. You can put in those mark on the notations, and when you are finish with put in all the marks on your notations, and by right click in the score editor, and choose the "interpret" rosegarden will change the velocities, and notations play after the marks you have put on your notations.
It is not possible yet, to display a piano segment in a dual system (grand staff).
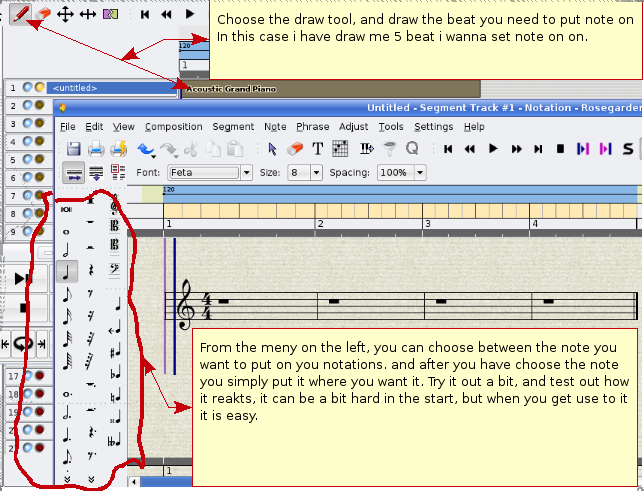
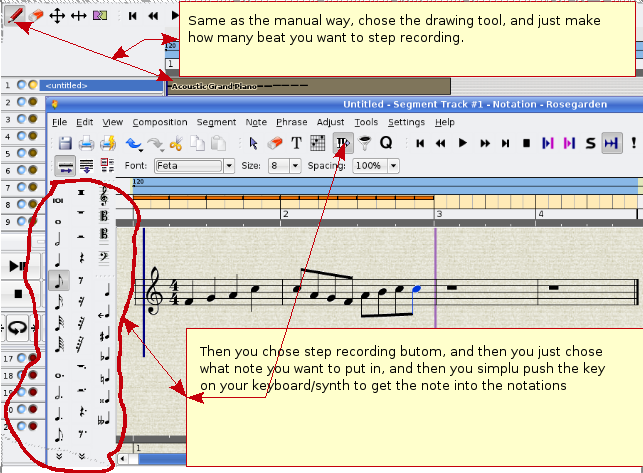
There are 2 ways to put note in score editor, first way is the manually putting notes.
And you have the Step recording, that one is my favorite. And it could be a nice way for the student to learn what note and what key on the synth/keyboard the student have to push to get the note.
If this is happening you could try to change the sequencer timer source.
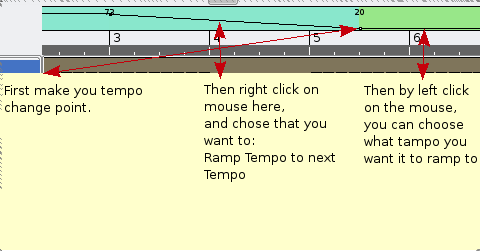
That can be done several ways, I'm gonna show you the one I think is the best to use. if you right click on the line you see right under 120, the menu for tempo change will pop up.

The menu is as follows:
Insert Tempo Change
Insert Tempo Change at Playback Position
Delete Tempo Change
Ramp Tempo to Next Tempo
Un-ramp Tempo
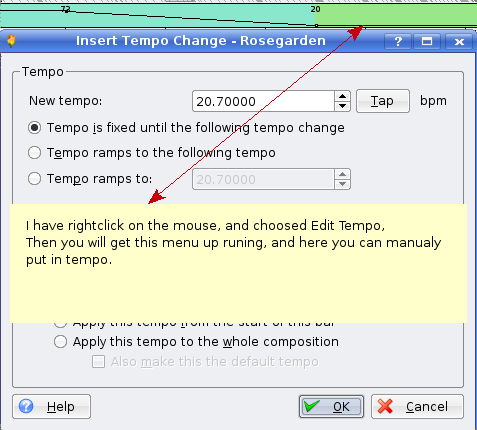
Edit Tempo
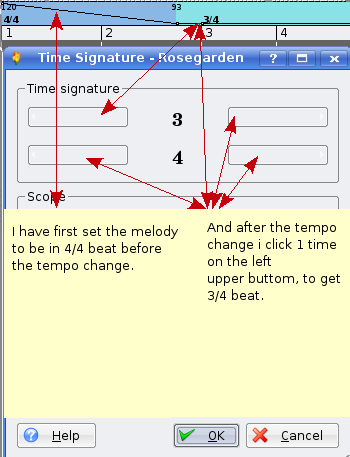
Edit Time Signature...
Open Tempo And Time Signature Editor
If you right click on the line there you want the tempo change, let's say with number 3, and then chose 'Insert Tempo Change' a dot with number 3 will shown up. And then left click and hold down after number 3, you can easy change tempo only by drag up and down.
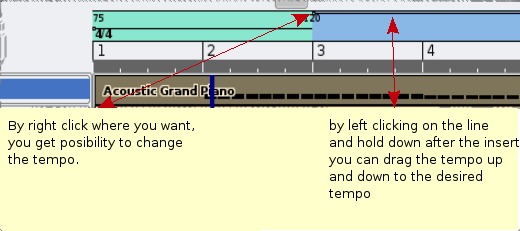
This simply make a tempo change there you are positions on the song.
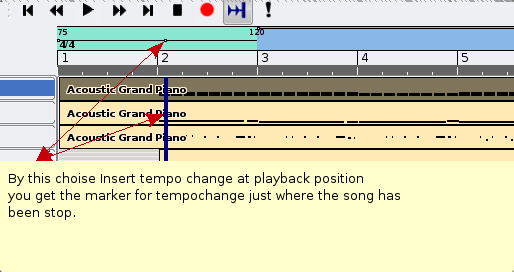
here you simply manually can type in what tempo you want, this is the best to use if you are after a special tempo, the drag functions are good to, but not so precise.
this give you the possibility to change the beat on you melody, on my example, I have started up the song with 4/4 beat, and after the tempo change I have changed the song to 3/4 beat (wals).
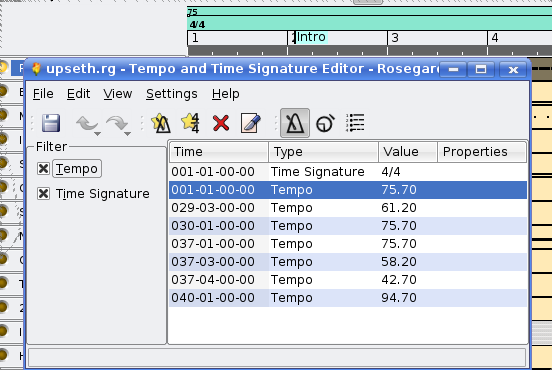
With this you manually can go into all you tempo change and beat change, and change to your liking
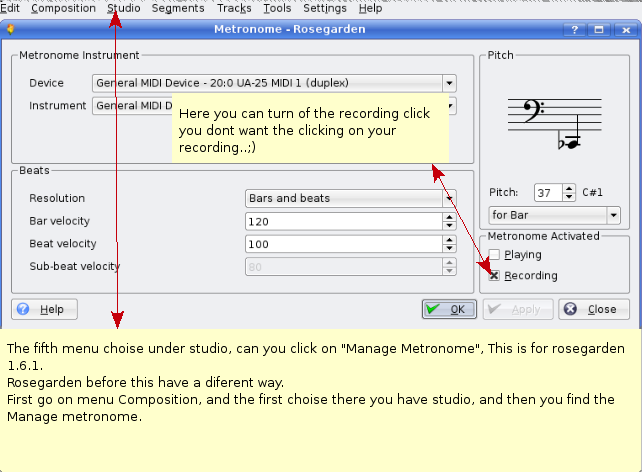
and the after you have done a successfully record of you midi song, you can add on some singing, real guitars, and so on, you have to be creative.:)
Here you have and example of music piece that have been made on rosegarden, I have got a friend of mine to play guitars.
arr/melody: Alf Tonny Bätz. Guitarist: Bjørn Nygård
Mp3 version
http://alfton.gfxi.no/files/upseth.mp3
Midi version
Challenge your self, or your students to go out in the nature, or in house. Just find a sound to make (real sax, oboe, and so on), and take this in use with rosegarden. to achieve this you can take in use Swami (aptitude install swami) there are something you have to be aware of, after you have installed swami, at this moment the swami do not add a menu entry in multimedia, this I hope some day will be fixed, but until that day you have to start swami in console, or pres ALT + F2 and type swami.
Swami have a nice GUI and looks like this:
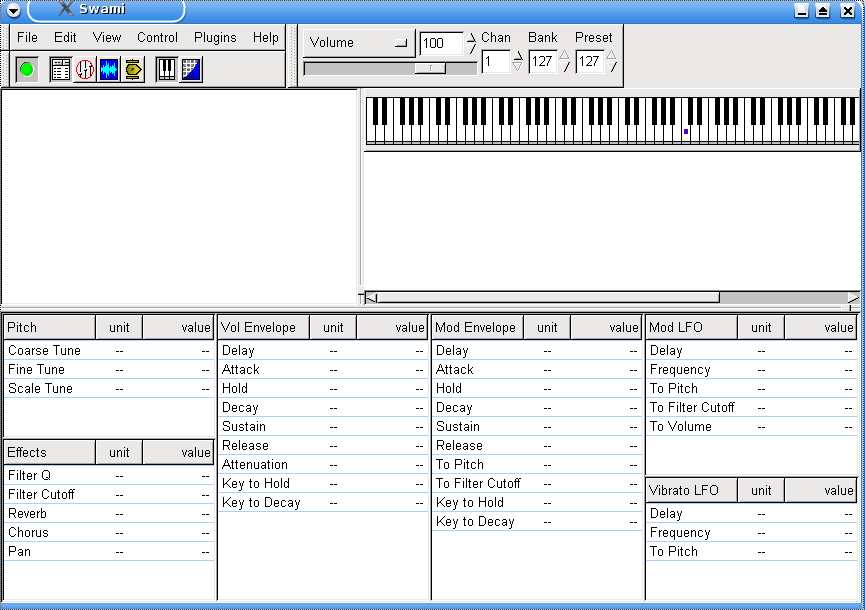
Swami at this moment are under devlopment, so the version you have to use is abit old, but it works. The swami projekt can you take a look at here: http://swami.resonance.org/trac
To make this work at the same time you have audacity, rosegarden runing, you have to configure swami to use jack as a sound connector:
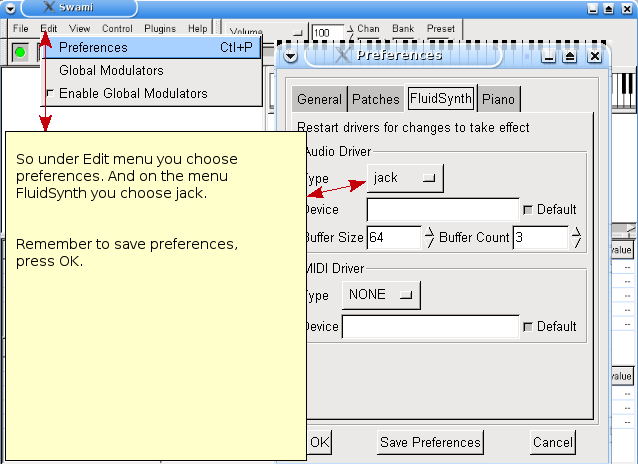
After that you have to start jackd you have to manualy connect FluidSynth so you can hear what been played.
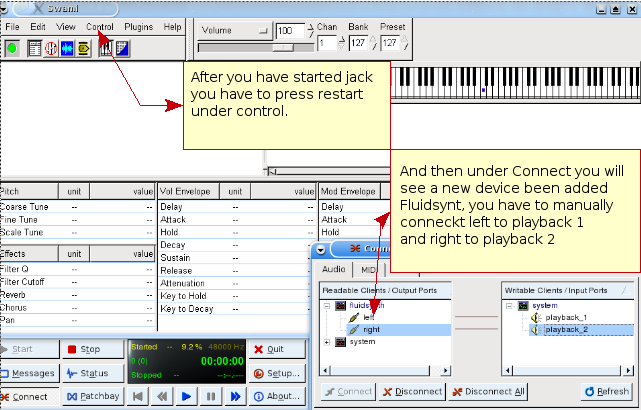
So now you are ready to start create your own sound to use with you musik project.
How to make a sound? Here you have to use audacity to record something, for example scream, word, or some real instruments, when you have cleaned up your new sound, you can export this as and WAV file, and import this into swami. In swami you can connect that sound to a program change number, and at last export your new sound as an SF2 file, and use fluidsynth-DSSI-plugin in rosegarden and take in use your brand new sound. Isn't that cool?
So lets go into this step by step.
1. File, create new
2. Right click on untitled, and choose Properties. (Rename it to your liking)
3. Click on the "+", and right click under Samples,
   and choose load sample (choose the wav files you want to use for your instrument)
4. Click on the "+" behind Samples, and User, there you see your wav file.
   In our case, there are two files, named L and R
   (Hint: file names are truncated to 10 characters)
5. Then click on Instrument, so it gets highlighted, then click right and choose New Instrument
6. Click on the "+" behind Instrument, and right click on New item,
   and choose properties and change name to your liking.
7. Then it's time to select the samples to be used for our new instrument:
   Mark them within Samples/User by holding down the control key while clicking.
   Afterwards, you can insert those samples at Instruments/Your Instrument by means of the
   Paste function in the context menu (right click).
   Your Samples have been assigned to the instrument name you made.
   (Hint: This works like a link; whenever you change sample properties,
    this will also take effect in your instrument.)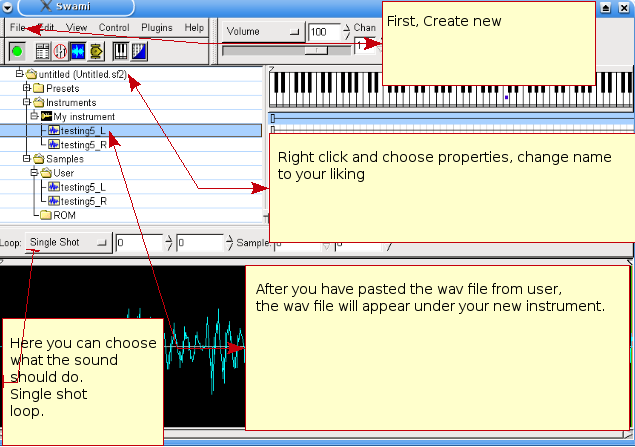
And just repeat the cyclus for each sound, and when you are finished, you just save it. And it's time to use it.
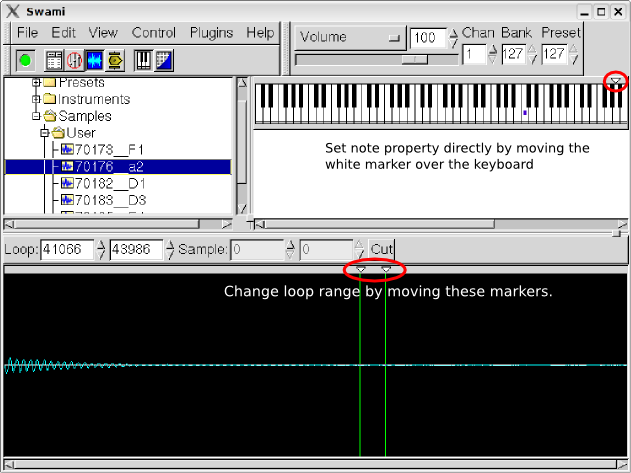
When creating a chromatic instrument from a set of samples that cover different pitch ranges (bass, mids, trebles), further actions need to be done to make sure you get a continues sound.
You will need information about what note is played in each sample. This reference note can be set either in sample properties, or you can simply move the white marker to the corresponding key. You can hear the effect instantly, when you click on the keyboard: The original pitch is played when you hit the reference note. From here it is bent up or down, depending on the distance you move right or left.
When you have set all reference notes for you samples, you should hear notes of the same pitch nonregarding what sample you select!
For continuous sounds (like organ, flute, strings), your samples can never be as long as the longest note that might be played when using your soundfont. Therefor it is necessary to define a loop range that is repeated over and over when the musician will keep a key pressed. Again, you can move two markers to find a section of constant amplitude - try to find zero crossings in the sample to prevent disturbing clicks.
This document is written and copyrighted by Alf Tonny Bätz (2008, 2009), Holger Levsen (2008) and is released under the GPL2 or any later version. Enjoy!
If you add content to it, please only do so if you are the author of it and plan to release it under the same conditions! Then add your name here and release it under the "GPL v2 or any later version" licence.
Copyright (C) 2008, 2009 Alf Tonny Bätz < alfton@gmail.com > and others, see the Copyright chapter for the full list of copyright owners.
This program is free software; you can redistribute it and/or modify it under the terms of the GNU General Public License as published by the Free Software Foundation; either version 2 of the License, or (at your option) any later version.
This program is distributed in the hope that it will be useful, but WITHOUT ANY WARRANTY; without even the implied warranty of MERCHANTABILITY or FITNESS FOR A PARTICULAR PURPOSE. See the GNU General Public License for more details.
You should have received a copy of the GNU General Public License along with this program; if not, write to the Free Software Foundation, Inc., 51 Franklin Street, Fifth Floor, Boston, MA 02110-1301 USA.
Version 2, June 1991
Copyright (C) 1989, 1991 Free Software Foundation, Inc. 51 Franklin Street, Fifth Floor, Boston, MA 02110-1301, USA. Everyone is permitted to copy and distribute verbatim copies of this license document, but changing it is not allowed.
0. This License applies to any program or other work which contains a notice placed by the copyright holder saying it may be distributed under the terms of this General Public License. The "Program", below, refers to any such program or work, and a "work based on the Program" means either the Program or any derivative work under copyright law: that is to say, a work containing the Program or a portion of it, either verbatim or with modifications and/or translated into another language. (Hereinafter, translation is included without limitation in the term "modification".) Each licensee is addressed as "you".
Activities other than copying, distribution and modification are not covered by this License; they are outside its scope. The act of running the Program is not restricted, and the output from the Program is covered only if its contents constitute a work based on the Program (independent of having been made by running the Program). Whether that is true depends on what the Program does.
1. You may copy and distribute verbatim copies of the Program's source code as you receive it, in any medium, provided that you conspicuously and appropriately publish on each copy an appropriate copyright notice and disclaimer of warranty; keep intact all the notices that refer to this License and to the absence of any warranty; and give any other recipients of the Program a copy of this License along with the Program.
You may charge a fee for the physical act of transferring a copy, and you may at your option offer warranty protection in exchange for a fee.
2. You may modify your copy or copies of the Program or any portion of it, thus forming a work based on the Program, and copy and distribute such modifications or work under the terms of Section 1 above, provided that you also meet all of these conditions:
a) You must cause the modified files to carry prominent notices stating that you changed the files and the date of any change.
b) You must cause any work that you distribute or publish, that in whole or in part contains or is derived from the Program or any part thereof, to be licensed as a whole at no charge to all third parties under the terms of this License.
c) If the modified program normally reads commands interactively when run, you must cause it, when started running for such interactive use in the most ordinary way, to print or display an announcement including an appropriate copyright notice and a notice that there is no warranty (or else, saying that you provide a warranty) and that users may redistribute the program under these conditions, and telling the user how to view a copy of this License. (Exception: if the Program itself is interactive but does not normally print such an announcement, your work based on the Program is not required to print an announcement.)
These requirements apply to the modified work as a whole. If identifiable sections of that work are not derived from the Program, and can be reasonably considered independent and separate works in themselves, then this License, and its terms, do not apply to those sections when you distribute them as separate works. But when you distribute the same sections as part of a whole which is a work based on the Program, the distribution of the whole must be on the terms of this License, whose permissions for other licensees extend to the entire whole, and thus to each and every part regardless of who wrote it.
Thus, it is not the intent of this section to claim rights or contest your rights to work written entirely by you; rather, the intent is to exercise the right to control the distribution of derivative or collective works based on the Program.
In addition, mere aggregation of another work not based on the Program with the Program (or with a work based on the Program) on a volume of a storage or distribution medium does not bring the other work under the scope of this License.
3. You may copy and distribute the Program (or a work based on it, under Section 2) in object code or executable form under the terms of Sections 1 and 2 above provided that you also do one of the following:
a) Accompany it with the complete corresponding machine-readable source code, which must be distributed under the terms of Sections 1 and 2 above on a medium customarily used for software interchange; or,
b) Accompany it with a written offer, valid for at least three years, to give any third party, for a charge no more than your cost of physically performing source distribution, a complete machine-readable copy of the corresponding source code, to be distributed under the terms of Sections 1 and 2 above on a medium customarily used for software interchange; or,
c) Accompany it with the information you received as to the offer to distribute corresponding source code. (This alternative is allowed only for noncommercial distribution and only if you received the program in object code or executable form with such an offer, in accord with Subsection b above.)
The source code for a work means the preferred form of the work for making modifications to it. For an executable work, complete source code means all the source code for all modules it contains, plus any associated interface definition files, plus the scripts used to control compilation and installation of the executable. However, as a special exception, the source code distributed need not include anything that is normally distributed (in either source or binary form) with the major components (compiler, kernel, and so on) of the operating system on which the executable runs, unless that component itself accompanies the executable.
If distribution of executable or object code is made by offering access to copy from a designated place, then offering equivalent access to copy the source code from the same place counts as distribution of the source code, even though third parties are not compelled to copy the source along with the object code.
4. You may not copy, modify, sublicense, or distribute the Program except as expressly provided under this License. Any attempt otherwise to copy, modify, sublicense or distribute the Program is void, and will automatically terminate your rights under this License. However, parties who have received copies, or rights, from you under this License will not have their licenses terminated so long as such parties remain in full compliance.
5. You are not required to accept this License, since you have not signed it. However, nothing else grants you permission to modify or distribute the Program or its derivative works. These actions are prohibited by law if you do not accept this License. Therefore, by modifying or distributing the Program (or any work based on the Program), you indicate your acceptance of this License to do so, and all its terms and conditions for copying, distributing or modifying the Program or works based on it.
6. Each time you redistribute the Program (or any work based on the Program), the recipient automatically receives a license from the original licensor to copy, distribute or modify the Program subject to these terms and conditions. You may not impose any further restrictions on the recipients' exercise of the rights granted herein. You are not responsible for enforcing compliance by third parties to this License.
7. If, as a consequence of a court judgment or allegation of patent infringement or for any other reason (not limited to patent issues), conditions are imposed on you (whether by court order, agreement or otherwise) that contradict the conditions of this License, they do not excuse you from the conditions of this License. If you cannot distribute so as to satisfy simultaneously your obligations under this License and any other pertinent obligations, then as a consequence you may not distribute the Program at all. For example, if a patent license would not permit royalty-free redistribution of the Program by all those who receive copies directly or indirectly through you, then the only way you could satisfy both it and this License would be to refrain entirely from distribution of the Program.
If any portion of this section is held invalid or unenforceable under any particular circumstance, the balance of the section is intended to apply and the section as a whole is intended to apply in other circumstances.
It is not the purpose of this section to induce you to infringe any patents or other property right claims or to contest validity of any such claims; this section has the sole purpose of protecting the integrity of the free software distribution system, which is implemented by public license practices. Many people have made generous contributions to the wide range of software distributed through that system in reliance on consistent application of that system; it is up to the author/donor to decide if he or she is willing to distribute software through any other system and a licensee cannot impose that choice.
This section is intended to make thoroughly clear what is believed to be a consequence of the rest of this License.
8. If the distribution and/or use of the Program is restricted in certain countries either by patents or by copyrighted interfaces, the original copyright holder who places the Program under this License may add an explicit geographical distribution limitation excluding those countries, so that distribution is permitted only in or among countries not thus excluded. In such case, this License incorporates the limitation as if written in the body of this License.
9. The Free Software Foundation may publish revised and/or new versions of the General Public License from time to time. Such new versions will be similar in spirit to the present version, but may differ in detail to address new problems or concerns.
Each version is given a distinguishing version number. If the Program specifies a version number of this License which applies to it and "any later version", you have the option of following the terms and conditions either of that version or of any later version published by the Free Software Foundation. If the Program does not specify a version number of this License, you may choose any version ever published by the Free Software Foundation.
10. If you wish to incorporate parts of the Program into other free programs whose distribution conditions are different, write to the author to ask for permission. For software which is copyrighted by the Free Software Foundation, write to the Free Software Foundation; we sometimes make exceptions for this. Our decision will be guided by the two goals of preserving the free status of all derivatives of our free software and of promoting the sharing and reuse of software generally.
NO WARRANTY
11. BECAUSE THE PROGRAM IS LICENSED FREE OF CHARGE, THERE IS NO WARRANTY FOR THE PROGRAM, TO THE EXTENT PERMITTED BY APPLICABLE LAW. EXCEPT WHEN OTHERWISE STATED IN WRITING THE COPYRIGHT HOLDERS AND/OR OTHER PARTIES PROVIDE THE PROGRAM "AS IS" WITHOUT WARRANTY OF ANY KIND, EITHER EXPRESSED OR IMPLIED, INCLUDING, BUT NOT LIMITED TO, THE IMPLIED WARRANTIES OF MERCHANTABILITY AND FITNESS FOR A PARTICULAR PURPOSE. THE ENTIRE RISK AS TO THE QUALITY AND PERFORMANCE OF THE PROGRAM IS WITH YOU. SHOULD THE PROGRAM PROVE DEFECTIVE, YOU ASSUME THE COST OF ALL NECESSARY SERVICING, REPAIR OR CORRECTION.
12. IN NO EVENT UNLESS REQUIRED BY APPLICABLE LAW OR AGREED TO IN WRITING WILL ANY COPYRIGHT HOLDER, OR ANY OTHER PARTY WHO MAY MODIFY AND/OR REDISTRIBUTE THE PROGRAM AS PERMITTED ABOVE, BE LIABLE TO YOU FOR DAMAGES, INCLUDING ANY GENERAL, SPECIAL, INCIDENTAL OR CONSEQUENTIAL DAMAGES ARISING OUT OF THE USE OR INABILITY TO USE THE PROGRAM (INCLUDING BUT NOT LIMITED TO LOSS OF DATA OR DATA BEING RENDERED INACCURATE OR LOSSES SUSTAINED BY YOU OR THIRD PARTIES OR A FAILURE OF THE PROGRAM TO OPERATE WITH ANY OTHER PROGRAMS), EVEN IF SUCH HOLDER OR OTHER PARTY HAS BEEN ADVISED OF THE POSSIBILITY OF SUCH DAMAGES.
END OF TERMS AND CONDITIONS
