目录
- 1. Debian Edu 12 别名 Bookworm 的手册
- 2. 关于 Debian Edu 和 Skolelinux
- 2.1. 部分历史及为何使用两个名称
- 3. 结构
- 4. 需求
- 5. 网络设置需求
- 6. 安装和下载选项
- 6.1. 在哪里找到另外的信息
- 6.2. 下载 Debian Edu 12 代号 bookworm 的安装媒体
- 6.2.1. amd64 或 i386
- 6.2.2. amd64 或 i386 的网络安装 iso 映像
- 6.2.3. amd64 或 i386 的BD iso 映像
- 6.2.4. 已下载映像文件的校验
- 6.2.5. 源代码
- 6.3. 安装 Debian Edu
- 6.3.1. 主要服务器安装
- 6.3.2. 桌面环境
- 6.3.3. 模块化安装
- 6.3.4. 安装类型和选项
- 6.3.5. 安装过程
- 6.3.6. 使用 debian-edu-router 安装一个网关
- 6.3.7. 一些典型的注意事项
- 6.3.8. 安装使用 USB 闪存驱动器来取代 CD / 蓝光光盘
- 6.3.9. 通过 PXE 在网络上安装和引导
- 6.3.10. 修改 PXE 安装
- 6.3.11. 定制镜像
- 6.4. 屏幕快照观览
- 7. 开始
- 7.1. 开始的最少步骤
- 7.1.1. 运行在主服务器上的服务
- 7.2. GOsa² 简介
- 7.2.1. GOsa² 登录和概览
- 7.3. 使用 GOsa² 管理用户
- 7.3.1. 添加用户
- 7.3.2. 搜索,修改和删除用户
- 7.3.3. 设置密码
- 7.3.4. 提高的用户管理
- 7.4. 用 GOsa² 管理用户组
- 7.5. 用 GOsa² 管理机器
- 7.5.1. 搜索和删除机器
- 7.5.2. 修改现有机器/网络组管理
- 8. 打印机管理
- 8.1. 使用连在工作站上的打印机
- 8.2. 网络打印机
- 9. 时钟同步
- 10. 扩展占满的分区
- 11. 维护
- 11.1. 更新软件
- 11.1.1. 保留你自己的安全更新相关信息
- 11.2. 备份管理
- 11.3. 服务器监视
- 11.3.1. Munin
- 11.3.2. Inciga
- 11.3.3. Sitesummary
- 11.4. 更多有关 Debian Edu 定制的信息
- 12. 升级
- 13. HowTo
- 14. 一般管理 HowTo
- 14.1. Configuration history: tracking /etc/ using the Git version control system
- 14.1.1. 用法示例
- 14.2. 调整分区大小
- 14.2.1. 逻辑卷管理
- 14.3. 使用 ldapvi
- 14.4. Kerberized NFS
- 14.4.1. 如何更改默认的
- 14.5. Standardskriver
- 14.6. JXplorer,一个 LDAP 图形用户界面
- 14.7. ldap-createuser-krb5, a command-line tool for adding users
- 14.8. 使用 stable-updates
- 14.9. 使用 backports 安装较新的软件
- 14.10. 用 CD 或类似的映像升级
- 14.11. 自动清理剩余的进程
- 14.12. 安全升级的自动安装
- 14.13. 夜间自动关机
- 14.13.1. 如何设置夜间关机
- 14.14. Access Debian Edu servers located behind a firewall
- 14.15. Installing additional service machines for spreading the load from the main server
- 14.16. 源自 wiki.debian.org 的 HowTo 文档
- 15. 如何进行高级管理
- 15.1. 使用 GOsa² 定制用户
- 15.1.1. 在年级组中创建用户
- 15.2. 其他的用户设定
- 15.2.1. 在所有用户的主目录中创建文件夹
- 15.3. 使用一个专用的存储服务器
- 15.4. Restrict SSH login access
- 15.4.1. 无 LTSP 客户端的设置
- 15.4.2. 有 LTSP 客户端的设置
- 15.4.3. 更多复杂设置的说明
- 16. 桌面 HowTo
- 17. 网络客户端 HowTo
- 17.1. 瘦客户机和无盘工作站介绍
- 17.1.1. LTSP 客户机类型选择
- 17.1.2. 使用不同的 LTSP 客户机网络
- 17.1.3. 增添 LTSP chroot 来支持 32 位的电脑客户端
- 17.1.4. LTSP 客户端配置
- 17.1.5. LTSP 客户端的声音
- 17.1.6. Access to USB drives and CD-ROMs/DVDs
- 17.1.7. 使用连接在 LTSP 客户机上的打印机
- 17.2. Modifying the PXE setup
- 17.2.1. 配置 PXE 菜单
- 17.2.2. 配置 PXE 安装
- 17.2.3. 添加 PXE 安装的定制仓库
- 17.3. 改变网络设置
- 17.4. 远程桌面
- 17.4.1. Xrdp
- 17.4.2. X2Go
- 17.4.3. 可用的远程桌面客户端
- 17.5. 无线客户端
- 17.6. Authorize Windows machine with Debian Edu credentials using pGina LDAP plugin
- 17.6.1. Adding pGina user in Debian Edu
- 17.6.2. Install pGina fork
- 17.6.3. Configure pGina
- 18. Debian Edu 中的 Samba
- 18.1. 通过 Samba 存取文件
- 19. 教学与学习 HowTo
- 20. 用户 HowTo
- 20.1. 修改密码
- 20.2. 运行独立 Java 应用程序
- 20.3. 使用电子邮件
- 20.4. Thunderbird
- 21. 贡献
- 22. 支持
- 23. Debian Edu Bookworm 中的新面貌
- 24. 版权与作者
- 25. 本文档的翻译
- 25.1. 如何翻译本文档
- 25.1.1. 使用 PO 文件来翻译
- 25.1.2. 使用 web 浏览器在线翻译
- 26. 附录 A - GNU 通用公共许可证
- 27. 附录 B —— 旧发布版的面貌
- 27.1. 2021 年 8 月 14 日发布的 Debian Edu 11 代号 Bullseye 的新特性
- 27.1.1. 安装变化
- 27.1.2. 软件更新
- 27.1.3. 文档和翻译更新
- 27.1.4. 与之前发布版本相比的其他更改
- 27.2. 旧版本的历史信息
翻译:
2016-2022 Ma Yong
2017 Boyuan Yang
2017 Roy Zhang
2020 EldersJavas
2020 wdggg
2020 Tao Wang
2021 Liu Tao
2021, 2024 Cube Kassaki
2021 Jingxuan
2022 Hugel
2024 Hong Hao
2024 Lucka
2024 SWfeiyu
![]()
这是 Debian Edu 12 (bookworm) 发行版的手册。
这是 https://wiki.debian.org/DebianEdu/Documentation/Bookworm 上的维基版并且时常更新。
可在线获取更新的翻译。
Debian Edu 又名 Skolelinux 是一个基于 Debian 的 Linux 发行版,它提供了一个完整配置的学校网络的开箱即用环境。 它实现了客户端-服务器方法。 服务器和客户端是相互交互的软件。 服务器提供客户端运行所需的信息。 当服务器安装在一台机器上,而它的客户端安装在另一台机器上时,通过这个概念的扩展,机器本身被称为服务器和客户端。
安装主服务器后,设置了所有学校网络所需的服务而且准备好使用本系统。仅需要通过 GOsa²,一个友好的 Web 用户界面,或者任何其他的 LDAP 编辑器添加用户和机器。而且还准备好了使用 PXE/iPXE 的网络引导环境,那么首先从 CD、蓝光光盘或者 USB 闪存驱动器安装主服务器之后可以通过网络安装所有其他的机器,这包括“漫游工作站”(其可以从学校网络脱离,通常是笔记本或上网本)。而且,计算机可以通过 PXE/iPXE 引导成为无盘工作站或者瘦客户机。
一系列教育应用程序如 GeoGebra,Kalzium,KGeography,GNU Solfege 和 Scratch 已包含在默认桌面环境设置中,这可以通过 Debian 体系轻松而几乎无限地扩展。
Debian Edu / Skolelinux 是一个由 Debian Edu 项目创建的 Linux 发行版。它作为 Debian Pure Blend 发行版是正式的 Debian 子项目。
Skolelinux 是提供开箱即用的完全配置学校网络环境的 Debian 版而用于你的学校的方法。
Skolelinux 项目在 2001 年 7 月 2 日启动于挪威而大约在同时 Raphaël Hertzog 在法国开始了 Debian-Edu。直到 2003 年两个项目合为一体,而维持了两者的名称。"Skole" 和 (Debian-)"Education" 在这些范围中正是两个好领会的措辞。
现在世界上的几个地区在使用这个系统。
文档的这部分叙述 Skolelinux 安装所提供的网络架构和服务。
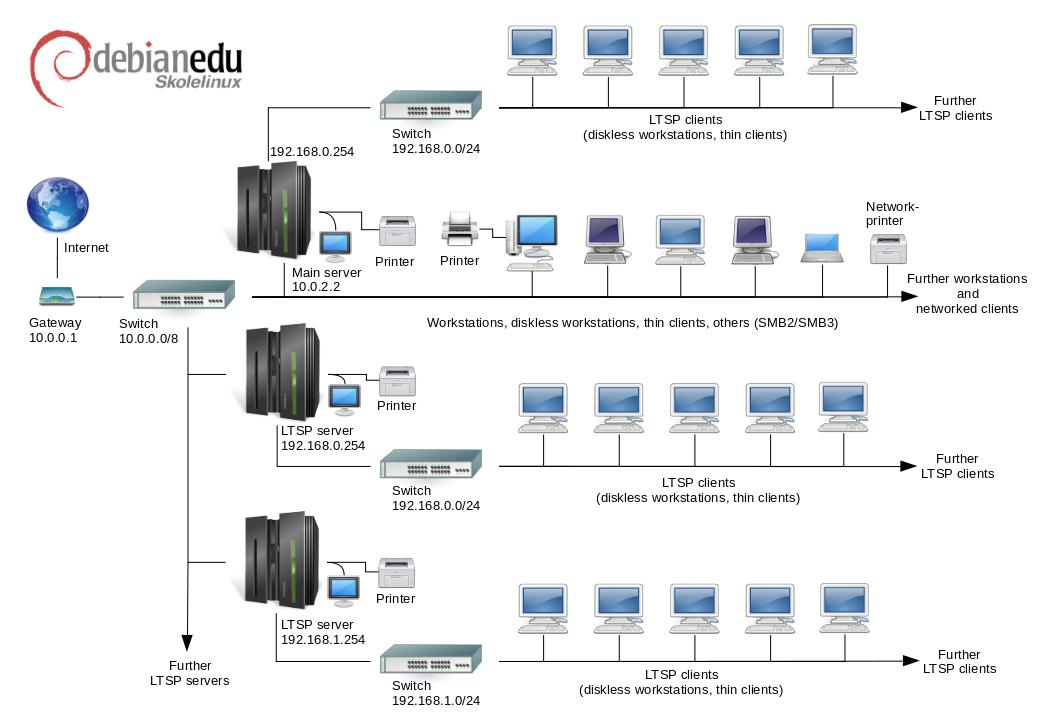
这是张假定的网络拓扑草图。Skolelinux 网络默认设置假定有一个(而且仅是一个)主服务器,同时可以包含常规的工作站和 LTSP 服务器(与瘦客户机和/或无盘工作站相关)。工作站的数量可以是任意多少(从一个都没有到有很多)。LTSP 服务器也一样,每一个在独立网络上的 LTSP 服务器与其客户机之间的通信不会影响其他的网络服务。LTSP 的详细说明在相关的 HowTo 章节里。
在每个学校网络中仅能有一个主服务器的原因是主服务器提供 DHCP,因而在每一网络中只能一台机器在工作。能够从主服务器向其他机器迁移服务而该服务在另一机器上就绪,随后更新 DNS 配置,为服务指出 DNS 别名到正确的计算机。
为了简化 Skolelinux 的标准设置,其互联网连接运行在一个单独的路由器上,也称为网关。参阅互联网路由器章节对于如何设置还不能根据需要配置现有网关的细节。
DHCP 在主服务器上为 10.0.0.0/8 网络工作,提供可以选择安装新服务器/工作站,运行内存测试,或者从本地硬盘引导的 PXE 引导菜单。
修改这个设计;相关细节,参阅相关的 HowTo 章节。
在第二个接口(默认预设选项是 192.168.0.0/24 和 192.168.1.0/24)的 LTSP 服务器上的 DHCP 仅用于的专用网络并极少需要改动。
在 LDAP 中所含有的所有子网配置。
一个 Skolelinux 网络需要通过选择主服务器设定配置安装一台主服务器(主机名“tjener”是挪威语“服务器”之意)并预设默认 IP 地址为 10.0.2.2。除主服务器设定配置外还可以(但不必需)选择并安装 LTSP 服务器和工作站的设定配置。
除了瘦客户机的管理之外,所有的服务最初设置在一台中央计算机上(主服务器)。为了性能的原因,LTSP 服务器将要分开来(不过在同一机器上可以安装主服务器和 LTSP 服务器两者的配置文件)。所有服务分配了专用 DNS 名称并且只在 IPv4 上提供。分配的 DNS 名称使其容易地从主服务器迁移单独的服务到不同的机器,简单地在主服务器上关闭该服务,而后变更 DNS 配置指向该服务的新位置(当然,首先要在这台机器上设置)。
通过网络传输的密码是encrypted保证所有连接安全,那样没有密码是作为普通文本通过网络发送。
以下是在 Skolelinux 网络中缺省设置的服务及其每一服务的 DNS 名称的列表。如有可能所有配置文件会以名称(无域名)关联到服务于是易于学校改变或者它们的域(如果它们有自己的 DNS 域)或是它们所使用的 IP 地址。
|
服务列表 | ||
|
服务描述 |
普通名称 |
DNS 服务名称 |
|
中央日志 |
rsyslog |
syslog |
|
域名服务 |
DNS (BIND) |
domain |
|
机器的自动网络配置 |
DHCP |
bootps |
|
时钟同步 |
NTP |
ntp |
|
通过网络文件系统的主目录 |
SMB / NFS |
homes |
|
电子邮局 |
IMAP(Dovecot) |
postoffice |
|
目录服务 |
OpenLDAP |
ldap |
|
用户管理 |
GOsa² |
--- |
|
Web 服务器 |
Apache/PHP |
www |
|
中央备份 |
sl-backup,slbackup-php |
backup |
|
Web 缓存 |
Proxy(Squid) |
webcache |
|
打印 |
通用UNIX 打印系统(CUPS) |
ipp |
|
安全远程登录 |
OpenSSH |
ssh |
|
自动配置 |
CFEngine |
cfengine |
|
(若干) LTSP 服务器 |
LTSP |
ltsp |
|
以错误报告监视机器和服务,和 Web 上的Status与历史。由电子邮件报告错误 |
Munin, Icinga 和 Sitesummary |
sitesummary |
每个用户的个人文件保存在他们的主目录中,由服务器使之可用。主目录可从所有计算机访问,让用户无论使用哪台计算机而可以存取同一文件。服务器无关操作系统,对于 Unix 客户端通过 NFS 而对于其他客户端则通过 SMB2/SMB3 提供访问。
只预设电子邮件本地投递设置(如在学校内),但如果学校有固定互联网连接那么可以设置投递电子邮件到更广的互联网。客户端设置为投递电子邮件到服务器(使用‘smarthost’),而用户可以通过 IMAP 读取他们的个人邮件。
所有服务使用同一个用户名和密码可以进入,得益于中央用户数据库的验证和授权。
使用 web 代理在本地 (Squid) 贮存文件在经常访问的位置提升性能。还能在单独的机器上一同做路由上限制的 web 流量与互联网访问的控制。
客户端的网络配置是使用 DHCP 自动完成的。所有类型的客户端可以连接到私有的 10.0.0.0/8 子网并且将获得协商 IP 地址;LTSP 客户机将会通过独立的 192.168.0.0/24 子网(这是保证 LTSP 客户机的网络流量不干扰到其他的网络服务)连接到相配合的 LTSP 服务器。
中央日志为所有机器发送日志信息到服务器而设置。日志服务设置仅为接收从本地网络到来的信息。
缺省的 DNS 服务器仅用内部域 (*.intern) 设置,直到实在的(“外部的”)DNS 域可以被设置。该 DNS 服务器为其网络上的所有机器可以用其作为主 DNS 服务器而设置作为缓存 DNS 服务器。
学生和教师有能力发布网站。该 web 服务器提供认证用户的程序,并对某用户和组群限制访问个人页面。作为 web 服务器能在服务器一侧安排,而用户将有能力创作有力的网页。
有关用户和计算机的信息可以在一处中央位置被更改,让网络上的所有计算机可以自动访问。为此要设置集中式目录服务器。该目录将含有用户,用户组,计算机和计算机组的信息。为避免用户混淆,文件组和网络组之间没有任何区别。这意味着构成网络组的计算机组将使用与用户组相同的名称空间。
服务和用户的管理将主要通过 web,并按照确定的标准,在 Skolelinux 的组件 web 浏览器中良好运作。代表委派个别用户或用户组使具有管理系统的能力。
为了避免 NFS 的某个难题,而使之较简单地排除问题,彼此分别的机器需要同步时钟。Skolelinux 服务器设置为本地网络时间协议 (NTP) 服务器的实现,所有工作站和客户端设置与服务器同步。服务器自己将通过互联网的 NTP 上游机器同步它的时钟,以此保证整个网络有准确时间。
打印机便于连接,或是直接连到主网,或者连接到服务器,工作站抑或 LTSP 服务器。打印机的使用可由单独的用户按照他们所属组来控制;这将由打印机的使用限额和使用控制做到。
一个 Skolelinux 网络上可以有许多 LTSP 服务器,这是由选择 LTSP 服务器的设定而安装的。
LTSP 服务器设置接收来自瘦客户端和工作站的日志,并转递这些信息到中央日志接受者。
请留意:
LTSP 无盘工作站是使用安装在服务器上的程序。
客户端根文件系统是使用 NFS 提供的。每次修改 LTSP 服务器之后要重新生成相关映像;在 LTSP 服务器上运行
debian-edu-ltsp-install --diskless_workstation
yes
。
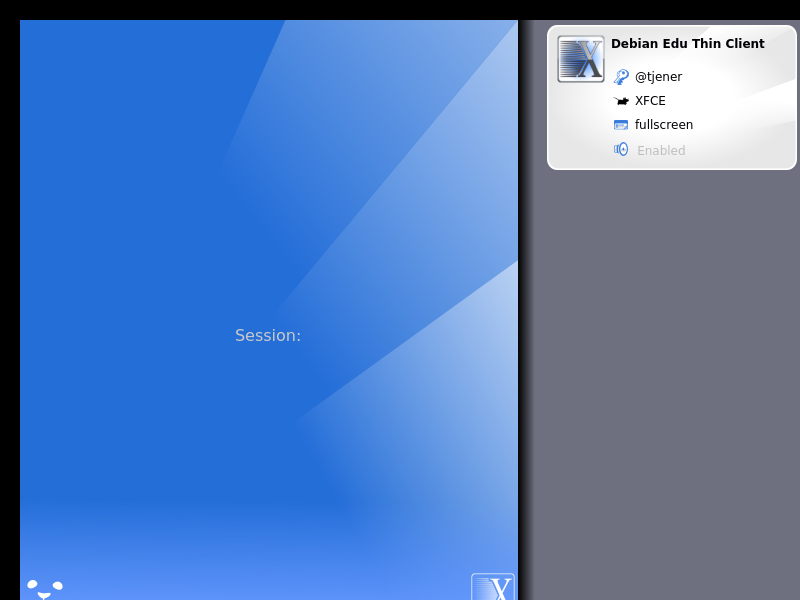
瘦客户机设置使普通PC可以作为(X-)终端运行。这意味着机器直接从服务器上使用PXE启动,无需使用本地客户端硬盘。瘦客户机现在使用X2Go设置,因为LTSP已经停止对它维护与更新。
瘦客户机是一个很好的方法,因为它们可以有效地在 LTSP 服务器上运行所有的程序,所以仍然可以利用非常老的机器(主要是32位)。其工作原理如下:服务使用 DHCP 和 TFTP 连接到网络并从网络启动。接下来,使用 NFS 从 LTSP 服务器上挂载文件系统,最后启动 X2Go 客户端。
无盘工作站在个人计算机上运行所有软件而没有在本地安装操作系统。这意味客户端机器直接通过 PXE 引导,而运行的软件没有安装在本地硬盘驱动器上。
在费与瘦客户端一样低的维护成本来使用强大的硬件方面,无盘工作站是极佳的方法。软件在服务器上管理和维护,而不需要在客户端本地安装软件。主目录和系统设置也保存在服务器上。
可以从中央计算机,大概是服务器来管理所有用 Skolelinux 安装程序安装的 Linux 机器。其通过 SSH
将能登录到所有的机器,从而完全访问这些机器。作为 root 自己首先需要运行
kinit 来获得 Kerberos TGT。
所有用户信息保留在 LDAP 目录中。用户帐号的更新对照这个数据库,用于客户端的用户验证。
目前有两种安装媒体映像:网络安装和蓝光光盘。这两个映像也都可以从 U 盘引导。
力求一旦能从任何类型的媒体安装服务器,而由网络引导在网络上安装其他客户端。
仅是网络安装镜像在安装的时候需要访问互联网。
除了想要的语言,位置,键盘布局和机器设定配置(主服务器,工作站,LTSP 服务器,……)之外,安装不会问到任何问题。所有其他的配置用合适的值自动设置,安装之后由系统管理员从中央位置更改。
每个 Skolelinux 用户帐号在文件服务器上分配使用文件系统的一部分。这部分(主目录)包含用户的配置文件,电子文件和网页。一些文件会被设置为系统上其他用户读取,一些会是互联网上每个人可读,而一些除该用户之外不会为任何人读取。
保证用户目录或共享目录使用的所有磁盘在安装中可以跨越所有计算机被唯一命名,它们可以被作为
/skole/host/directory/
被挂载。最初,在文件服务器上创建的是一个目录,
/skole/tjener/home0/,所有的用户帐号在那里创建。在需要提供特别的用户组或特别的用途模式时更多的目录能在那时被创建。
在标准 UNIX 许可系统下能够共享存取文件,用户需要附加到共享组(如 "students")而他们缺省是在个人基本组。如果用户有适当的umask来新建组权限项(002 或 007),而如果工作在setgid目录保证文件继承正确的组所有者,效果是组成员之间共享管理文件。
对新建文件的初始存取设置是一个方针问题。Debian 缺省umask是 022 (那会不允许组权限为described above),而 Debian
Edu 使用缺省 022 - 导致创建的文件对于所有的人有读权限,那可以稍迟由明确用户行为消除。这可以选择改变(编辑
/etc/pam.d/common-session)为 007 的umask -
导致首先阻止读权限,制定他们的权限是必要的用户行为。这第一个接近促进知识的共享,并使系统更透明,而第二个方法降低不想要敏感信息散布的风险。第一个方案的问题是用户不清楚他们建立的资料会对所有其他用户有访问权限。他们可能仅由查看其他用户的目录发现看到能辨认为他们的文件。第二个方法具有的问题是少数人适合制定他们的文件权限,即使如果他们不包含敏感信息而其内容会帮助到想要得知其他解答个人问题的好打听用户(典型的配置争议)。
这是设置 Skolelinux 方案的不同方法。它可以被安装在一台单独应用的个人计算机上,或作为许多学校操作中心的整体方案。这个灵活性制定了网络部件,服务器和客户端机器的极为不同的配置。
不同设定的目的在网络架构一章中解释。
 如果计划使用 LTSP,需要看 LTSP 硬件需求
wiki 页面。
如果计划使用 LTSP,需要看 LTSP 硬件需求
wiki 页面。
运行 Debian Edu / Skolelinux 的计算机必须有或是 32 位(Debian 架构 'i386',最陈旧被支持的处理器是 686 级)或者 64 位(Debian 架构 'amd64')x86 处理器。
瘦客户端能够仅有 256 MiB RAM 而且是 400 MHz 的处理器,但推荐用更多的 RAM 和更快的处理器。
对于工作站,无盘工作站和独立使用的系统,1500 MHz 及 1024 MiB 的内存绝对是最低限度的需求。为运行最新的 web 浏览器和 LibreOffice 建议至少是 2048 MiB 的内存。
最低限度的磁盘空间需求取决于所安装的设定:
组合主服务器 + LTSP 服务器 + 工作站(如果需要服务器的图形界面):60 GiB(加上使用者帐户的额外空间)。
LTSP 服务器:40 GiB。
工作站或独立系统:30 GiB。
联网设备的最小化安装:4 GiB。
LTSP 服务器在使用缺省网络架构时需要两个网卡:
eth0 连接到主网(10.0.0.0/8),
使用 eth1 为 LTSP 客户端服务。
笔记本电脑是可移动的工作站,因此它们有同工作站一样的需求。
在 https://wiki.debian.org/DebianEdu/Hardware/ 上提供了一份测试过的硬件清单。这一清单远不完整。
https://wiki.debian.org/InstallingDebianOn 努力将如何在一些特定硬件上安装、配置和使用 Debian 记入文档,,让可能的购买者知道硬件是否被支持,并且让现有的所有者知道如何让硬件达到最佳性能。
当使用缺省的网络架构时,这些规则适用:
你需要的正是一台主服务器。
你在主网上可以有上百工作站。
在主网络上可以有许多 LTSP 服务器;两个分开的子网是在 LDAP 中预先配置的(DNS,DHCP),还可以再添加。
在每一个 LTSP 服务器网络上可以有上百的瘦客户端和/或无盘工作站。
可以有上百的其他机器会有充裕的 IP 地址来分配。
为了访问互联网你需要一个路由/网关(参看下面)。
路由/网关,在外部接口连接到互联网并在网络掩码 255.0.0.0 的 IP 地址 10.0.0.1 的内部接口运行,需要连接到互联网。
路由将不运行 DHCP 服务器,它可以运行 DNS 服务器,但这是不需要的而且也不会被使用。
如果您没有路由器或无法设置您的路由器,任何满足Debian最小化安装需求且配备至少两个网络接口的设备均可作为网关来连接现有网络和Debian
Edu设备。请参考 安装文档中提供的简单方法,通过debian-edu-router-config安装和设置一台
Debian 设备。
如果需要嵌入式路由器或访问点设备的话,推荐使用 OpenWRT,当然也可以使用原先的固件。使用原先的固件更容易;使用 OpenWRT 会给你更多选择和控制权。请查看 OpenWRT 网页来找到支持的硬件的列表。
能够使用不同的网络设置(有个 归档的过程 来做这件事),但如果不以现有的网络基础结构勉强去做,那么推荐不要那么做,并推荐维持缺省状态的 网络结构。
在开始安装为生产使用的系统前建议阅读或至少看一下 Debian Bookworm 发行说明。更多有关 Debian Bookworm 发行的信息可在其安装手册里获得。
请尝试一下 Debian Edu/Skolelinux,应该能行。
不过,建议在开始安装主服务器之前阅读有关硬件和网络需求以及架构的章节。
还要务必阅读本手册的入门一章,因为那说明了第一次如何登录。
amd64 和
i386 是两个 Debian 的 x86 CPU 架构名称,两者由
AMD,Intel 和其他厂商制造。amd64 是 64 位架构而
i386 是 32 位架构。现今新的安装将使用
amd64。i386
仅将用于非常老旧的硬件。
网络安装 iso 映像可以用于从 CD/DVD 和 USB 闪存驱动器安装并且有两个 Debian 架构:amd64 或 i386。顾名思义,安装有赖于对互联网的访问。
一旦 Bookworm 发布其映像就可以从这里下载:
这些 ISO 映像约 7.5 GB 大并可用于 amd64 或 i386 机器的安装,也不用访问互联网。它像网络安装映像一样可用于 USB 闪存驱动器或足够大的盘介质。
一旦 Bookworm 发布其映像就可以从这里下载:
Debian-CD 常见问题集的一部分对校验和使用这些映像做了详细说明。
源代码从通常位置的 Debian 档案来获得,系列媒介链接在 http://get.debian.org/cdimage/release/current/source/
当安装 Debian Edu 时,有一些选项要选择。不要畏惧;不是很多。我们做了很好的工作隐藏了安装 Debian 期间及其后续的复杂性。然而,Debian Edu 就是 Debian,如需要则有超过 59,000 个软件包从中选择大量配置选项。对于我们大多数的使用者,我们的默认配置是精细的。请注意:如果打算使用 LTSP,选择一个轻量级桌面环境。
通过提供 DHCP 的路由器访问互联网的典型学校或家庭网络:
典型的学校或机构网络,类似于上述,但需要使用代理。
添加‘debian-edu-expert’到内核命令行;参阅后续细节来做。
必须回答一些附加问题,包括讲到的代理服务器。
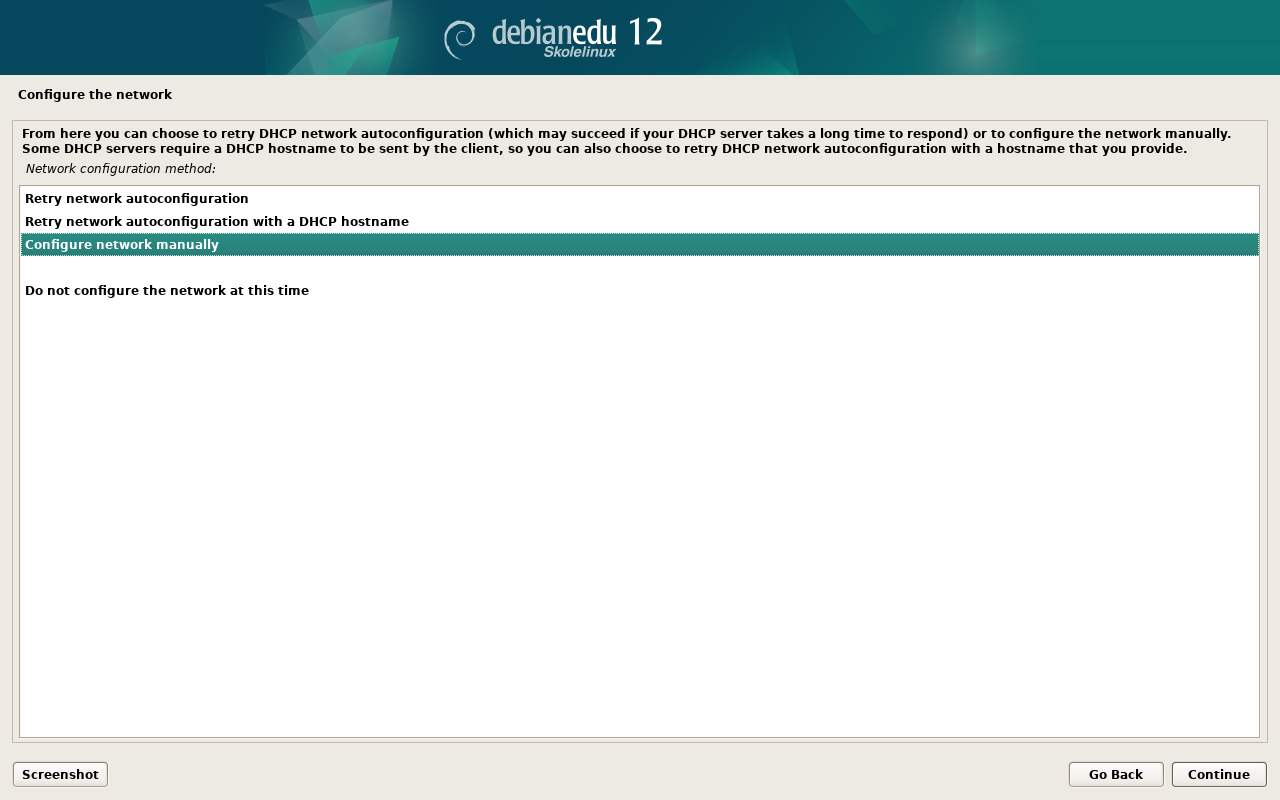
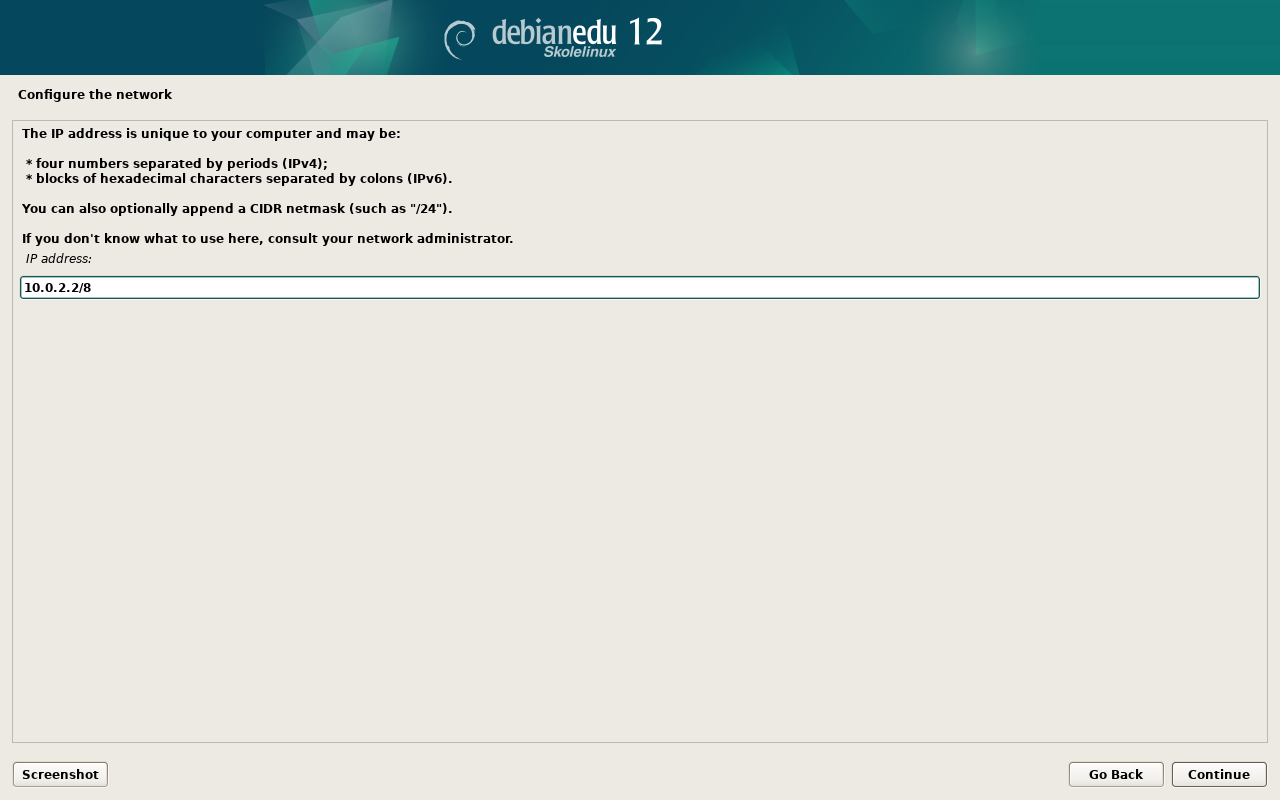
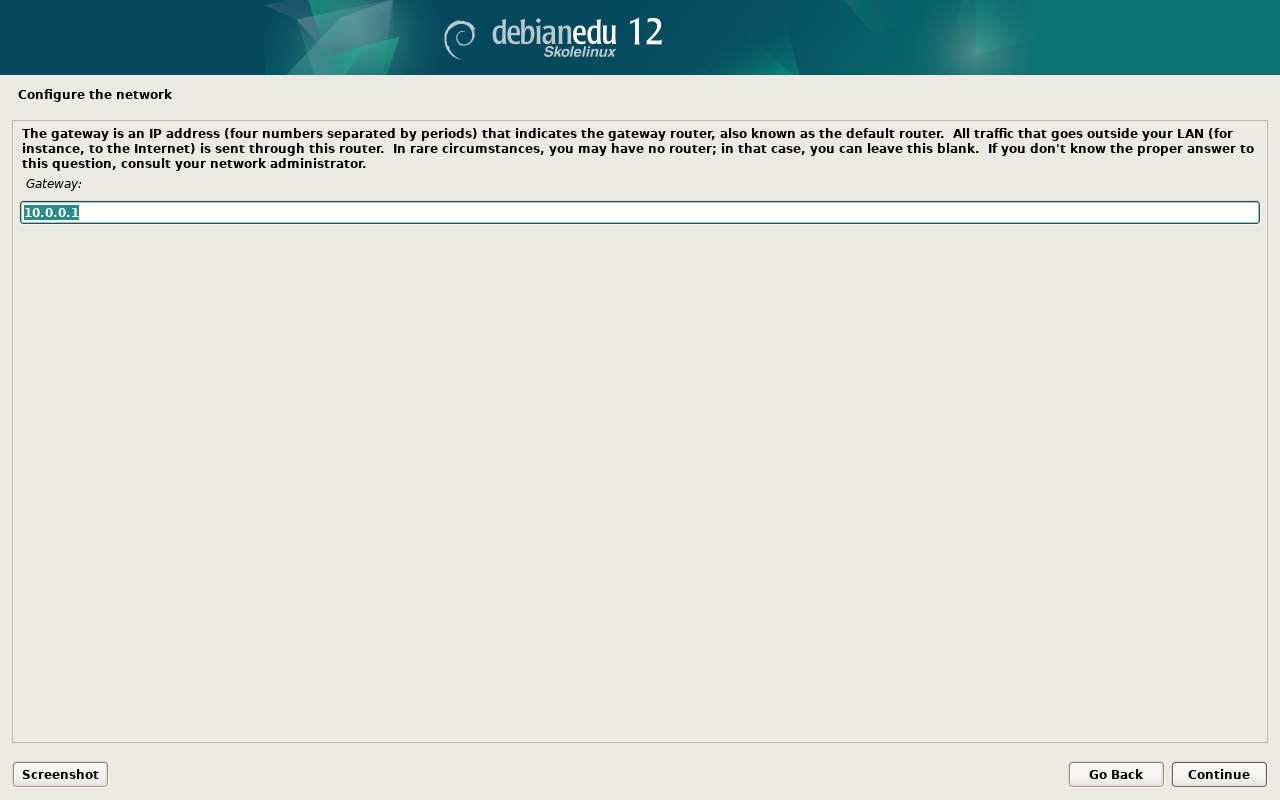
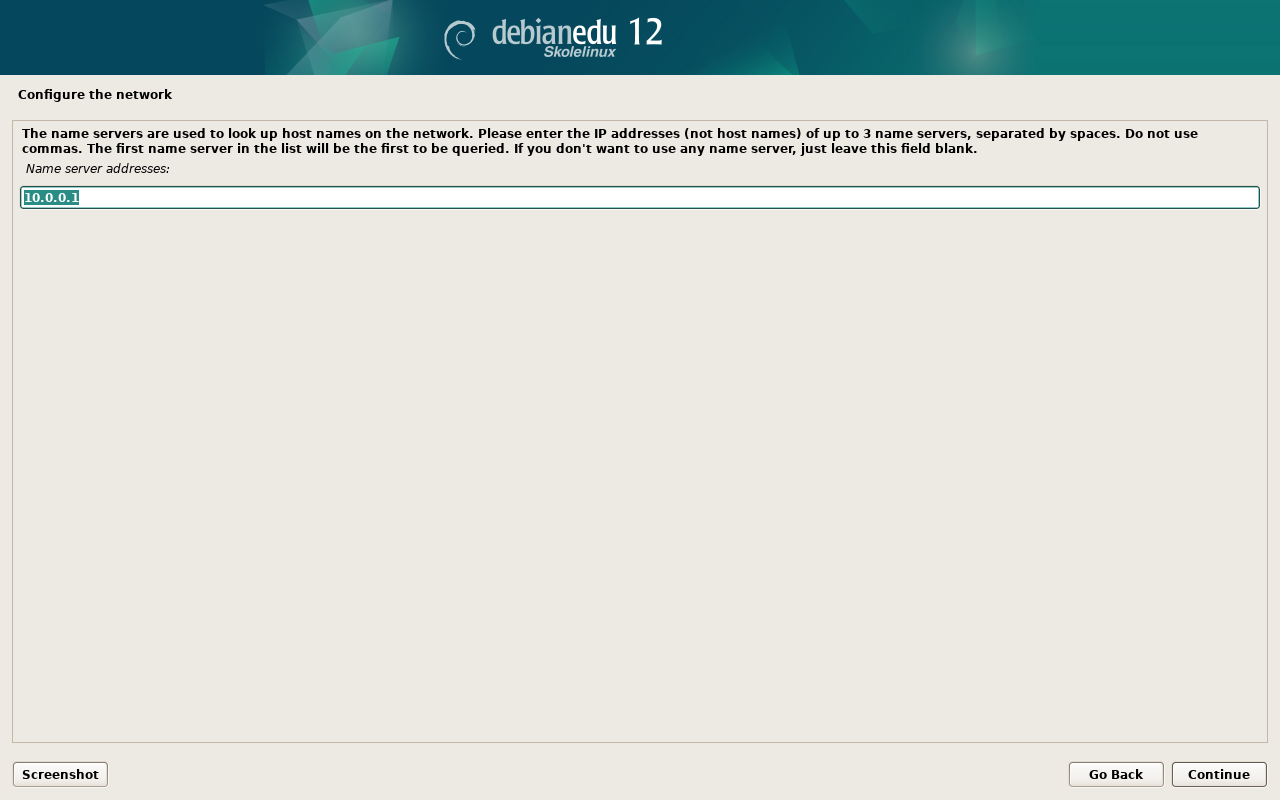
网络由 IP 为 10.0.0.1/8 的路由器/网关(那不提供 DHCP 服务器)而访问互联网:
一旦自动网络配置失败(由于未发现 DHCP),就选择手工网络配置。
输入 10.0.2.2/8 作为主机 IP
输入 10.0.0.1 作为网关 IP
如果不知道更合适的就输入 8.8.8.8 作为域名服务器 IP
主服务器将在第一次启动之后正常工作。
离线(无网络连接):
使用蓝光光盘 ISO 映像。
核实所有(真实/虚拟)网线插头被拔出。
选择‘现在不进行网络设置’(在 DHCP 配置网络失败并按下‘继续’之后)。
在互联网联通的正确环境下第一次启动就更新系统。
有几种桌面环境可用:
Xfce 的负载比 LXDE 略大但有非常好的语言支持(106 种语言)。
KDE 和 GNOME 都有很好的语言支持,但对于比较陈旧的计算机和 LTSP 客户机都是重负。
Cinnamon 是 GNOME 的一个轻量级替代。
MATE 比上面三个轻巧,但对一些地区缺少良好的语言支持。
LXDE 有着最小的负载而支持 35 种语言。
LXQt 是一款具有更新颖外观和体验(就像 KDE 一样基于 Qt)的轻量级桌面环境(语言支持类似于 LXDE)。
Debian Edu 作为一个国际项目而选择使用了 Xfce 作为默认桌面环境;参阅下面如何来设置一个不同的桌面环境。
安装配置文件为工作站(Workstation)的系统时,会安装许多与教育相关的程序。要仅安装基本配置文件,请在开始安装之前删除desktop=XXXXkernel命令行参数;有关如何执行此操作的详细信息,请参阅下文。这允许安装一个特定于站点的系统,并可以用来加速测试安装。
请注意:如果之后打算安装一个桌面环境,不要使用像例如 education-desktop-xfce 这样的 Debian Edu 元软件包是因为这将会引入全部教育相关的程序;例如可改为安装 task-xfce-desktop。应视使用情况安装一些新的相关年级的元软件包 education-preschool,education-primaryschool,education-secondaryschool,education-highschool。
有关 Debian Edu 综合软件包的详细情况,请看 Debian Edu 软件包概览页。
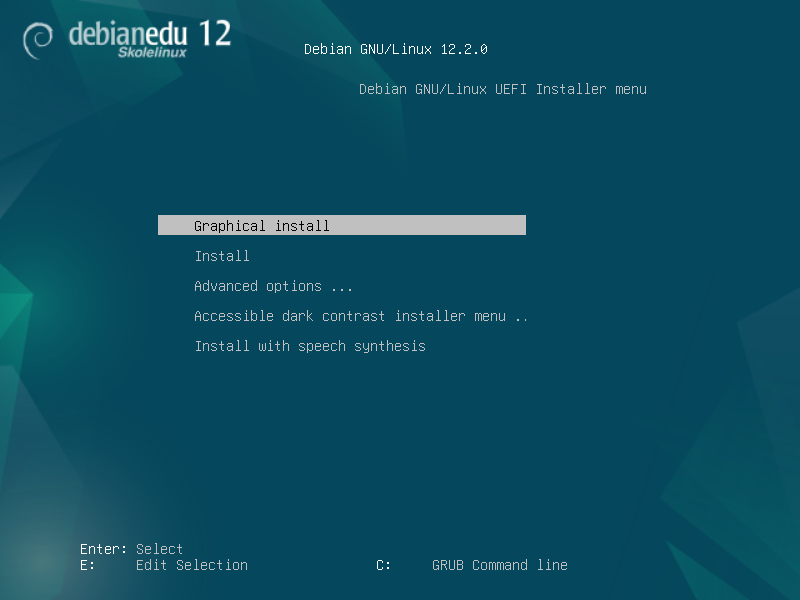
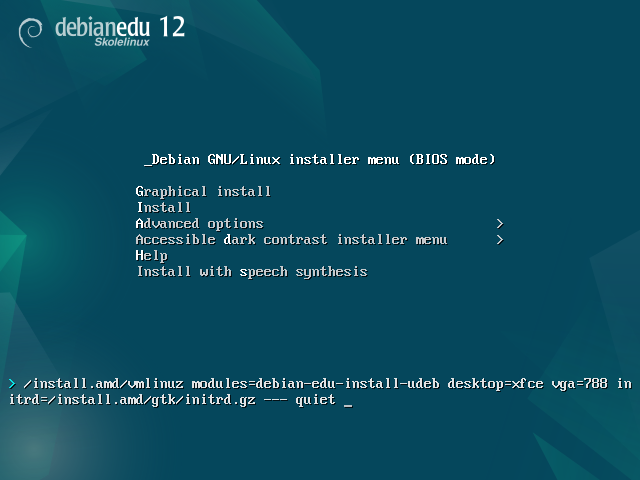
在 64 位硬件上的安装程序引导菜单 - BIOS 模式
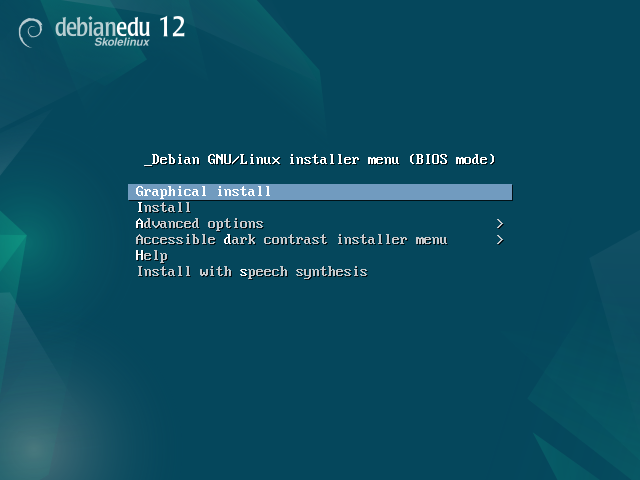
Graphical install 使用图形界面安装程序而你可以使用鼠标。
使用文本模式安装。
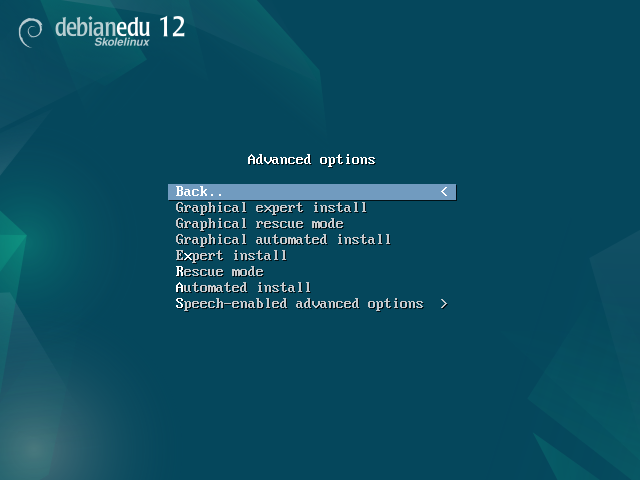
进阶选项> 给予更多详细选项来选择的子菜单。
Help 给予所使用的安装程序的一些提示;参看以下的屏幕快照。
Back.. 返回到主菜单。
Graphical expert install 在图形模式中给予访问所有的问题,适用鼠标。
Graphical rescue mode 让这个安装介质成为紧急任务的救援盘。
Graphical automated install 需要preseed文件。
Expert install 给予访问在文本模式中所有的问题。
Rescue mode 文本模式;让这个安装介质成为紧急任务的救援盘。
Automated install 文本模式;需要预置文件。
 不使用
不使用 Graphical expert install 或者
Expert install,在特殊情况下改用
debian-edu-expert 作为附加的内核参数。
Help screen
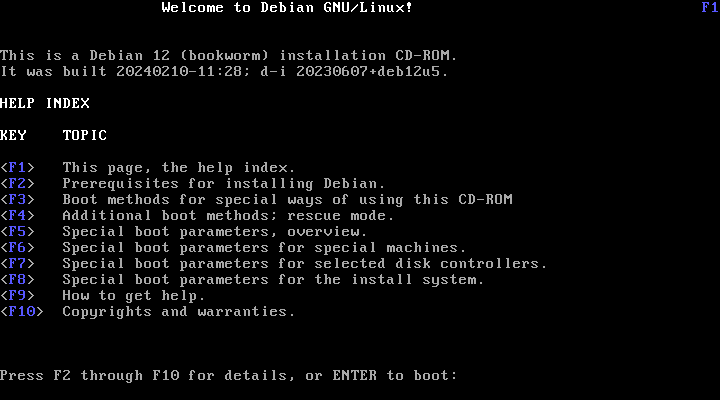
帮助屏幕是自己说明并能用键盘上的 <F>-键获得更多题目解释中的细节。
在 64 位硬件上的安装程序引导菜单- UEFI 模式
Add or change boot parameters for installations
在两种情况中,于引导菜单下按 TAB 或 E 键可以编辑引导选项;这一屏幕快照显示了 Graphical install 的命令行。
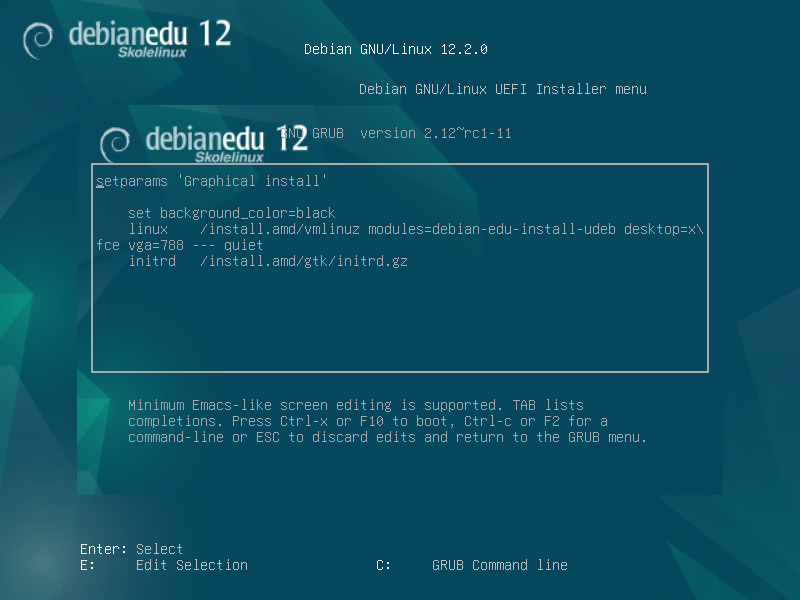
可以使用网络上一个存在的 HTTP 代理服务来加速从 CD 安装主服务器设定配置。例如添加
mirror/http/proxy=http://10.0.2.2:3128作为一个附加引导参数。如果在一台机器上已经安装了主服务器设定配置,后续安装应通过 PXE 完成,因为这将自动使用主服务器的代理。
要安装 GNOME 桌面环境来替换默认的 Xfce 桌面环境,在
desktop=xfce中用gnome替换xfce参数。要改为安装 LXDE 桌面环境,使用
desktop=lxde。要改为安装 LXQt 桌面环境,使用
desktop=lxqt。要改为安装 KDE Plasma 桌面环境,使用
desktop=kde。要改为安装 Cinnamon 桌面环境,使用
desktop=cinnamon。而改为安装 MATE 桌面环境,使用
desktop=mate。
如果计划设置一个 LTSP 服务器的话,请记住系统要求确保有至少有两块网卡(NIC)。
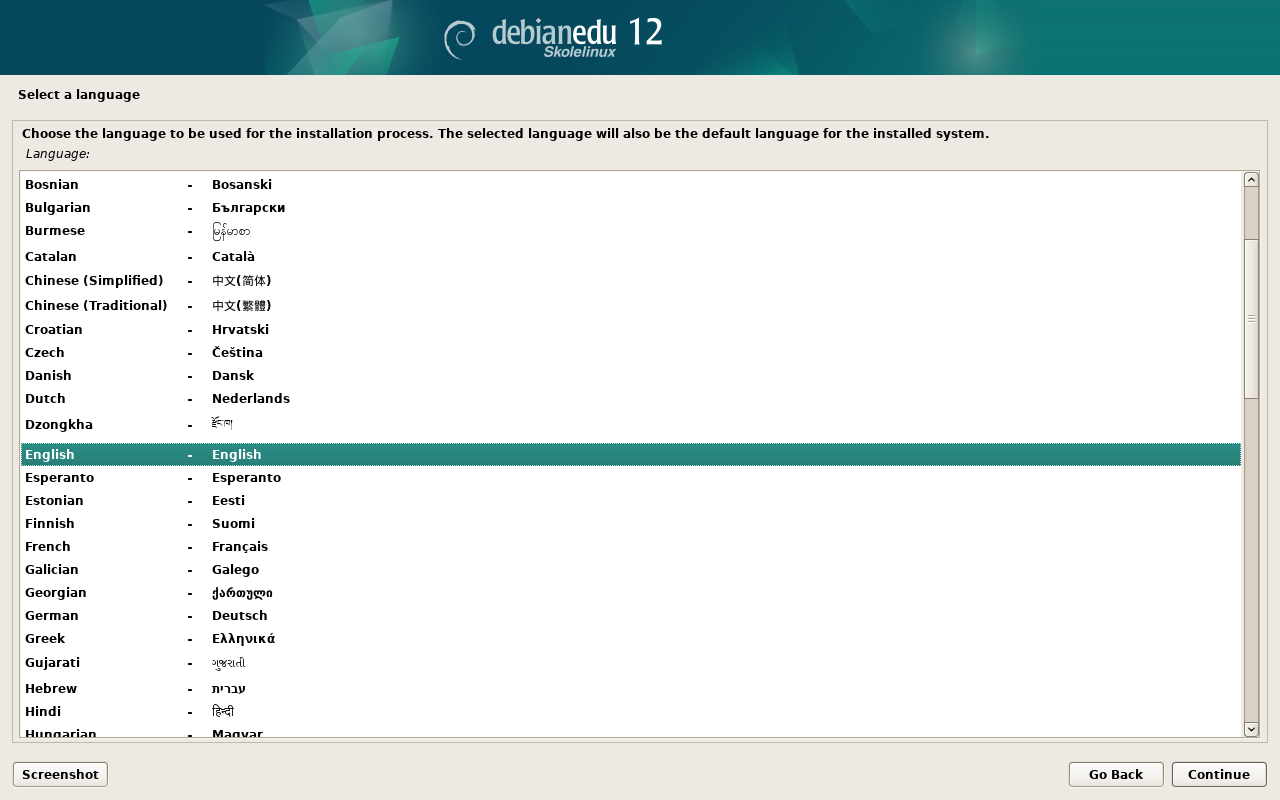
选择一种语言(对于本安装及安装后的系统)。
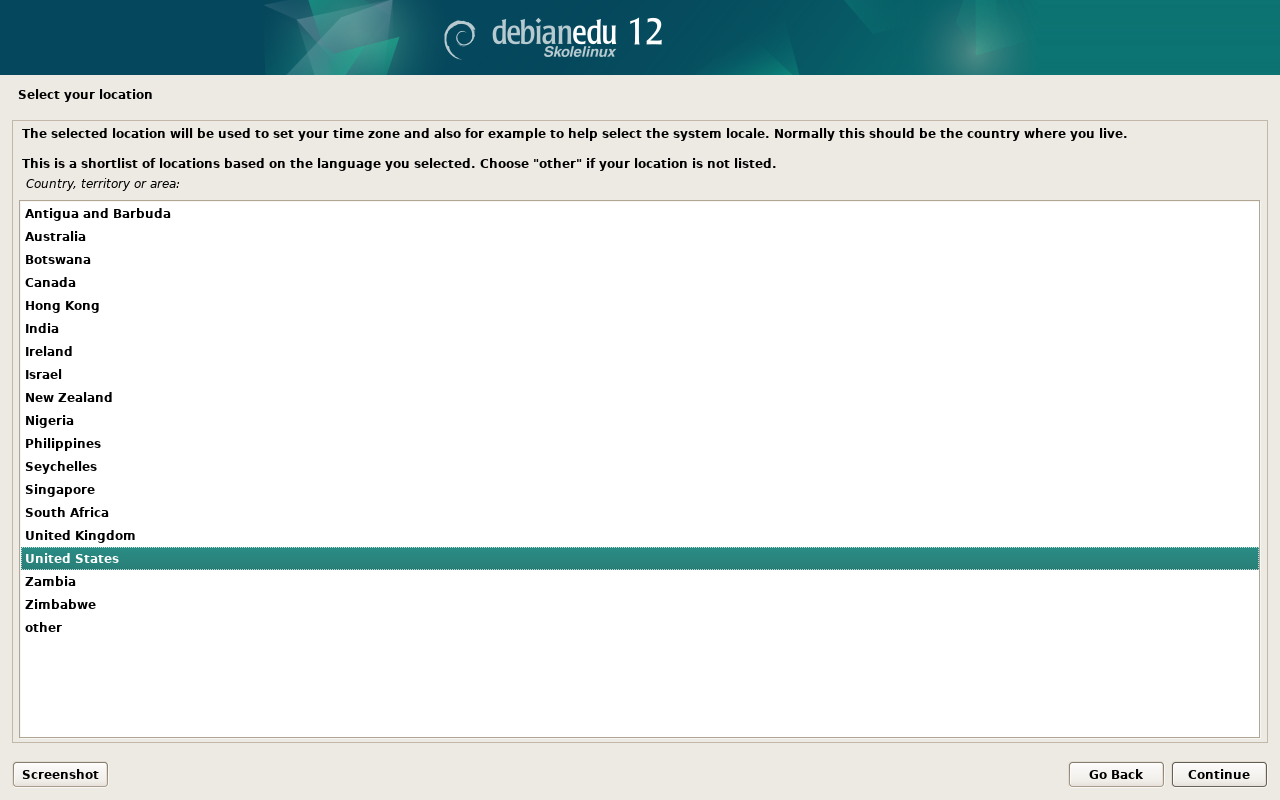
选择一个区域那通常是你生活的地方。
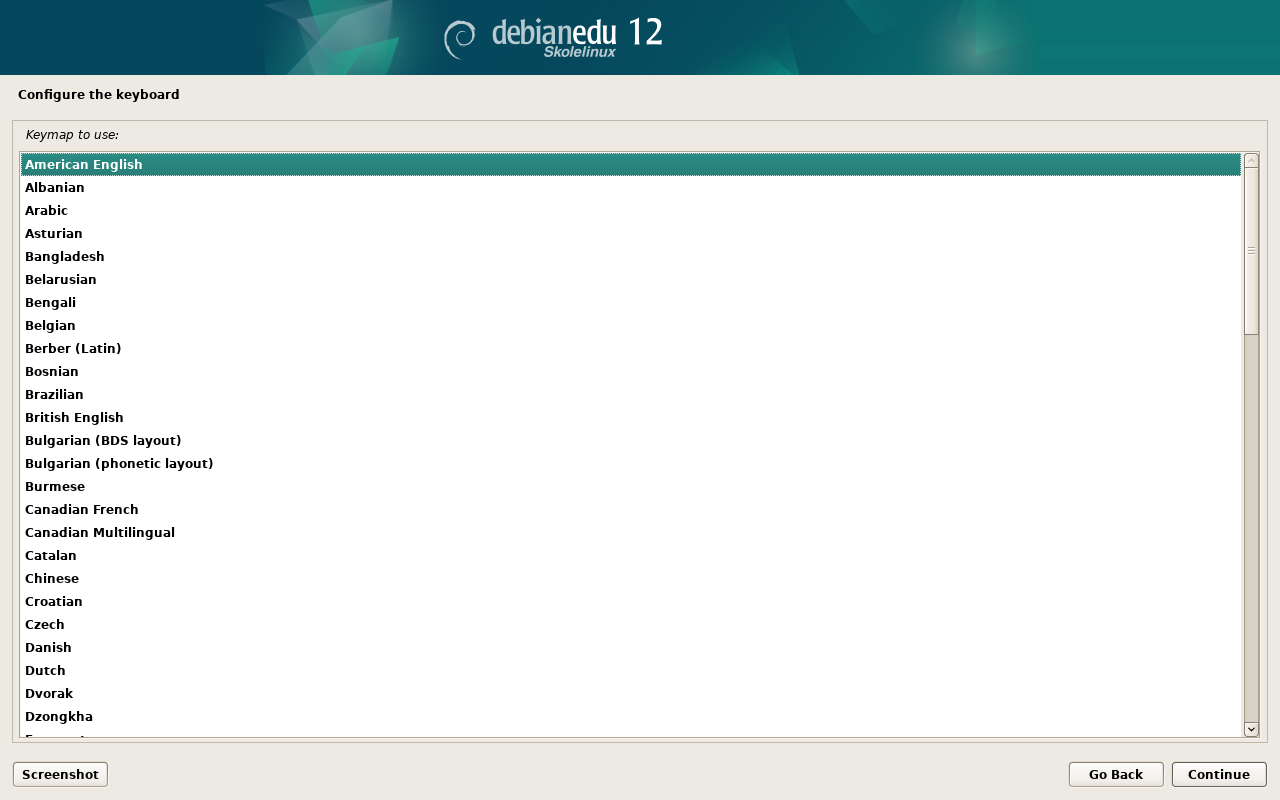
选择键盘布局(缺省的地区通常很好)。
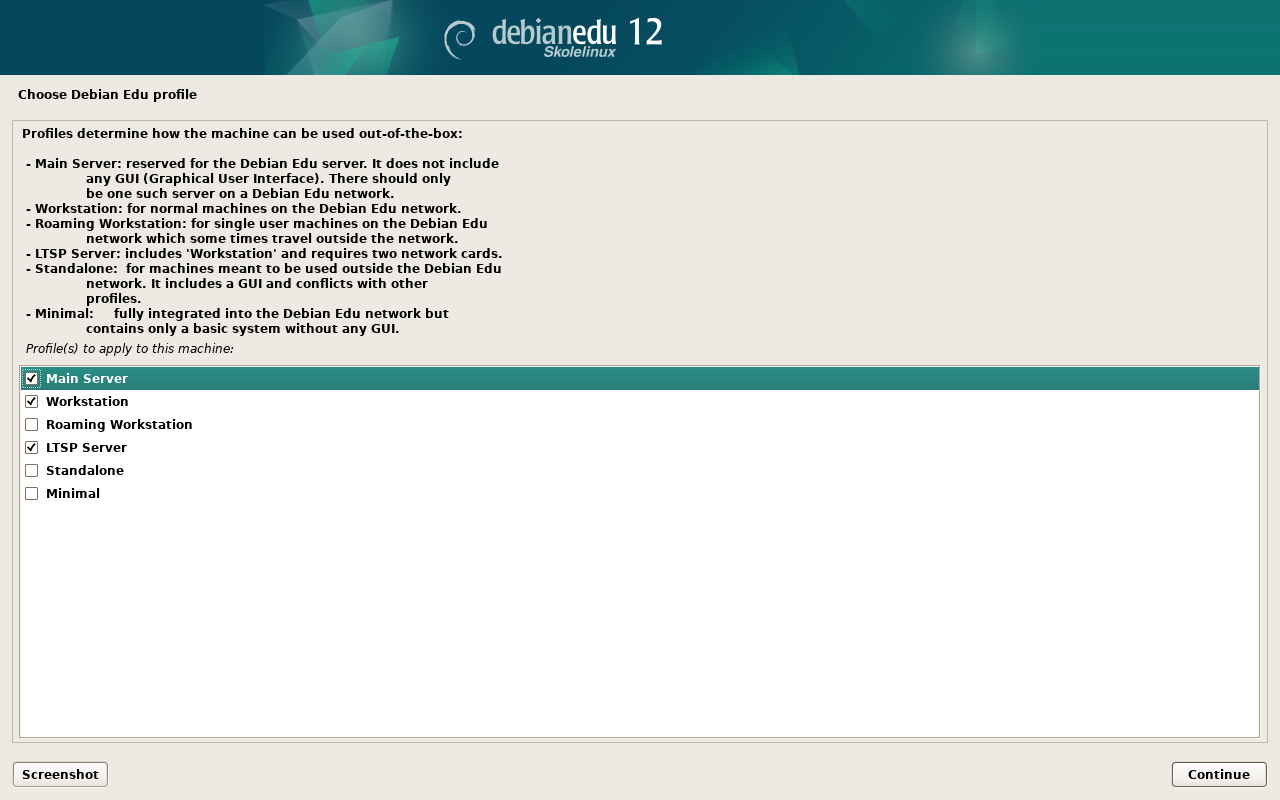
从以下列表中选择各设定:
主服务器
这是为学校提供所有服务的预配置“开箱即可工作”的主服务器(tjener)。每一个学校只可安装一台主服务器!这个预配置不包括图形用户界面。如果需要图形用户界面,此时在这里选择工作站或 LTSP 服务器。
工作站
一台计算机从它的本地硬盘驱动器引导,并且如一台普通的计算机本地驱动运行全部软件,只是由主服务器认证用户登录,那里储存着用户的文件和桌面profile。
漫游工作站
同于工作站但能够使用贮藏资格认证,意味这可以在学校外的网络中使用。用户的文件和profile保存在本地硬盘上。对于单一的用户notebook和laptop在较早的发布版中建议不选择“工作站”或“独立安装”。
LTSP 服务器
瘦客户机(和无盘工作站)服务器,也称为 LTSP 服务器。客户端没有硬盘驱动器而是从服务器引导和运行软件。这台计算机需要两个网卡,大量的内存,适合更多的处理器或多核心。这个主题更多的信息参阅关于网络客户端的章节。选择这个配置也启用了工作站配置(甚至并没有选择) - LTSP 服务器也总是可以作为工作站使用。
独立安装
普通的计算机可以不以主服务器运转(那是,它不需要在网络中)。包括笔记本。
最小安装
这个设定配置会安装基本软件包和配置机器融入 Debian Edu 网络,但没有任何服务和应用。用作从主服务器手工迁移出单个服务的平台。
如果普通用户需要使用类似的系统,则需要使用GOsa²(类似于工作站)添加它,并且需要安装libpam-krb5软件包。
预先选择主服务器、工作站和LTSP 服务器配置文件。如果想要安装一台所谓的组合主服务器上的话,那么把这些配置文件可以一起安装在一台机器上。这意味着这台主服务器会是 LTSP 服务器,并且也用作工作站。这是默认选择,因为我们设想大多数人以后会想要它。请注意,必须将两块网卡安装在以后作为组合主服务器或者作为 LTSP 服务器使用的机器上。
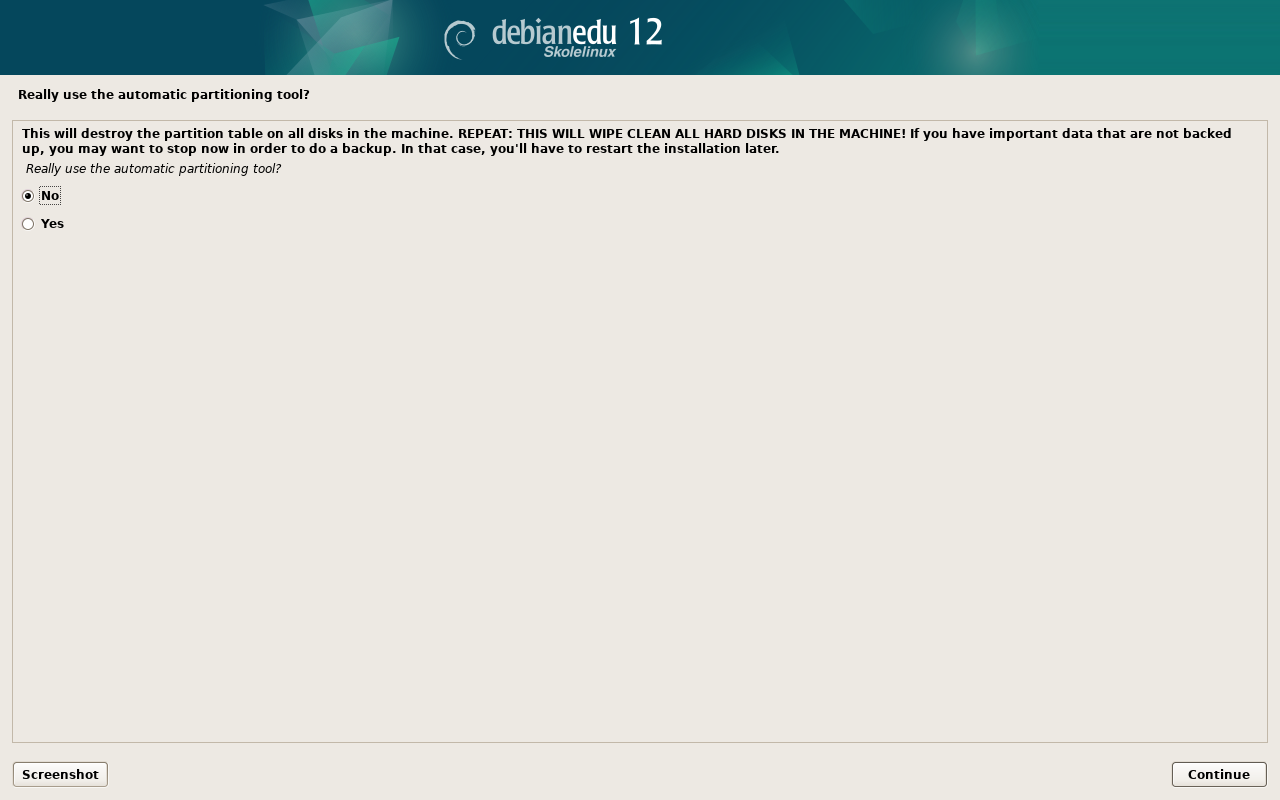
对自动分区说“是”或者“不”。要意识到说“是”将摧毁硬盘驱动器上的全部数据!而说“不”会依赖更多工作 - 你要保证需要的分区已经建立并且足够大。
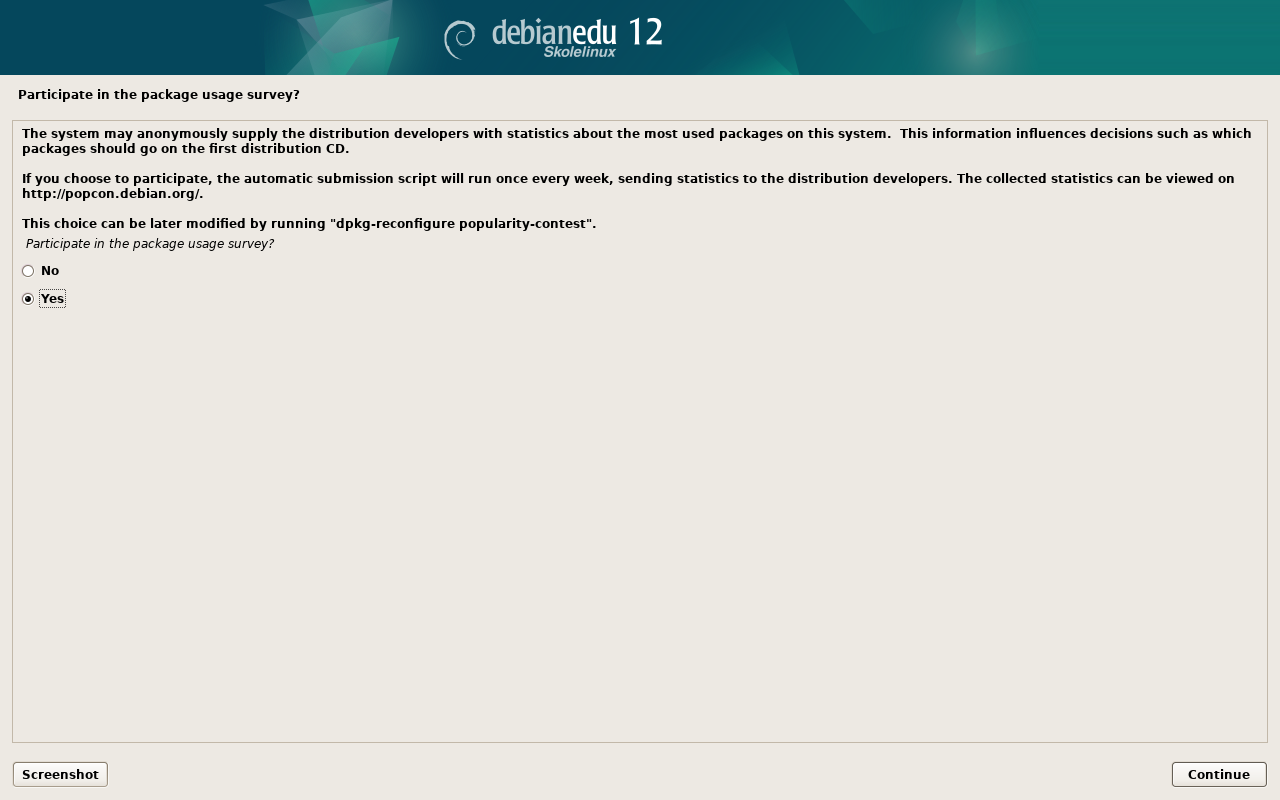
请对提交信息到 https://popcon.debian.org/ 说“是”来允许我们知道那些软件包的流行度并将其保持到将来的发布中。尽管不必这样做,这却是你所做帮助的简单方法。

等待。如果所选设定配置包含 LTSP 服务器那么安装程序在最后会耗费相当一段时间,“完成安装 - 运行 debian-edu-profile-udeb...”。
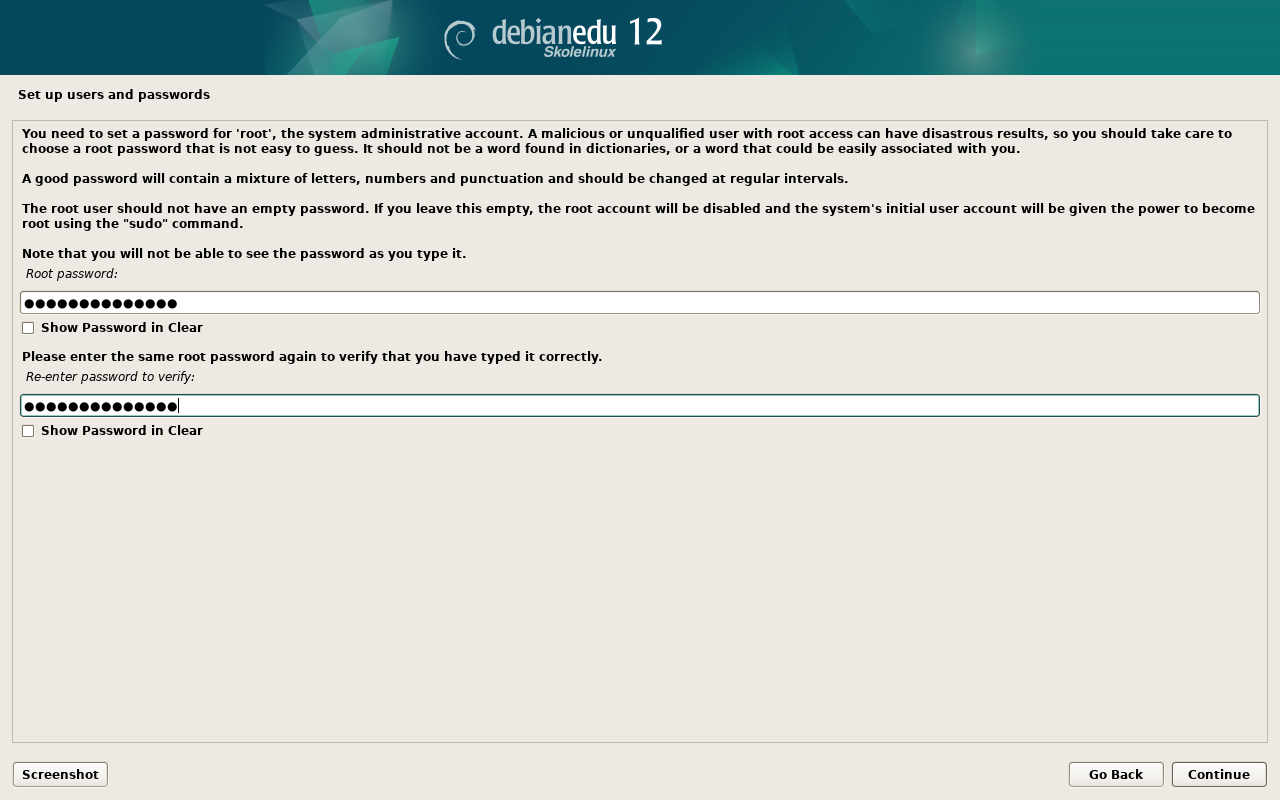
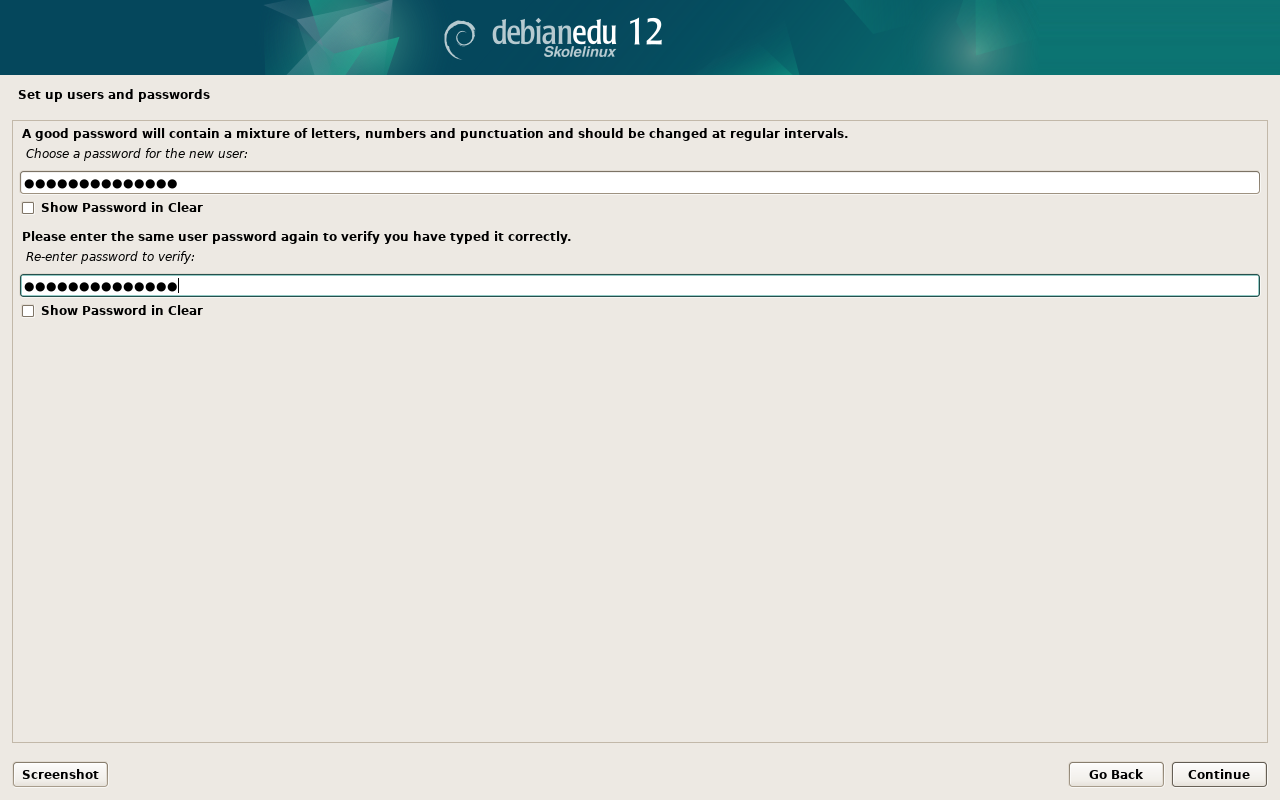
给出 root 密码之后,你会被询问创建“非管理任务”的常规用户帐号。这是 Debian Edu 非常重要的帐号:你要使用这个帐号管理 Skolelinux 网络。
用户的密码必须具有至少 5
个字符的长度并且和用户名必须不相似 -- 否则登录不会被认可(尽管安装程序会接受较短的密码还有和用户名相似的密码)。
若是组合主服务器重启系统后还需等待。这将花费相当长的时间生成无盘工作站的 SquashFS 映像。
若是独立的 LTSP 服务器,无盘工作站和/或瘦客户端的设置需要一些手工的步骤。相关细节,参见网络客户端 HowTo 章节。
debian-edu-router-config 软件包简化了 Debian Edu
网络的网关设置流程,您可以在交互式的配置流程中通过一系列对话框来获取或输入需要的信息。
要使用它,需要先进行 Debian 的最小化安装。请确保您使用的是普通的 Debian 安装程序而非 Debian Edu
安装程序,debian-edu-router-config并不支持 Debian
Edu。
然后安装 debian-edu-router-config,执行
DEBIAN_FRONTEND=noninteractive apt install -y -q debian-edu-router-config
可能出现一些关于配置的错误信息,现在可以忽略它们。
debian-edu-router-config
安装完成后,接下来的配置流程需要物理访问计算机。
The network interfaces may already be connected to the corresponding networks but do not have to be. However it is necessary to be aware which interface will be connected to which network. In order to obtain more information about the network hardware
lshw -class network
这个命令能够提供这些信息。
Remove the configuration of the two network interfaces to be used from
/etc/network/interfaces or files in
/etc/network/interfaces.d/ and un-configure
the two interfaces using
ip addr flush <interface>
The actual configuration process is started with
dpkg-reconfigure --force uif debian-edu-router-config
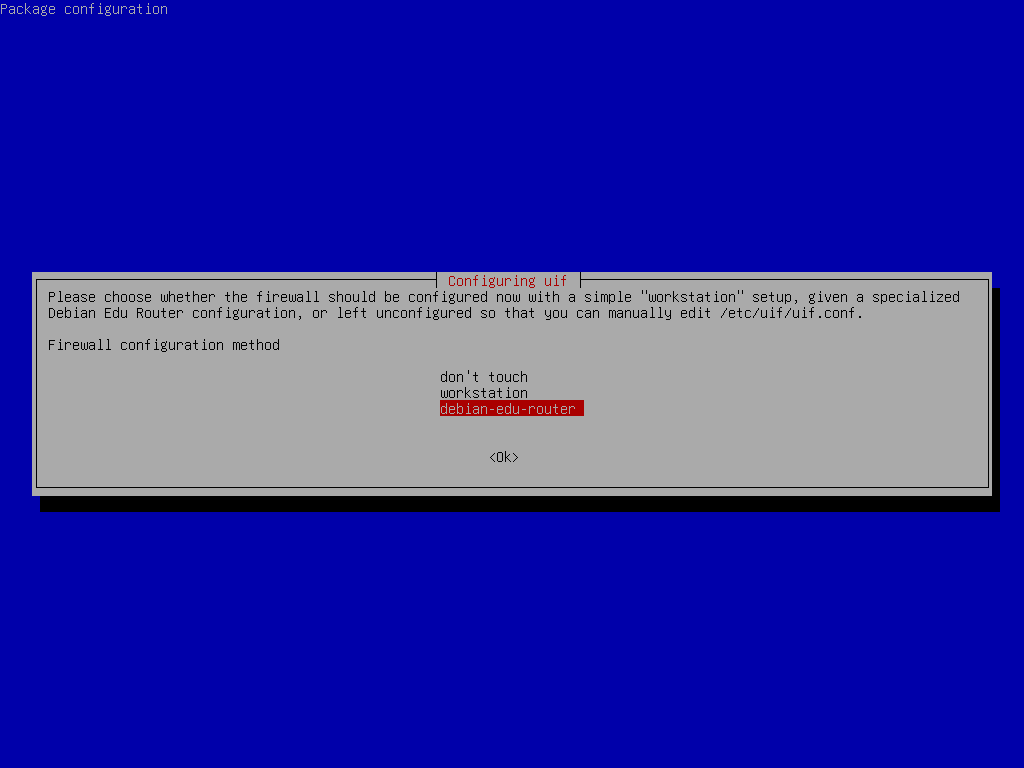

When asked about the uif firewall configuration method choose "debian-edu-router". Confirm that you want to set up the firewall for Debian Edu Router.
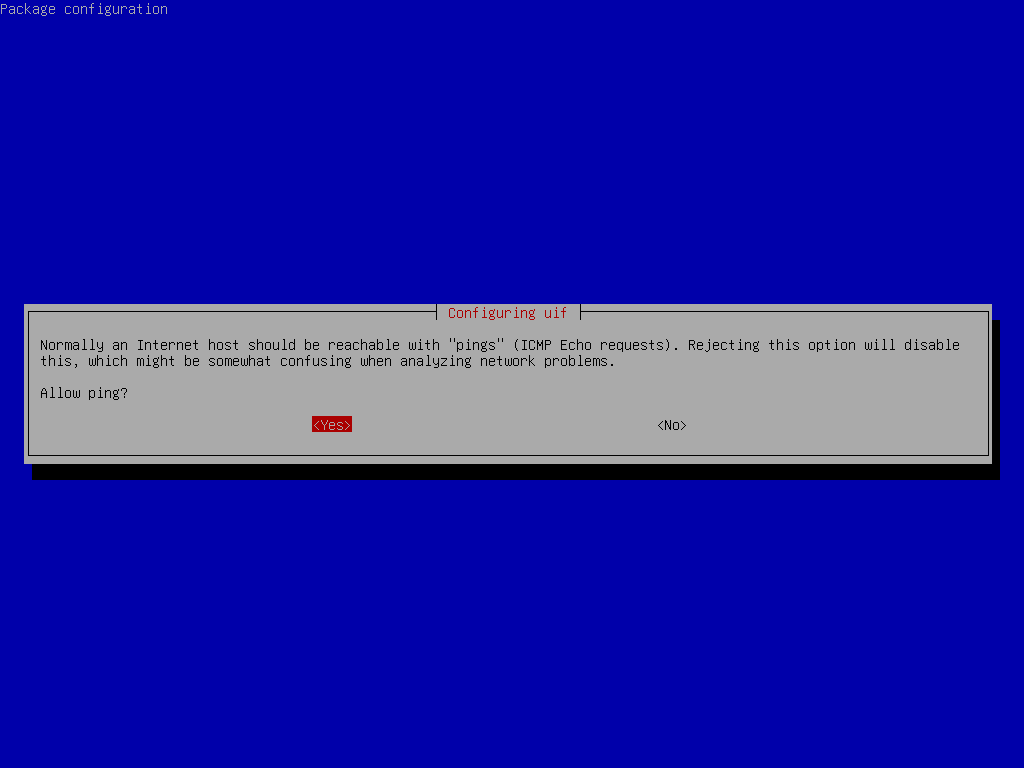
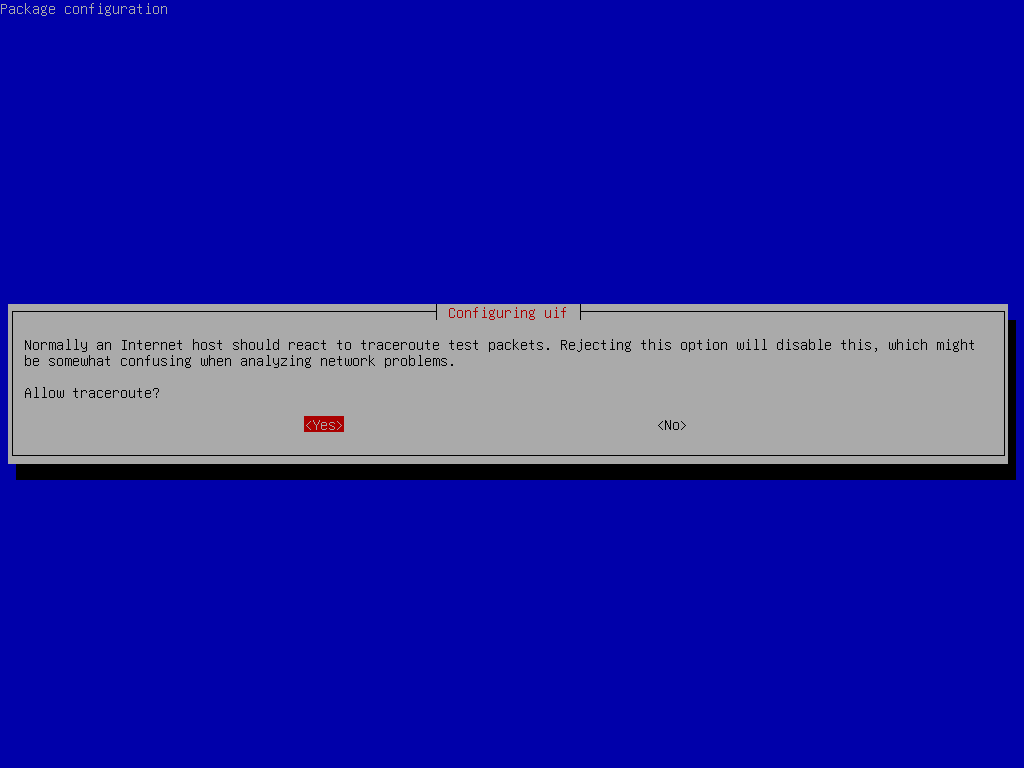
Decide whether you want to respond to ping and traceroute. If unsure answer with yes as it can be useful for diagnosing network issues.
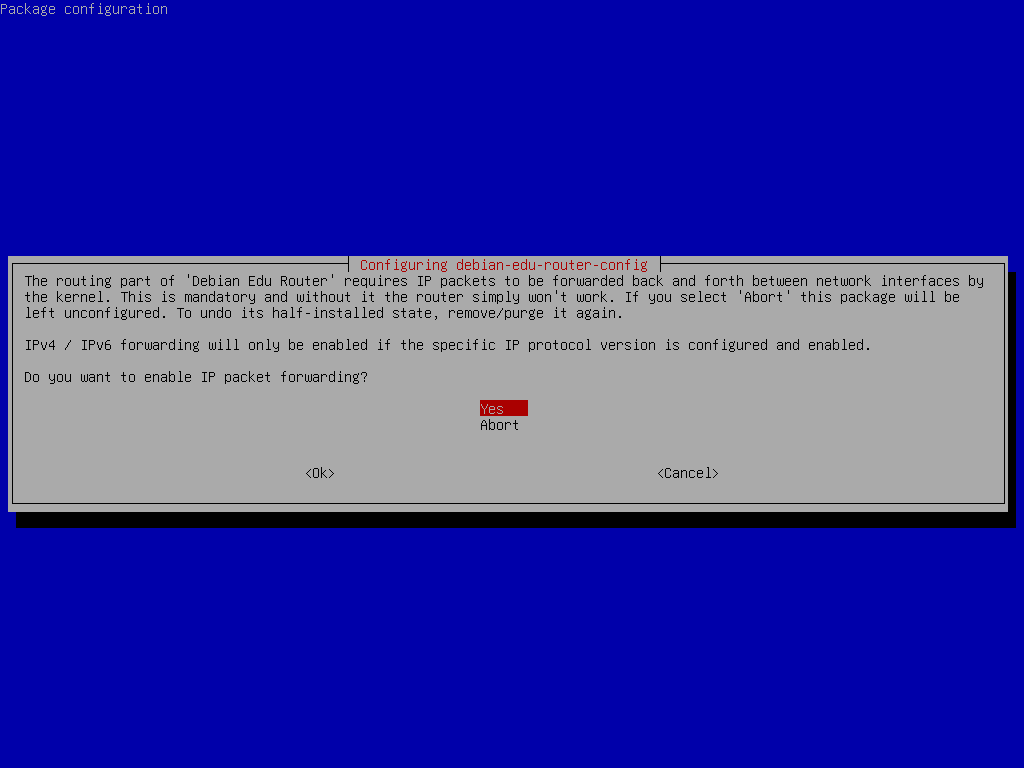
Confirm that you want to enable IP packet forwarding.
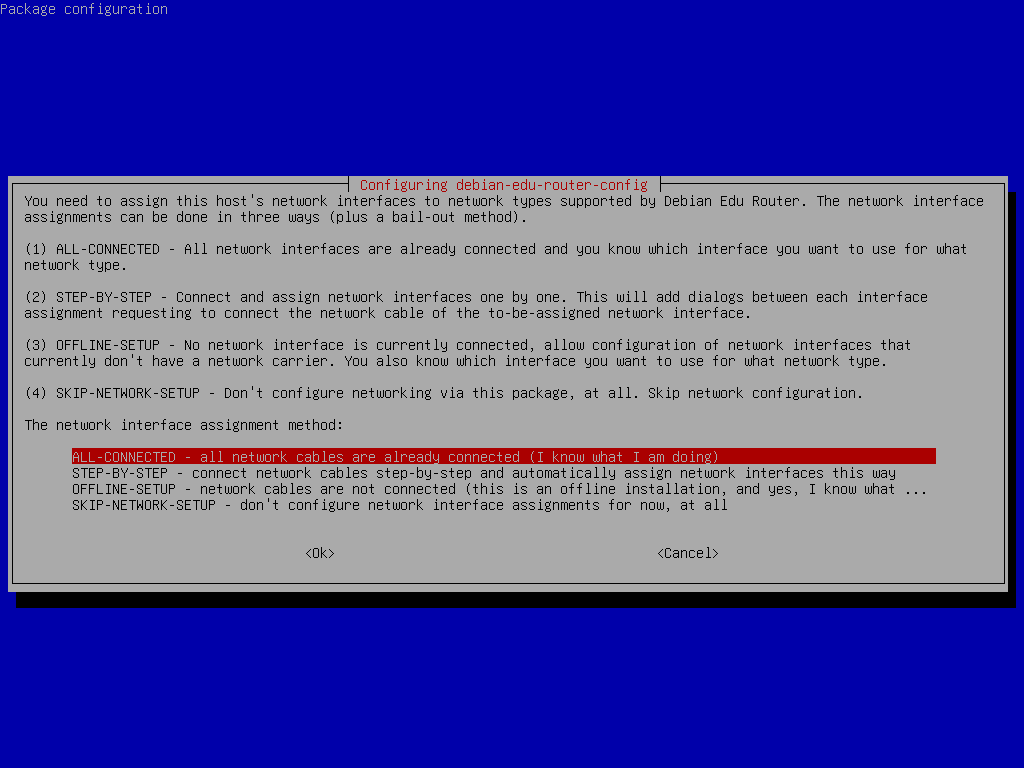
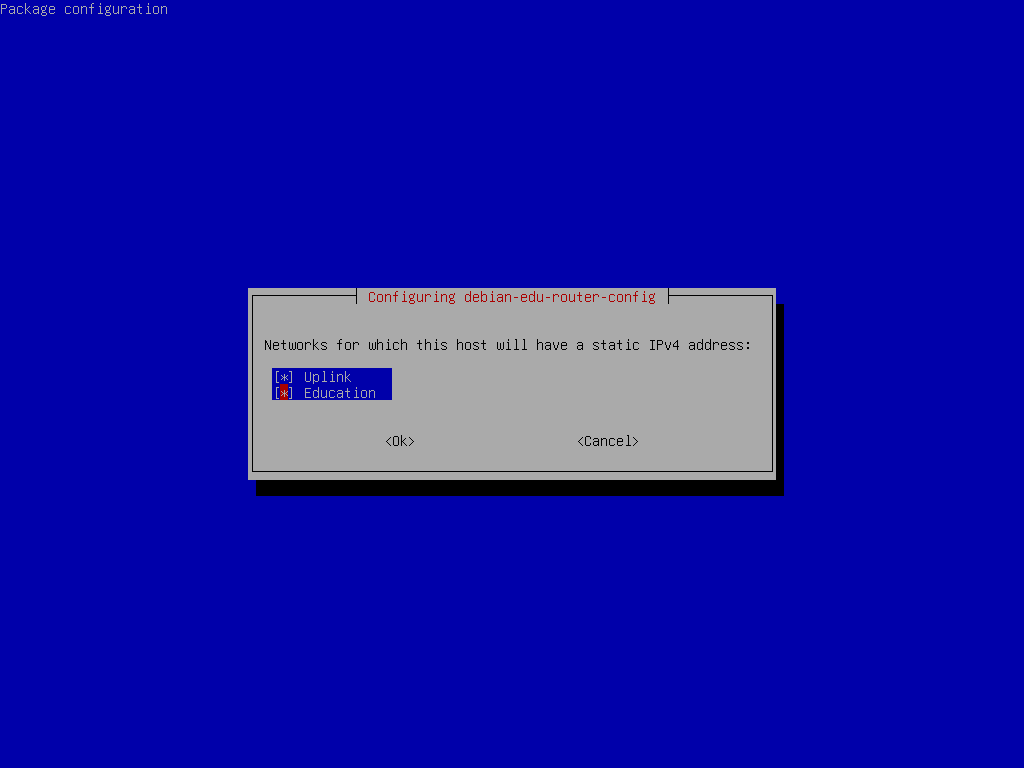
Next, assign networks to the network interfaces in your router, choose one of the offered options depending on whether your network interfaces are already connected or not.
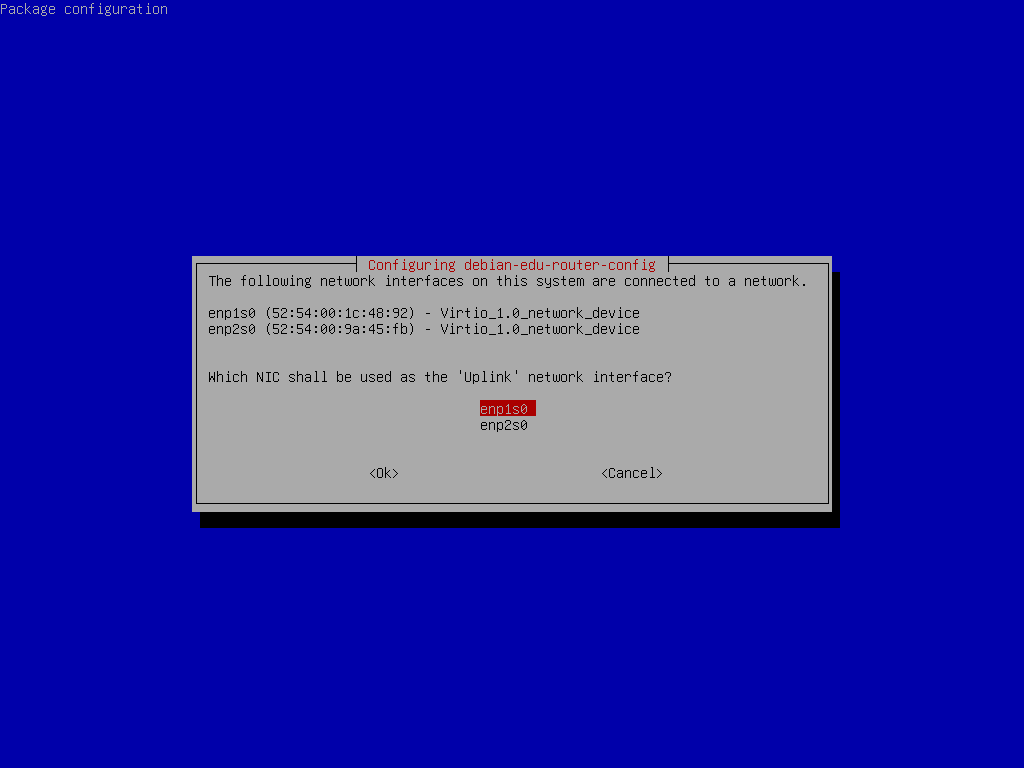
Select the interface which is connected to the upstream network.
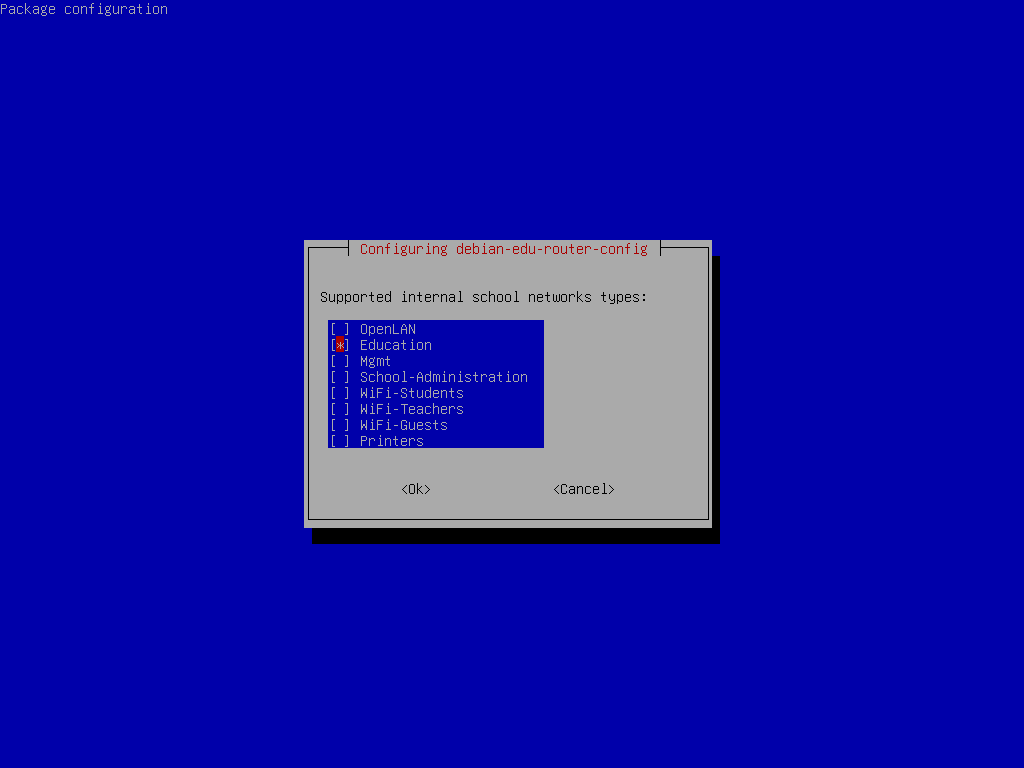
Select an internal network, in case you are unsure and simply want a single internal network select "Education" here.
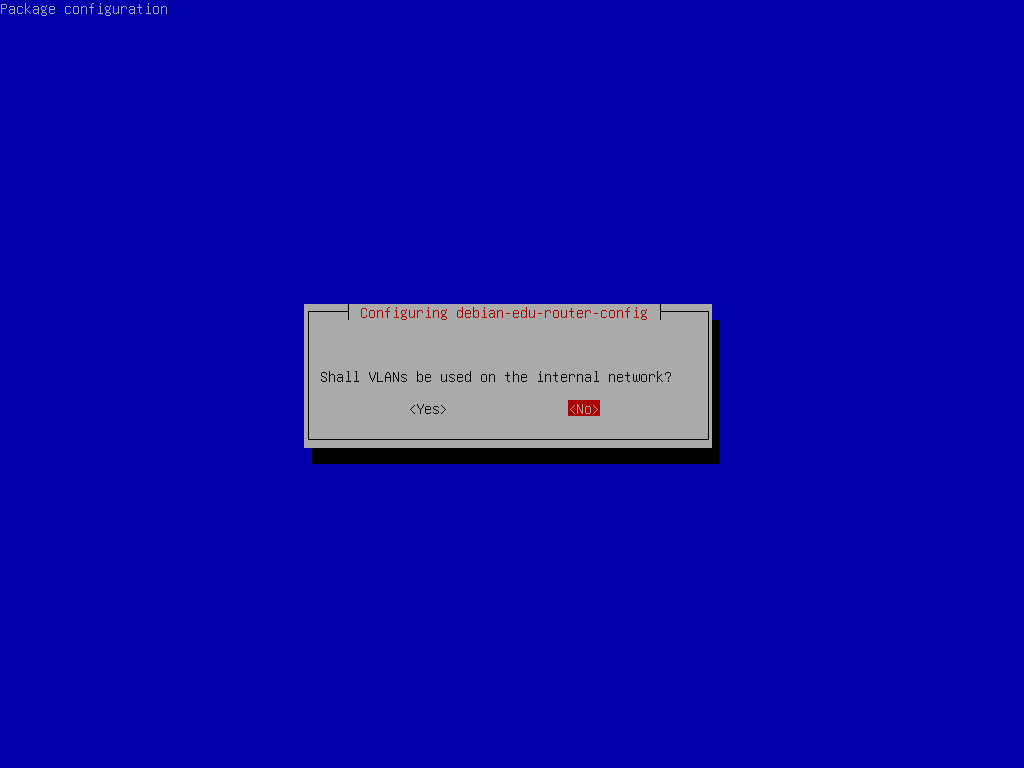
Select whether VLANs should be used for internal networks, if you are unsure select no here.
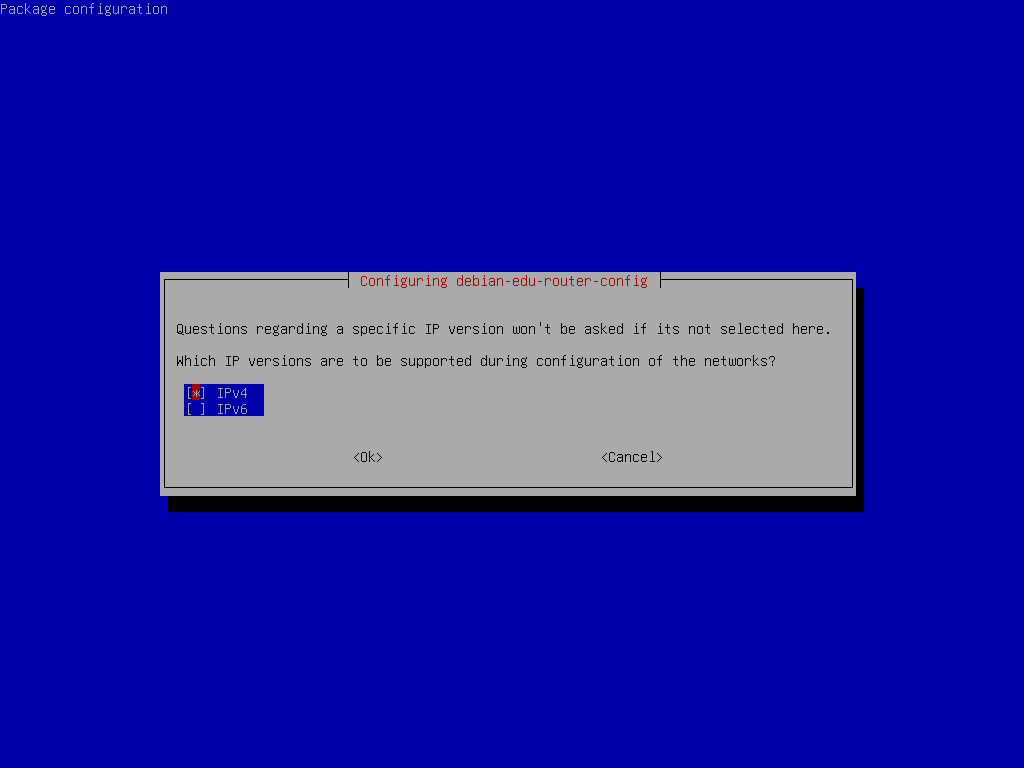
Select "IPv4" here.
如果你的上游网络需要一个静态IP地址,并且你已经遵循了内部“教育”网络上的建议,请选择“上行链接”。
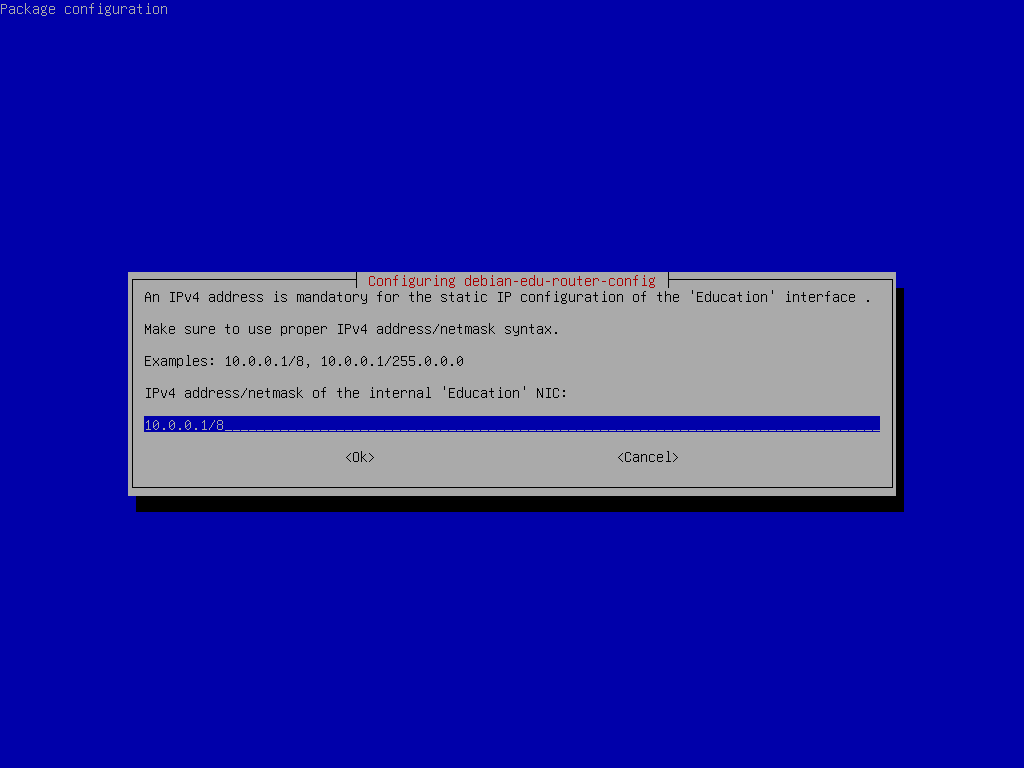
如果你遵循了上述内部网络的建议请将IP地址设为 10.0.0.1/8。
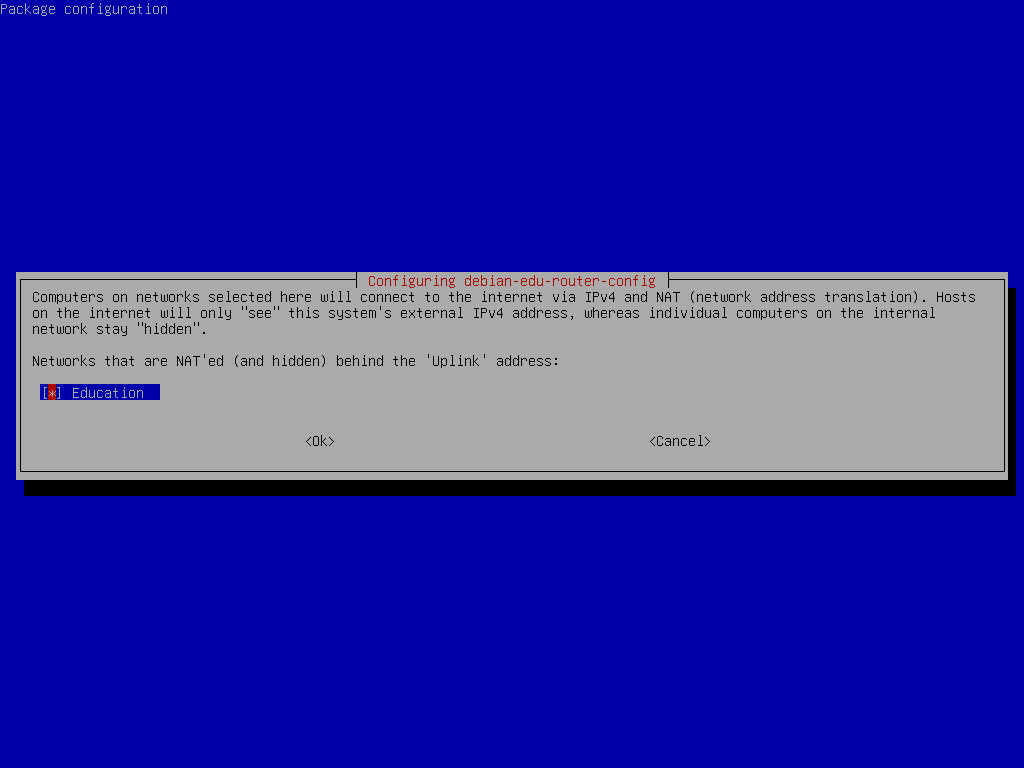
Enable NAT for the internal network.
为内部网络允许互联网访问。
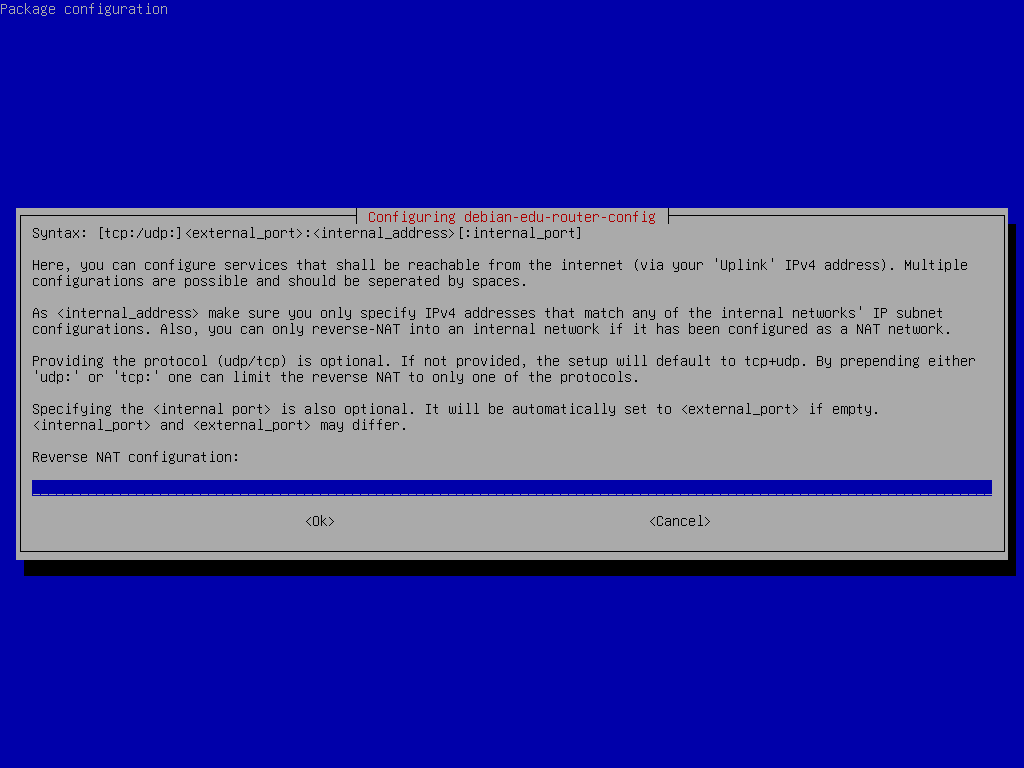
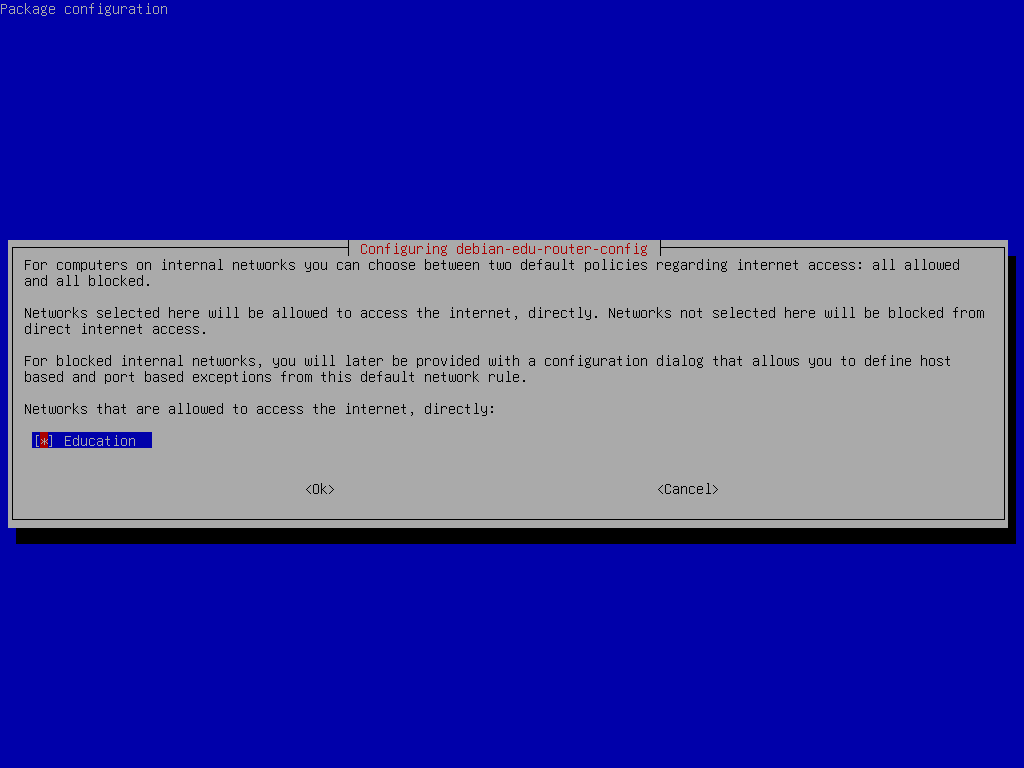
如果你想将任意一个内部服务暴露在公网上请使用可描述的标记。请注意网关的SSH访问权限可以使用下列对话框来配置。
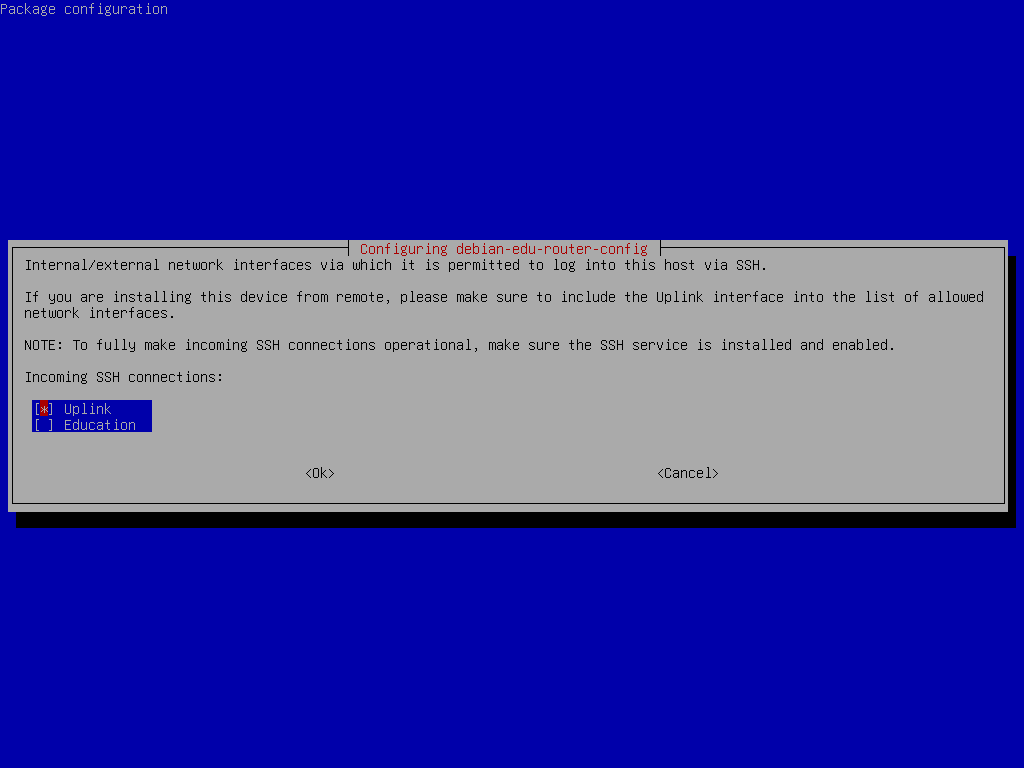
决定允许哪个网络通过SSH访问网关。
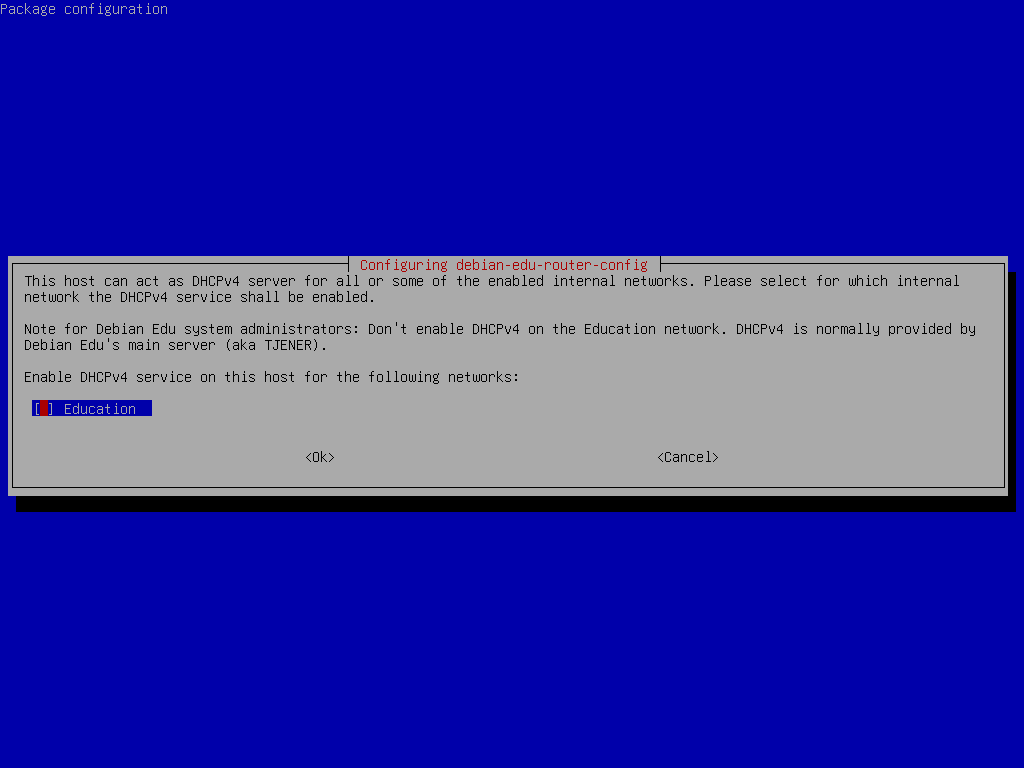
不要在内部网络启用DHCP,它将由Debian Edu主服务器提供。
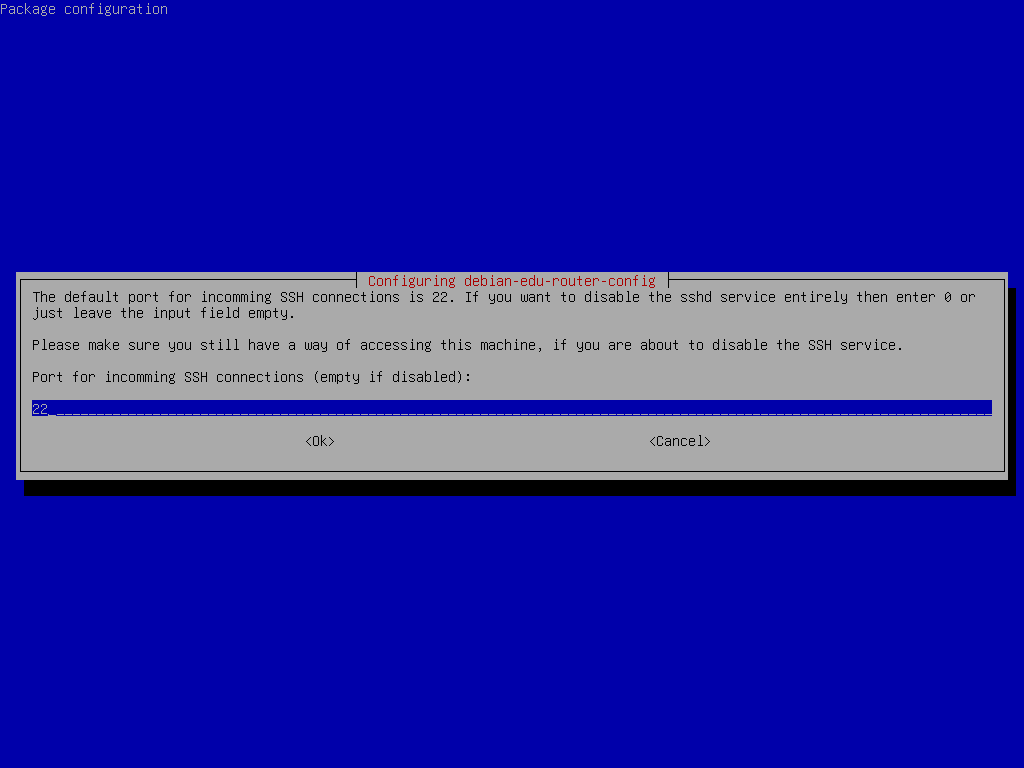
配置SSH端口,如果没有修改的话应该为22。
Connect the network interfaces if you have not already done so and reboot the machine. Now, when you logging in as a root you should see Debian Edu Router Menu.

If SSH access has been enabled the gateway can be reconfigured remotely via
the menu offered when logging in as root. Pressing
c in the main menu switches to the
configuration menu from which all or parts of the configuration can be
changed using the same dialogue system which was used for the initial
configuration.
最合适你要使用的“漫游工作站”prolile(参看上面)。要知道所有数据保存在本地(那在备份上要用一些额外的任务)并储存登录证书(那么密码变更之后,如果你没有连接你的笔记本到网络并以新密码登录过可能依赖你的旧密码登录)。
在从 USB 闪存盘 /
蓝光光盘映像安装之后,/etc/apt/sources.list
只会包含来自那个映像的源。如果有互联网连接,我们强烈建议在其中添加如下数行而可获得安装安全更新:
deb http://deb.debian.org/debian/ bookworm main
deb http://security.debian.org bookworm-security main
A netinst installation (which is the type of installation our CD provides) will fetch some packages from the CD and the rest from the net. The amount of packages fetched from the net varies from profile to profile but stays below a gigabyte (unless you choose to install all possible desktop environments). Once you have installed the main server (whether a pure main server or combi-server does not matter), further installation will use its proxy to avoid downloading the same package several times from the net.
It is possible to directly copy a CD/BD ISO image to USB flash drives (also known as "USB sticks") and boot from them. Simply execute a command like this, just adapting the file and device name to your needs:
sudo dd if=debian-edu-amd64-XXX.iso of=/dev/sdX bs=1M
在插入 USB 设备后而运行该命令之前,要确定这个 X 的值:
lsblk -p
请注意拷贝将会用相当长的时间。
取决于你选择了哪个镜像,USB 闪存驱动器会表现得就像 CD 或者蓝光光盘。
For this installation method it is required that you have a running main server. When clients boot via the network, an iPXE menu with installer and boot selection options is displayed. If PXE installation fails with an error message claiming a XXX.bin file is missing, then most probably the client's network card requires nonfree firmware. In this case the Debian Installer's initrd must be modified. This can be achieved by executing the command:
/usr/share/debian-edu-config/tools/pxe-addfirmware
于该服务器上。
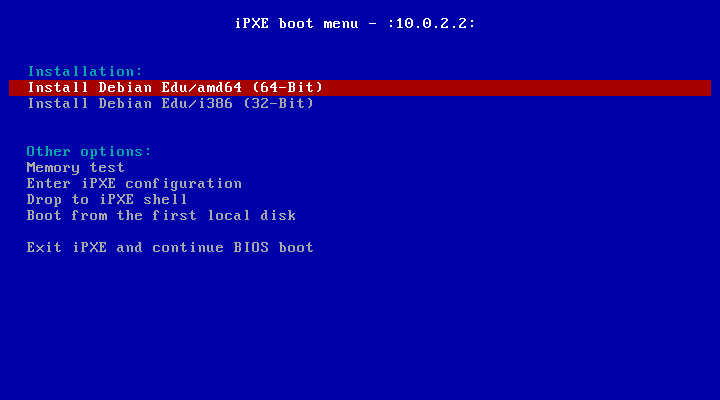
仅有主服务器设定配置的 iPXE 菜单看上去是怎样的:
这是使用 LTSP 服务器配置的 iPXE 菜单外观:
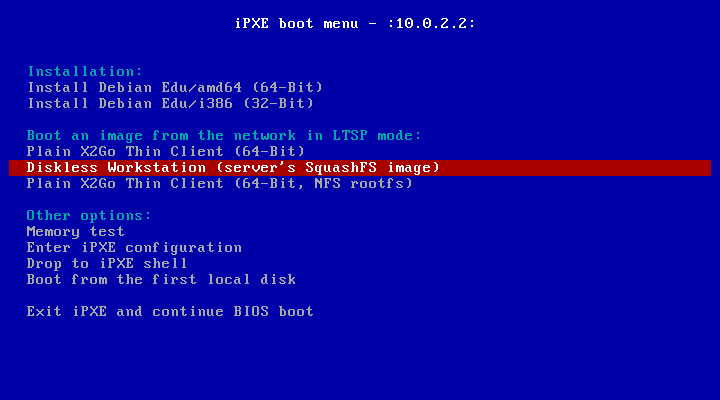
这个设置也允许无盘工作站和瘦客户端在主网络上引导。不像工作站和独立的 LTSP 服务器,无盘工作站不必添加到具有 GOsa² 的LDAP中。
更多关于网络客户端的信息可以在 Network clients HowTo 章中被找到。
PXE 安装使用 debian 安装程序 preseed 文件,那可以被修改来询问安装更多的软件包。
类似随后的一行需要添加到
tjener:/etc/debian-edu/www/debian-edu-install.dat
d-i pkgsel/include string my-extra-package(s)
The PXE installation uses the preseeding file
/etc/debian-edu/www/debian-edu-install.dat.
This file can be changed to adjust the preseeding used during installation,
to avoid more questions when installing over the net. Another way to achieve
this is to provide extra settings in
/etc/debian-edu/pxeinstall.conf and
/etc/debian-edu/www/debian-edu-install.dat.local
and to run /usr/sbin/debian-edu-pxeinstall
to update the generated files.
进一步的信息可以在 Debian 安装手册里找到。
要禁止或变更通过 PXE 安装时代理的使用,在
tjener:/etc/debian-edu/www/debian-edu-install.dat
中包含
mirror/http/proxy,mirror/ftp/proxy
和 preseed/early_command
的数行需要被改变。要禁止安装时代理的使用,在最初两行的前面放置 '#',并从其末尾移除 "export
http_proxy="http://webcache:3128"; " 部分。
Some settings can not be preseeded because they are needed before the
preseeding file is downloaded. Language, keyboard layout and desktop
environment are examples of such settings. If you want to change the default
settings, edit the iPXE menu file
/srv/tftp/ltsp/ltsp.ipxe on the main
server.
创建定制的 CD,DVD 或蓝光光盘会因为使用了 Debian 安装程序而相当容易,它有模块化设计及其它很好的特性。预置 对通常提出的问题允许确定答案。
因此所有需要做的是用你的答案(这个在 Debian 安装程序手册的附录里叙述)和 重新录制 CD/DVD 来创建预置文件。
文本方式和图形安装有相同的功能 - 仅是外观不同。图形方式提供使用鼠标的机会,自然看着最宜人并且更新颖。除非用图形方式硬件有困难,那没有理由不使用它。
So here is a screenshot tour through a graphical 64-bit Main Server + Workstation + LTSP Server installation (in BIOS mode) and how it looks at the first boot of the main server and a PXE boot on the LTSP client network (thin client session screen - and login screen after the session on the right has been clicked).


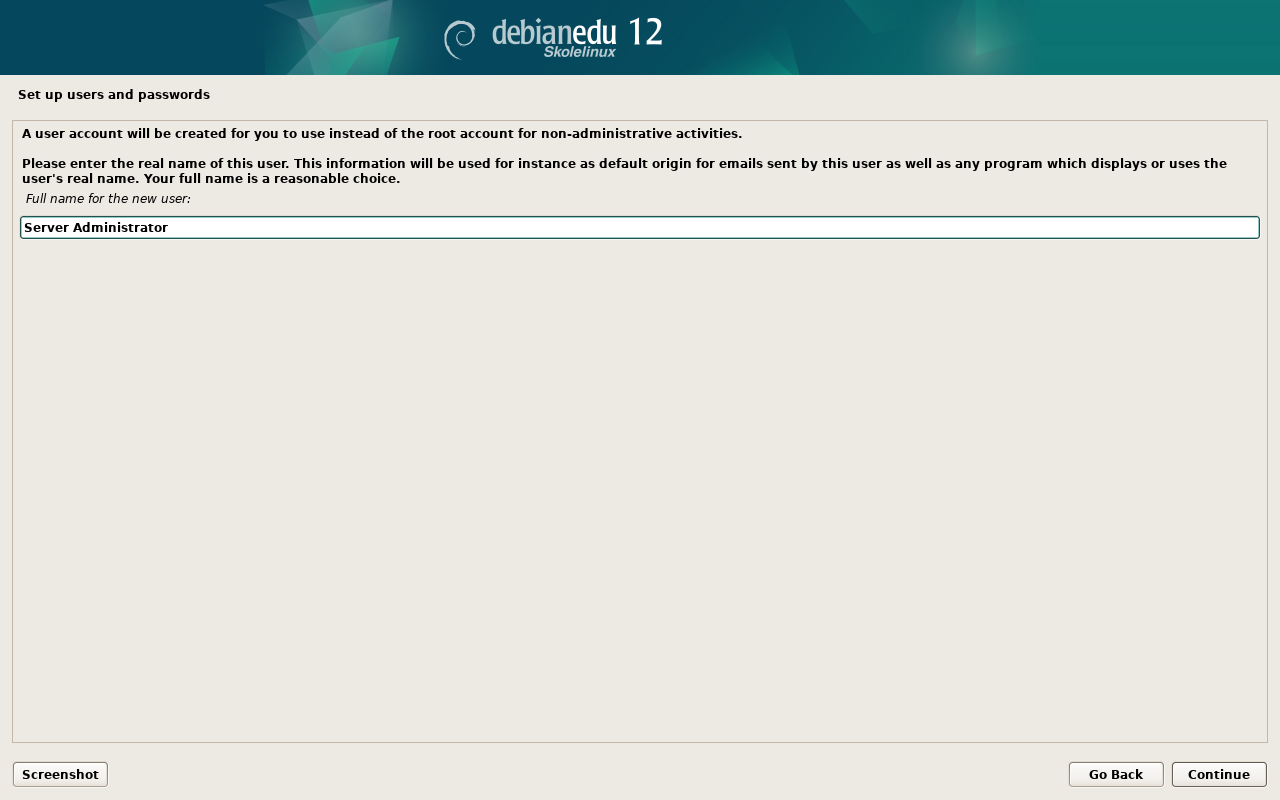
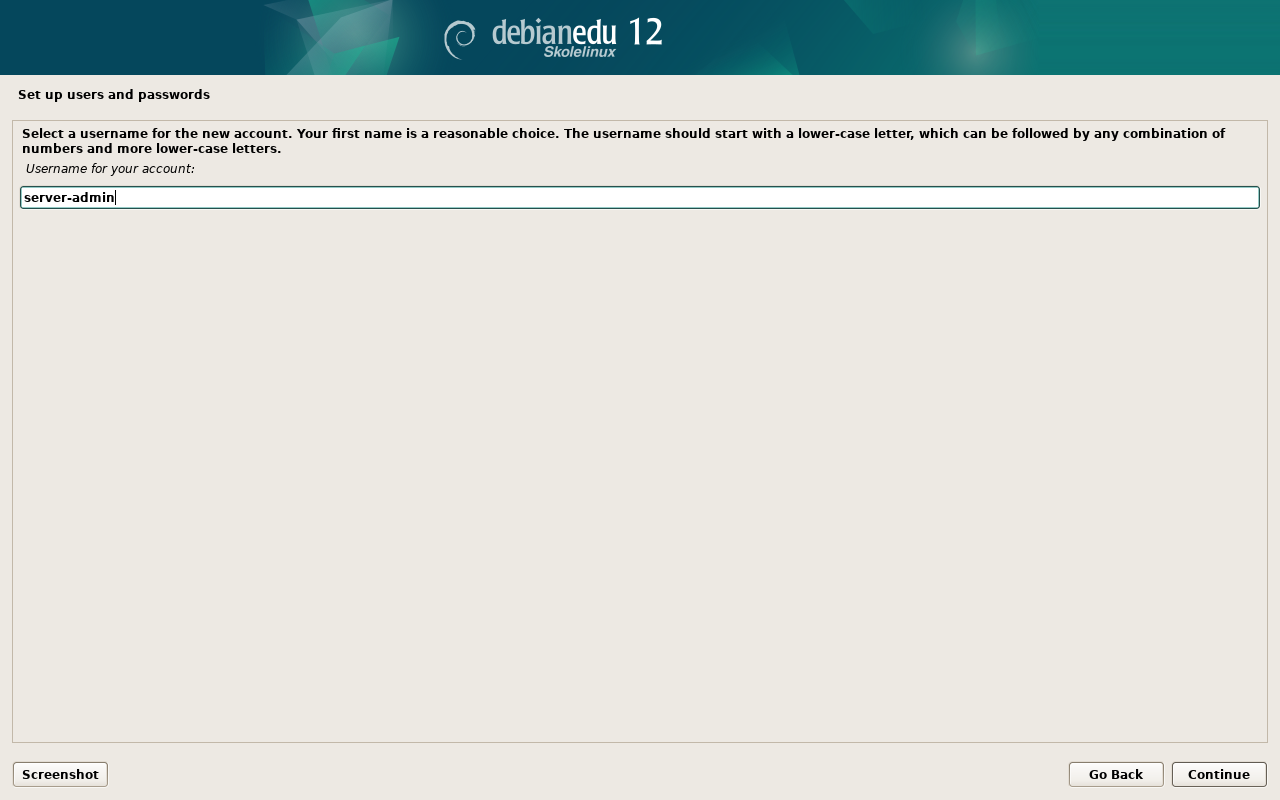

在主服务器安装时创建了第一个使用者帐户。该帐户在下文将被称为“第一用户”。这个帐户是特殊的,因为其主目录权限设置为 700(因此需要
chmod o+x ~ 以使个人网页可访问),而且第一用户可以使用
sudo 成为 root。
请在添加用户前参阅有关 Debian Edu 具体的文件系统访问配置信息;如有需要请调整站点策略。
安装之后,作为首用户的你需要做的第一件事是:
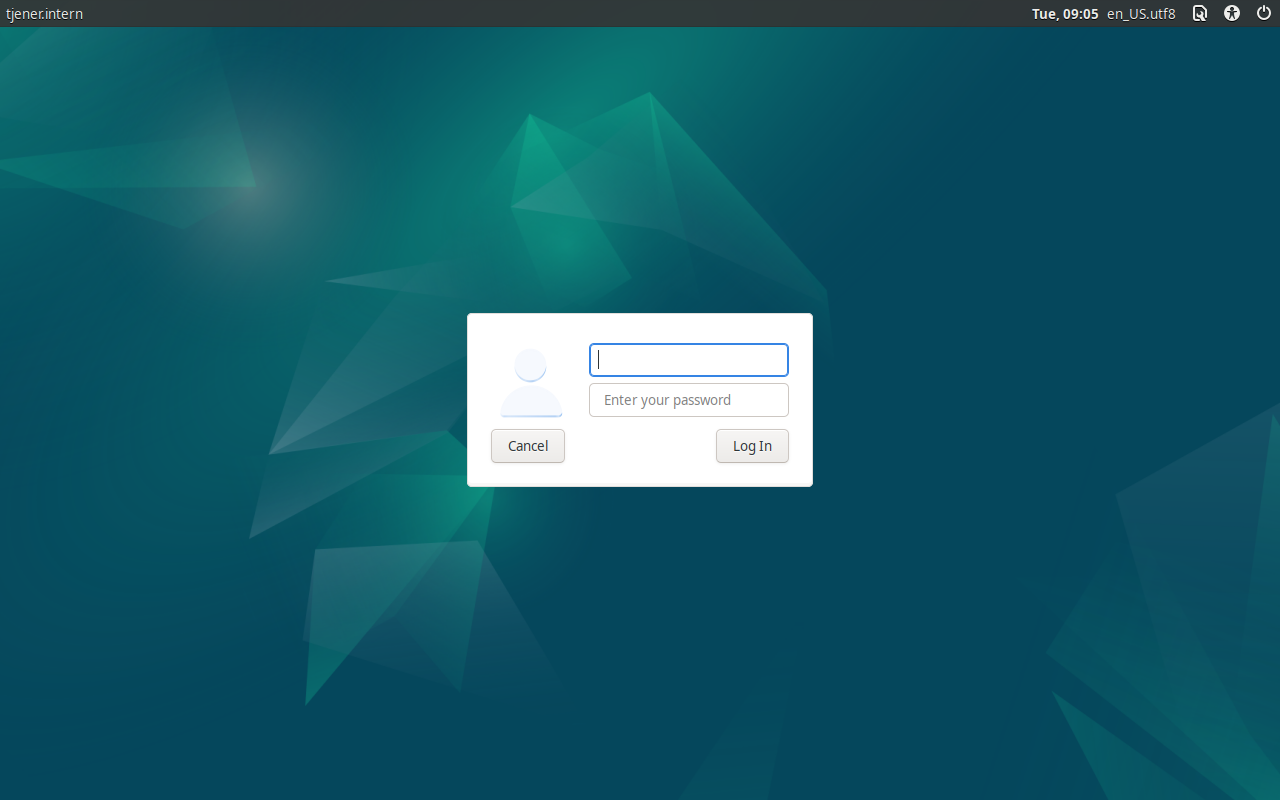
登录到主服务器。
用 GOsa² 添加用户。
使用 GOsa² 添加工作站。
在下面详细讲述添加用户和工作站,请完整阅读这章。包括如何正确进行这些最少步骤以及,每个人大概会需要做的其他材料。
There is additional information available elsewhere in this manual: the New features in Bookworm chapter should be read by everyone who is familiar with previous releases. And for those upgrading from a previous release, make sure to read the Upgrades chapter.
如果普通的 DNS 流量阻塞你的外部网络而你需要使用某个特定的 DNS 服务器来查找互联网主机,你需要告知这个 DNS
服务器作为它的“转发器”来使用这一服务器。
这里的 HowTo 一章涵盖了更多的提示和技巧以及一些经常被问及的问题。
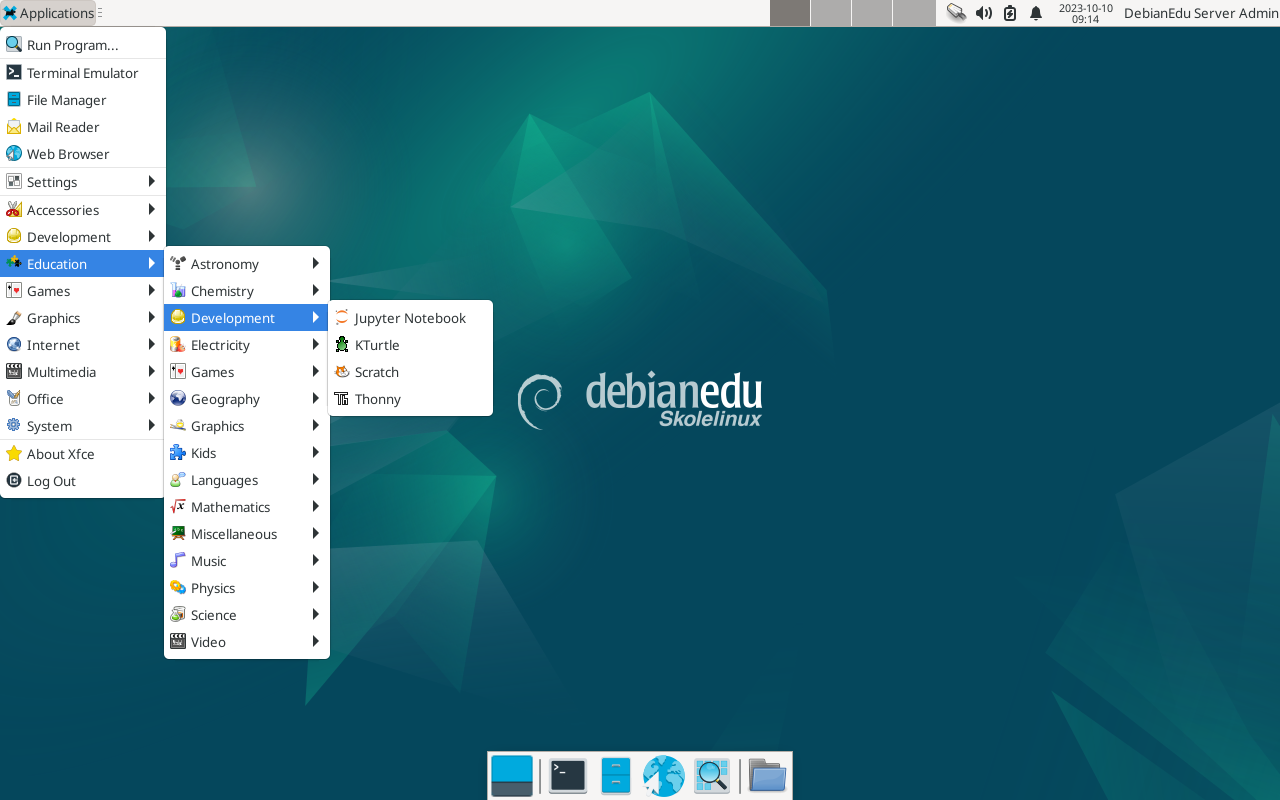
GOsa² 是一个可以帮助管理你的 Debian Edu 设置的一些重要部分的基于 web 的管理工具。使用 GOsa² 你可以管理(添加,修改,或者删除)这些主要的组:
用户管理
组管理
NIS 网络组管理
计算机管理
DNS 管理
DHCP 管理
为了访问 GOsa² 需要 Skolelinux 主服务器和安装了 web 浏览器的(客户端)系统,如果是作为所谓的组合服务器(主服务器 + LTSP 服务器 + 工作站配置)来安装的话,可以是主服务器自身。
If you (probably accidentally) installed a pure Main Server profile and don't have a client with a web-browser handy, it's easy to install a minimal desktop on the main server using this command sequence in a (non-graphical) shell as the user you created during the main server's installation (first user):
  $ sudo apt update
  $ sudo apt install task-desktop-xfce lightdm education-menus
  $ sudo service lightdm start
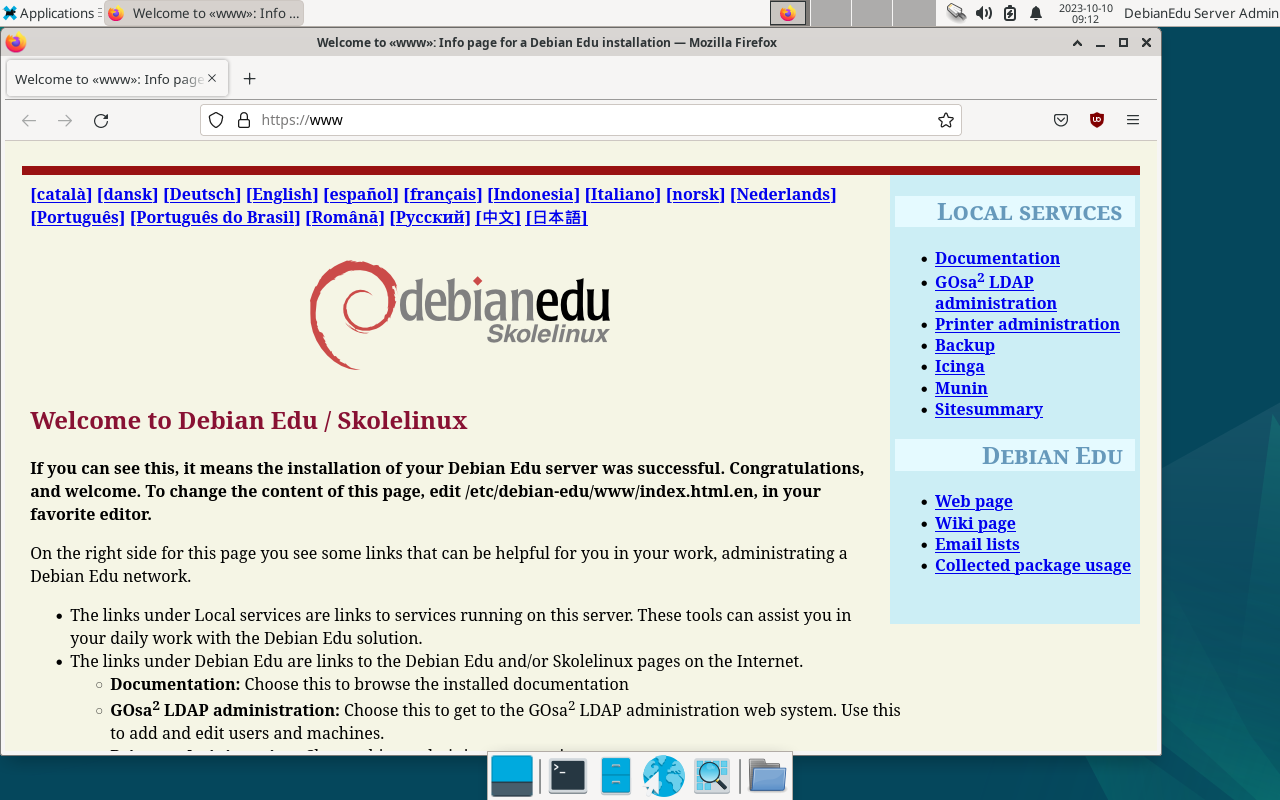
从一个 web 浏览器中使用这个 URL https://www/gosa 来访问 GOsa²,并作为首用户登录。
If you are using a new Debian Edu Bookworm machine, the site certificate will be known by the browser.
否则,你将收到有关 SSL 证书有误的错误消息。如果你知道是独自在你的网络上,就告诉浏览器接受它并忽略那个。
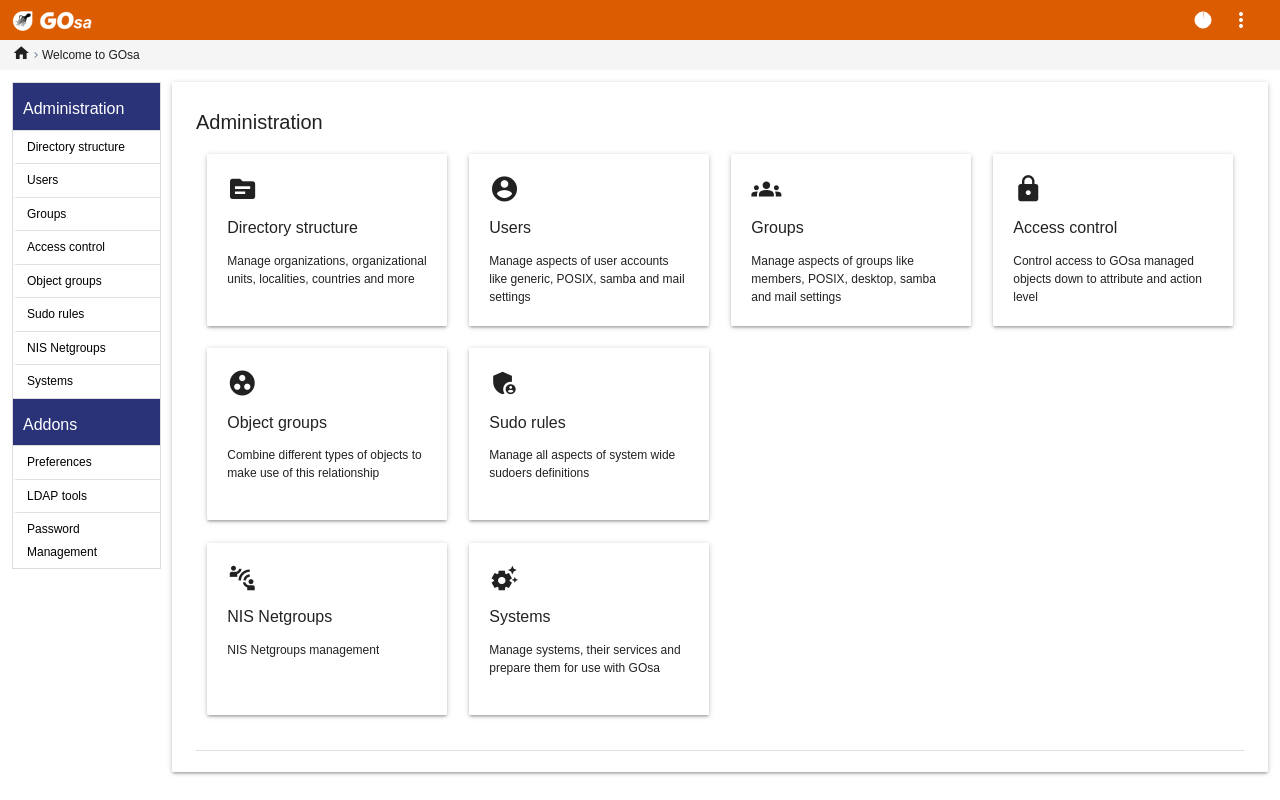
在 GOsa² 登录之后你会看到 GOsa² 的概览页面。
接下来,你可以在菜单里选择一个任务或者在综览页面中点击任何任务图标。为了导航,我们建议使用屏幕左侧的菜单,它将保持显示在所有 GOsa² 所提供的管理页面中。
在 Debian Edu 中,账户,组,和系统信息保存在一个 LDAP 目录里。这个数据不仅用于主服务器,而且也用于网络中的(无盘)工作站,LTSP 服务器和其他机器。用 LDAP,有关学生,教师,等等的账户信息仅需要输入一次。之后由 LDAP 提供信息,在整个 Skolelinux 网络中的所有系统可用该信息。
GOsa² 是一种使用 LDAP 来存储其信息并提供分层的部门结构的管理工具。你可以为每个“部门”添加使用者账户,组,系统,网络组,等等。取决于你所设计的结构,你可以用 GOsa²/LDAP 中的部门结构迁移你的组织结构进入 Debian Edu 主服务器的 LDAP 数据树中。
A default Debian Edu main server installation currently provides two "departments": Teachers and Students, plus the base level of the LDAP tree. Student accounts are intended to be added to the "Students" department, teachers to the "Teachers" department; systems (servers, workstations, printers etc.) are currently added to the base level. Find your own scheme for customising this structure. (You can find an example how to create users in year groups, with common home directories for each group in the HowTo/AdvancedAdministration chapter of this manual.)
根据你要处理的任务(管理用户,管理组,管理系统等),GOsa² 会在所选部门(或基础层)上呈现不同的视图。
首先,点击左边导航菜单中的“Users”。屏幕右侧会转为显示一个有“Students”和“Teachers”的部门文件夹以及 GOsa² 管理员(第一个被创建的用户)账户的列表。这个表的上方可以看到一个名为 Base 的字段而允许通过树状结构导航(鼠标移动到该区域上就会呈现一个下拉菜单)并为需要的操作(例如添加一个新用户)选择一个基本文件夹。
接下来你可以在树状导航项目中看到“操作”菜单。在这一项上面移动你的鼠标一个子菜单呈现在屏幕上;选择其中的“创建”,而后是“用户”。你将由用户创建向导来指导。
最重要的是添加模板(新学生或新教师)和你的用户的全名(见图)。
当你跟随向导时,你将看到 GOsa² 根据真实姓名自动生成用户名。它自动选择一个尚不存在的用户名,那么有相同全名的多类用户不是问题。注意如果全名中包含非 ASCII 字节 GOsa² 可能生成无效的用户名。
如果你不喜欢生成的用户名,你可以在下拉框中选择其他用户名,但你在向导中没有自由选择。(如果你想要能够编辑提议的用户名,用一个编辑器打开
/etc/gosa/gosa.conf并添加allowUIDProposalModification="true"作为附加选项到 "location definition"。)在向导完成后,你将看到新用户对象的 GOsa² 屏幕。使用上端的标签检查全部字段。
创建用户后(无需自定义字段,向导现在已经为空),点击右下角的“确定”按钮。
作为最后一步,GOsa² 会询问新用户的密码。键入两次之后点击右下角的“设置密码”。 某些字符可能不被允许作为密码的一部分。
如果一切顺利,你现在可以在用户列表中看到新用户。你现在能以那个新用户名登录你的网络中的任何 Skolelinux 机器。
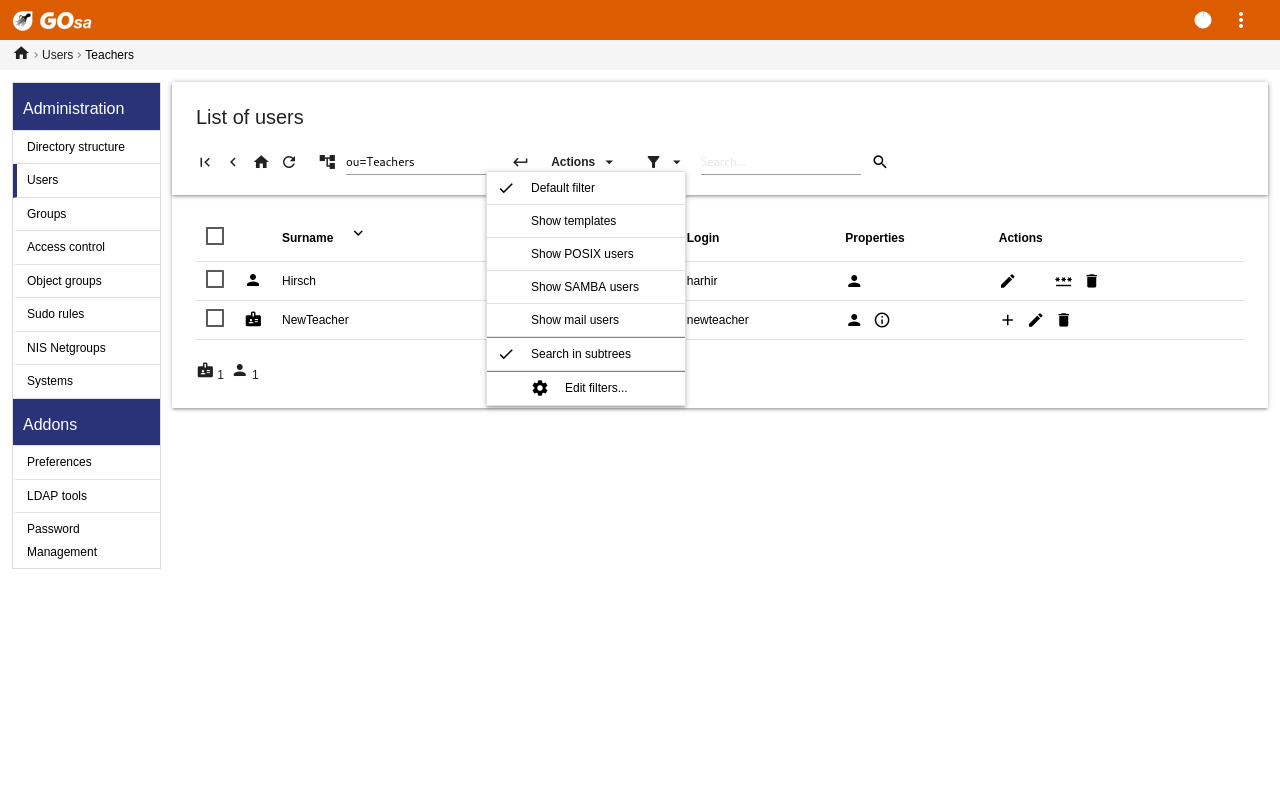
要修改或删除用户,使用 GOsa² 浏览在你的系统中的用户列表。在屏幕中部你能够打开“过滤”框,一个由 GOsa² 提供的搜索工具。如果你不知道你的用户账户在树状结构中的确切位置,转变 GOsa²/LDAP 树的基本层并以“在子树中搜索”选项标记搜索。
当使用“Filter”框时,结果将立即出现在表格列表视图中的文本中间。每一行代表一个用户账户而在每行右边最远的项目是供操作的小图标:编辑用户,锁定账户,设置密码,和删除用户。
将会显示一个新页面,你可以在哪里直接修改有关用户的信息,更改用户的密码和修改用户所属的组列表。

学生可以使用自己的用户名登录 GOsa² 来更改自己的密码。在桌面系统(或系统设置)菜单提供的易于访问的 GOsa² 入口,称为 Gosa。一个已登录的学生会被显示在一个很小版本的 GOsa² 中,仅允许访问这个学生自己的账户数据表单以及设置密码对话框。
以自己的用户名登录的教师在 GOsa² 中有特殊的权限。显示更多的 GOsa² 特权视图,并可以更改所有学生账户的密码。这应该非常适合年级期间。
以管理方式为用户设置新密码
搜索要修改的用户,如上所述
点击用户名所在行尾的钥匙符号
在随后提供的页面上,你可以设置自己选择的新密码
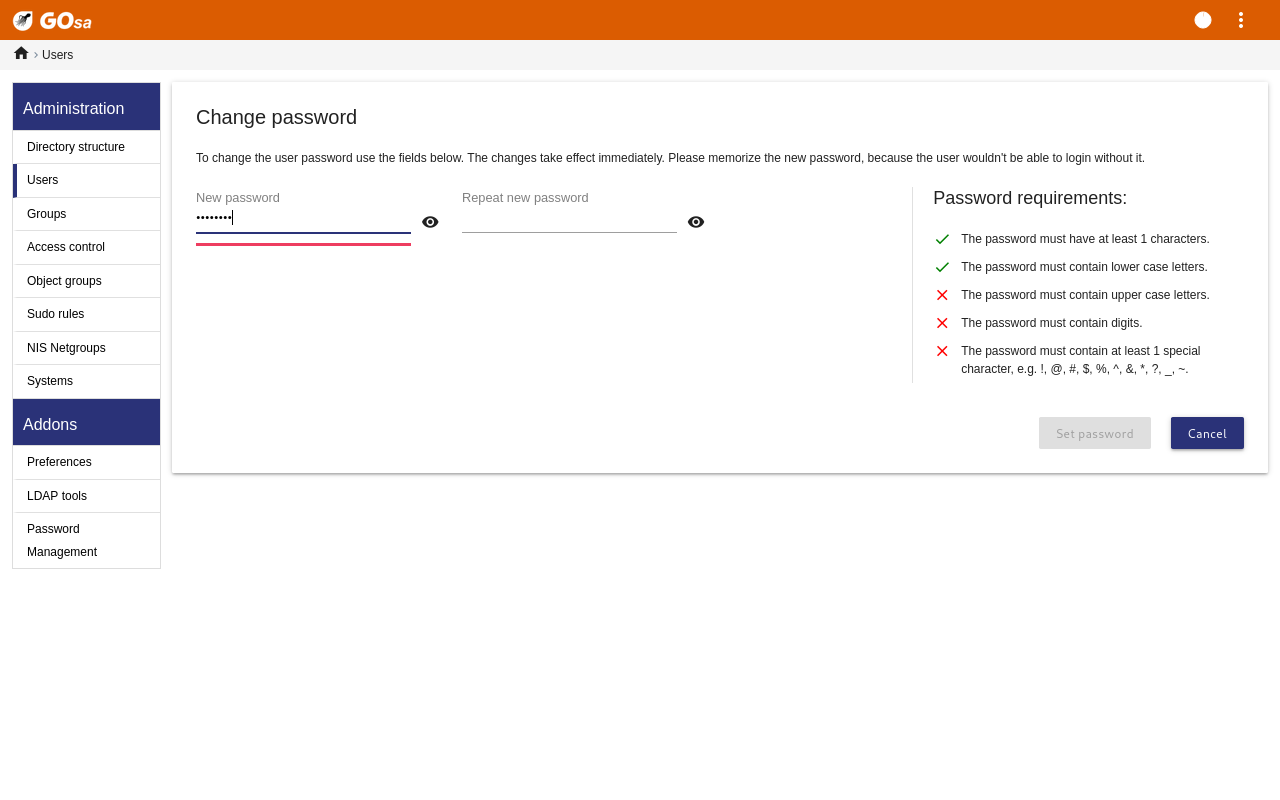
Be aware of security implications due to easy to guess passwords!
可以通过使用 CSV 文件用 GOsa² 大量创建用户,可以使用任何好的电子表格软件(例如, localc
)。至少,为随后的字段输入提供:uid,姓,名字和密码。确定在 uid 字段中没有重复的记录。请注意应该检查重复的
LDAP 中已经存在的 uid 记录(由在命令行中执行 getent passwd | grep tjener/home
| cut -d":" -f1 而得到)。
上述 CSV 文件格式指标(GOsa² 对之相当不容):
使用“,”作为字段分隔符
不要使用引号
CSV 文件不必包含一个标题行(通常包含分类的列名)
这些字段的顺序是不相关的,可以在 GOsa² 批量导入期间被定义
批量导入的步骤是:
点击左侧导航菜单中的“LDAP 管理器”链接
点击屏幕右侧的“导入”标签
浏览本地磁盘,并选择要导入的有用户列表的 CSV 文件
选择在批量导入期间应用的可用用户模板(如NewTeacher或NewStudent)
点击右下角的“导入”按钮
首先做一些测试是一个好主意,最好使用带有几个虚构用户的 CSV 文件,稍后可以删除。
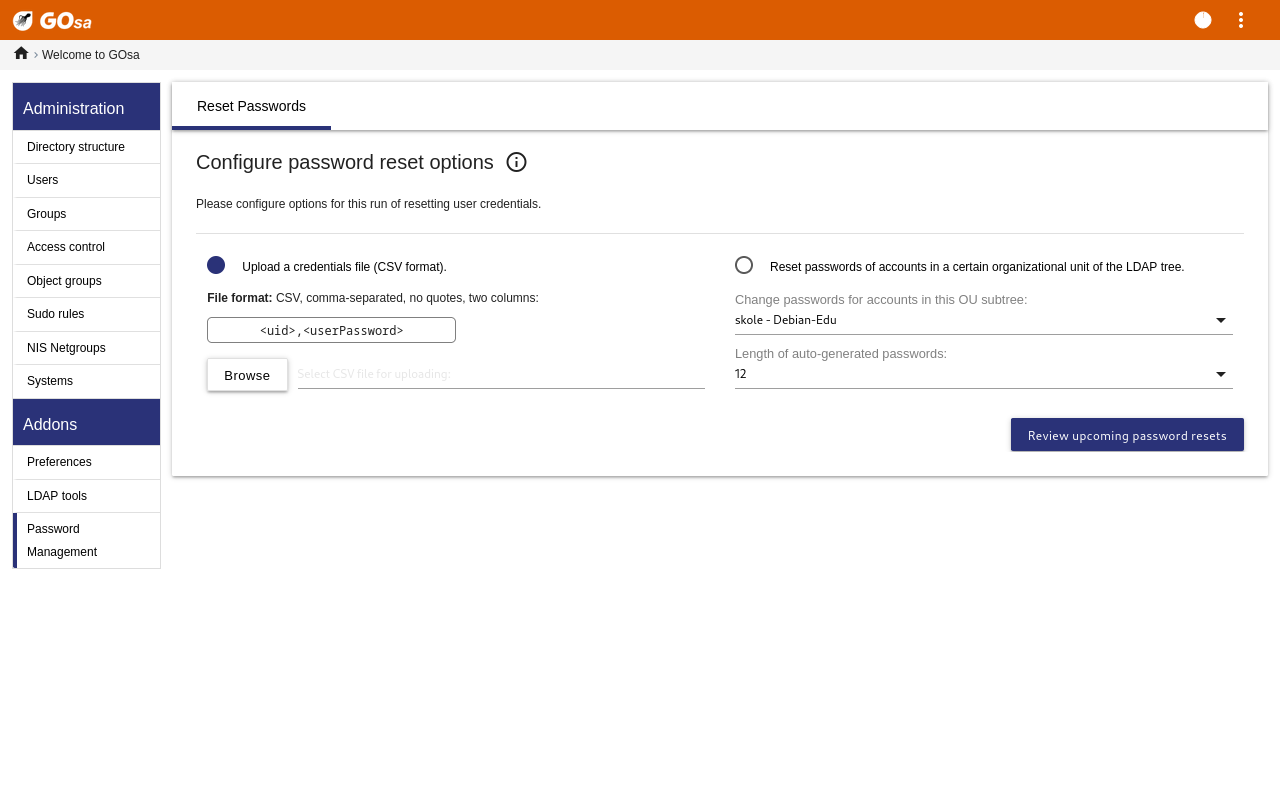
Same applies to the password management module, which allows one to reset a lot of passwords using a CSV file or to re-generate new passwords for users belonging to a special LDAP subtree.
User accounts can also be added from the command line using the
ldap-createuser-krb5 tool, see the
documentation in the Administration
HowTo
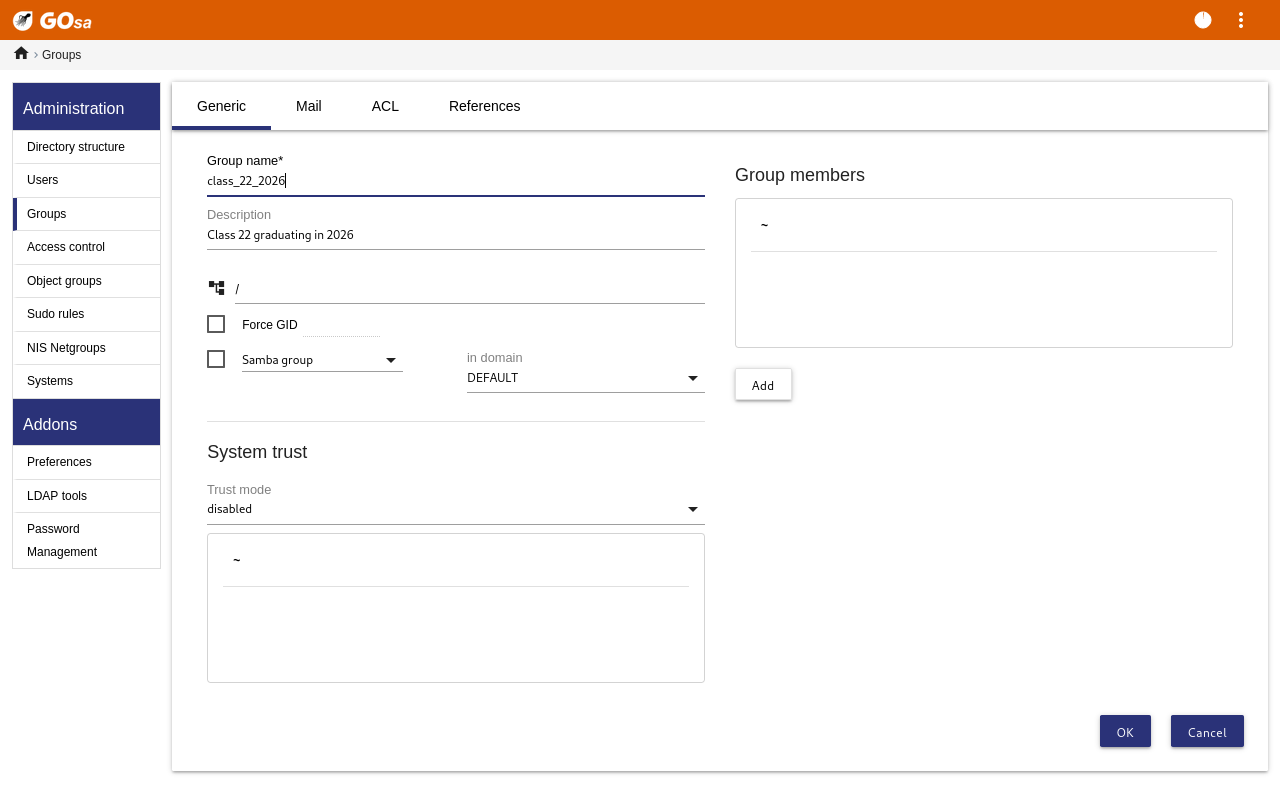
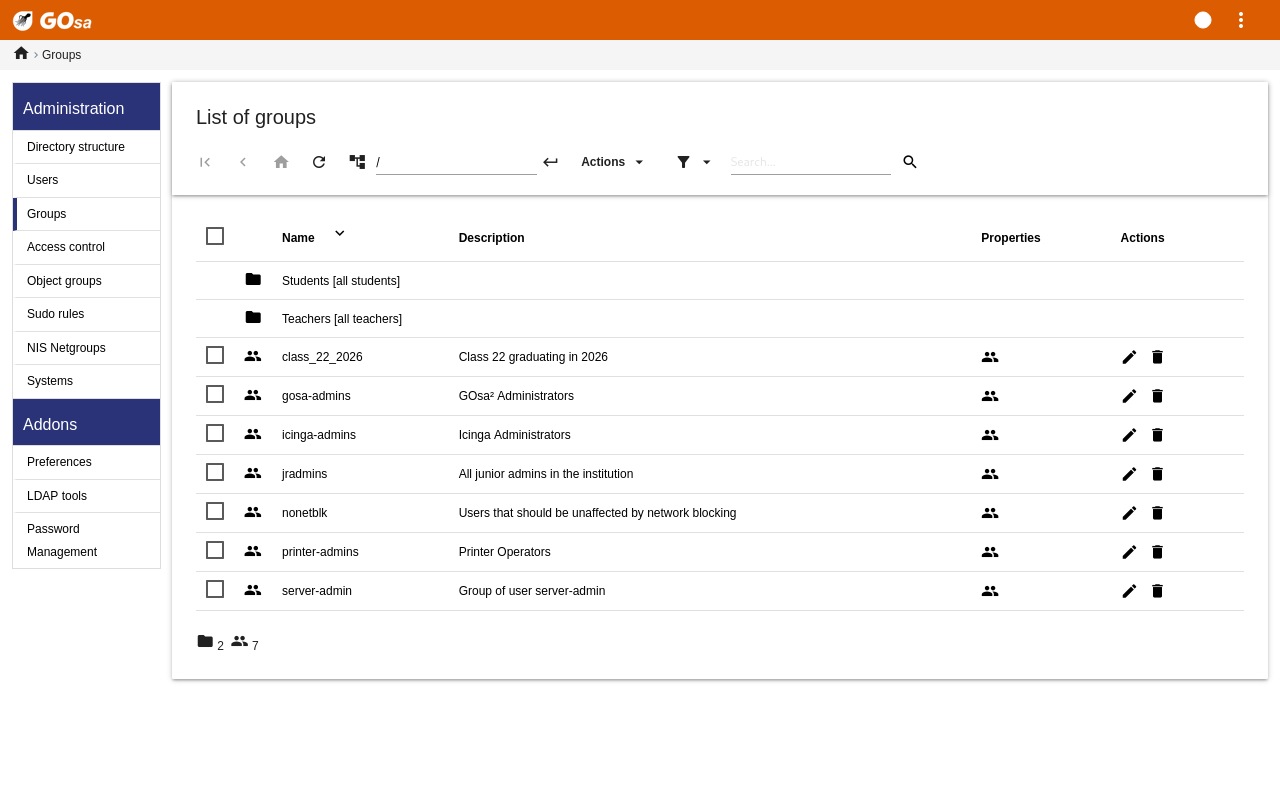
组管理与用户管理非常相似。
你可以输入每个组的名称和描述。确定在创建新组时选择 LADP 树中右侧水平位置。
添加用户到新创建的组会带你返回用户列表,你最有可能使用过滤器框来查找用户。也会检查 LDAP 树层。
组管理中输入的组也是常规的 unix 组,因此也可以将它们用于文件权限。
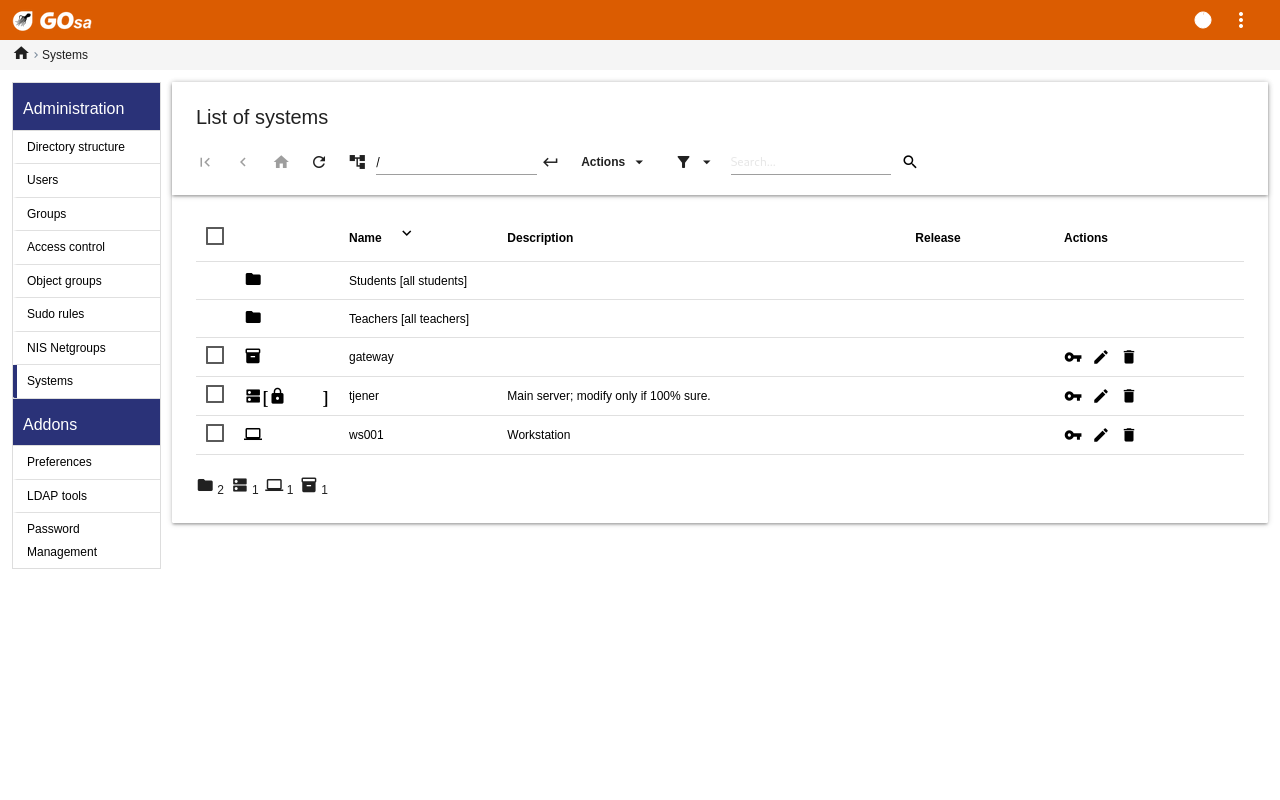
机器管理基本上允许你管理 Debian Edu 网络中的所有联网设备。使用 GOsa² 添加到 LDAP 目录的每台机器有一个主机名,一个 IP 地址,一个 MAC 地址和一个域名(通常是“内部”)。完整的 Debian Edu 结构的描述参阅本手册的结构一章。
无盘工作站和瘦客户端在组合主服务器实例中开箱即可工作。
Workstations with disks (including separate LTSP servers) have to be added with GOsa². Behind the scenes,
both a machine specific Kerberos Principal (sort of
account) and a related keytab file (containing a key
used as password) are generated; the keytab file needs
to be present on the workstation to be able to mount users' home
directories. Once the added system has been rebooted, log into it as root
and run
/usr/share/debian-edu-config/tools/copy-host-keytab.
要为已配置了 GOsa2的系统创建主体和密钥表文件,请以 root 用户登录主服务器并运行
/usr/share/debian-edu-config/tools/gosa-modify-host <hostname> <IP>
Please note: host keytab creation is possible for systems of type workstations, servers and terminals but not for those of type netdevices. See the Network clients HowTo chapter for NFS configuration options.
To add a machine, use the GOsa² main menu, systems, add. The name of the machine is expected to be a valid unqualified hostname, do not add the domain name here. You can use an IP address/hostname from the preconfigured address space 10.0.0.0/8. Currently there are only two predefined fixed addresses: 10.0.2.2 (tjener) and 10.0.0.1 (gateway). The addresses from 10.0.16.20 to 10.0.31.254 (roughly 10.0.16.0/20 or 4000 hosts) are reserved for DHCP and are assigned dynamically.
要在 GOsa² 中分配具有 MAC 地址为 52:54:00:12:34:10 的一个静态 IP 地址你需要输入这个 MAC 地址,主机名和其
IP;抑或可以点击建议 ip 按钮将在 10.0.0.0/8
中显示第一个自由的固定地址,如果以这种方式添加第一台机器,最有可能的是 10.0.0.2。应最好考虑有关你的网络:例如你将为服务器而使用 x>10
和 x<50 的 10.0.0.x,而对于工作站 x>100。不要忽略激活已正确添加的系统。除主服务器之外所有系统将在那时有一个相关的图标。
如果机器已经作为瘦客户机/无盘工作站启动或者已经安装使用任何的联网设定,sitesummary2ldapdhcp
脚本可以用于自动向 GOsa² 添加机器。对于简单的机器如是就会工作,对于具有多个 mac
地址的机器必须选择实际使用的一个地址,sitesummary2ldapdhcp -h
显示使用信息。请注意,应用 sitesummary2ldapdhcp 后显示的 IP
地址属于动态 IP 范围。而后可以修改这些系统来适合于自己的网络:重命名每个新系统,激活 DHCP 和
DNS,将其添加到网络组(对于推荐的网络组参见下面的屏幕快照),然后重新启动系统。以下的屏幕快照显示了在实际中的所见:
root@tjener:~# sitesummary2ldapdhcp -a -i ether-22:11:33:44:55:ff
info: Create GOsa machine for am-2211334455ff.intern [10.0.16.21] id ether-22:11:33:44:55:ff.

Enter password if you want to activate these changes, and ^c to abort.

Connecting to LDAP as cn=admin,ou=ldap-access,dc=skole,dc=skolelinux,dc=no
enter password: ********
root@tjener:~#


cronjob 更新 DNS 每小时运行一次; su -c ldap2bind
可用以手动触发更新。
使用 GOsa² 添加一台机器到 LDAP 树中之后,你可以修改其属性使用搜索功能并在计算机名称上点击 (与用户那样)。
这些系统的条目格式类似于一个你已经从修改用户条目所知道的,但在上下文间字段意味不同的事情。
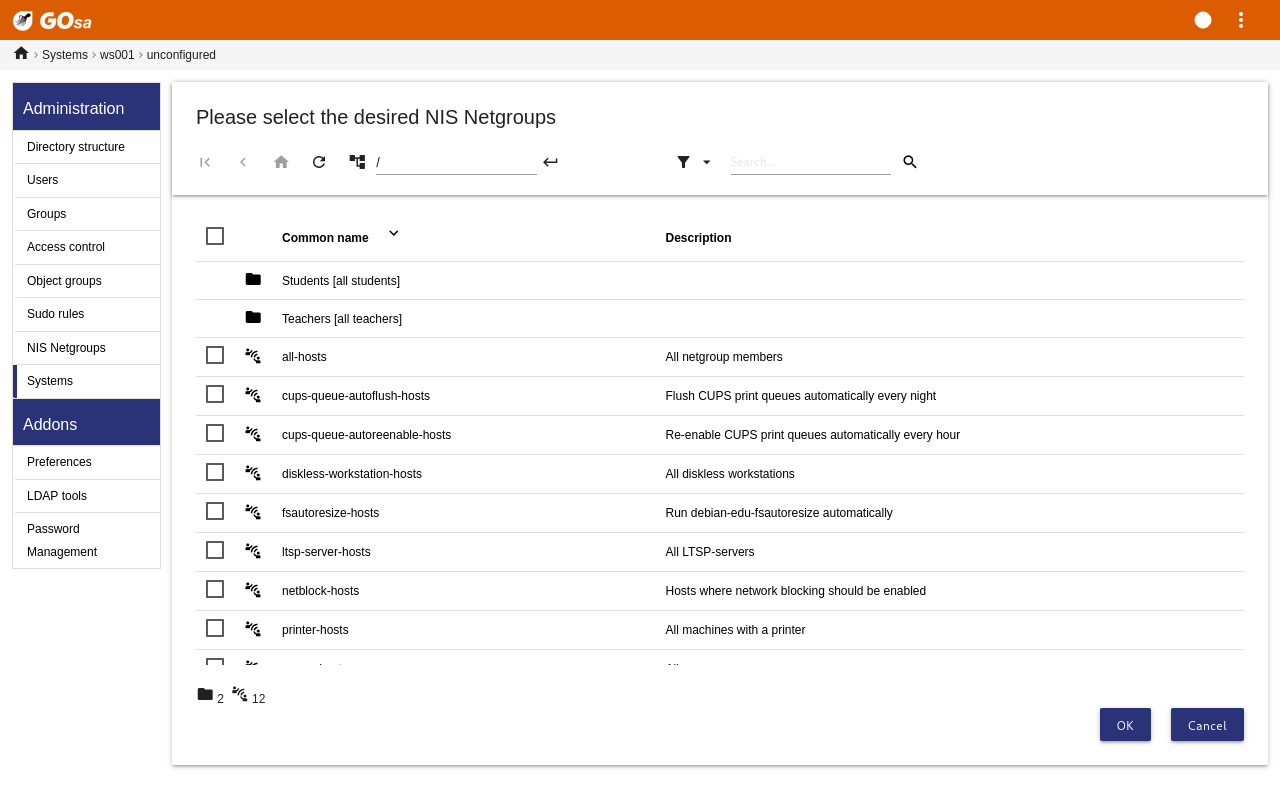
For example, adding a machine to a NetGroup
does not modify the file access or command execution permissions for that
machine or the users logged in to that machine; instead it restricts the
services that machine can use on your main server.
默认安装提供网络组
所有主机
cups-queue-autoflush-hosts
cups-queue-autoreenable-hosts
fsautoresize-hosts
ltsp-server-hosts
netblock-hosts
printer-hosts
server-hosts
shutdown-at-night-hosts
shutdown-at-night-wakeup-hosts-blacklist
workstation-hosts
当前 NetGroup 功能用于:
重新调整分区大小(fsautoresize-hosts)
这一组中的 Debian Edu 机器将自动调整运行空间不足的 LVM分 区大小。
Shutdown machines at night (shutdown-at-night-hosts and shutdown-at-night-wakeup-hosts-blacklist)
这一组的 Debian Edu 机器将在夜晚自动关闭以节省能源。
管理打印机 (cups-queue-autoflush-hosts and cups-queue-autoreenable-hosts)
这些组当中的 Debian Edu 机器将每天晚上自动刷新所有打印队列,并且每小时重新启用任何禁用的打印队列。
Blocking Internet access (netblock-hosts)
Debian Edu machines in this group will be allowed to connect to machines only on the local network. Combined with web proxy restrictions this might be used during exams.
For centralized printer management point your web browser to https://www.intern:631. This is the normal CUPS management interface
where you can add/delete/modify your printers and can clean up the printing
queue. By default only the first user is allowed but this can be changed by
adding users to the GOsa² printer-admins
group.
在设定为工作站的系统中默认安装了 p910nd 软件包。
如此编辑
/etc/default/p910nd(USB 打印机):P910ND_OPTS="-f /dev/usb/lp0"
P910ND_START=1
配置打印机使用 web 界面
https://www.intern:631;选择网络打印机类型AppSocket/HP JetDirect(对于所有打印机不理会商标或型号)并设置socket://<workstation ip>:9100作为连接 URI。
The default configuration in Debian Edu is to keep the clocks on all machines synchronous but not necessarily correct. NTP is used to update the time. The clocks will be synchronised with an external source by default. This can cause machines to keep the external Internet connection open if it is created when used.
如果您使用拨号或 ISDN ,且按分钟付费,您可能想要改变该默认设定。
To disable synchronisation with an external clock, the file /etc/ntp.conf on
the main server needs to be modified. Add comment ("#") marks in front of
the server entries. After this, the NTP
server needs to be restarted by running service ntp
restart as root. To test if a machine is using the external
clock sources, run ntpq -c lpeer.
由于自动分区可能出现的错误,安装后某些分区可能太满了。要扩充这些分区,以 root 身份运行
debian-edu-fsautoresize -n。参看如何管理章节中如何“重新分划分区大小”的更多信息。
本节介绍如何使用 apt full-upgrade。
使用 apt 真的很容易。如果要更新系统,只需要以 root
身份在命令行中执行两个命令:apt update(更新可用软件包的列表)和
apt full-upgrade(对可以升级的软件包进行升级)。
升级使用 C locale 来获得英语输出也是个好主意那若出现难题更可能在搜索引擎中产生答案。
LC_ALL=C apt full-upgrade -y
After upgrading the debian-edu-config
package, changed Cfengine configuration files might be available. Run
ls -ltr /etc/cfengine3/debian-edu/ to check
if this is the case. To apply the changes, run LC_ALL=C
cf-agent -D installation.
It is important to run debian-edu-ltsp-install
--diskless_workstation yes after LTSP server upgrades to
keep the SquashFS image for diskless clients in sync.
After a point release upgrade of a system with Main
Server or LTSP Server profile,
debian-edu-pxeinstall needs to be run to
update the PXE installation environment.
安装 cron-apt 和
apt-listchanges 并配置它们来发送邮件到你正在阅读的地址也是一个好主意。
cron-apt
每天通过电子邮件通知你有关可升级的任何软件包。它不安装这些升级,但下载它们(通常在夜间),那么当执行 apt
full-upgrade 时不必等待下载。
如果希望能够轻松完成更新的自动安装,只需要按照 wiki.debian.org/UnattendedUpgrades
上所述安装和配置 unattended-upgrades 软件包。
apt-listchanges 可以通过电子邮件来发送新的变更日志记录,抑或选择运行
apt 时在终端中显示它们。
Running cron-apt as described above is a
good way to learn when security updates are available for installed
packages. Another way to stay informed about security updates is to
subscribe to the Debian
security-announce mailinglist, which has the benefit of also telling
you what the security update is about. The downside (compared to
cron-apt) is that it also includes
information about updates for packages which aren't installed.
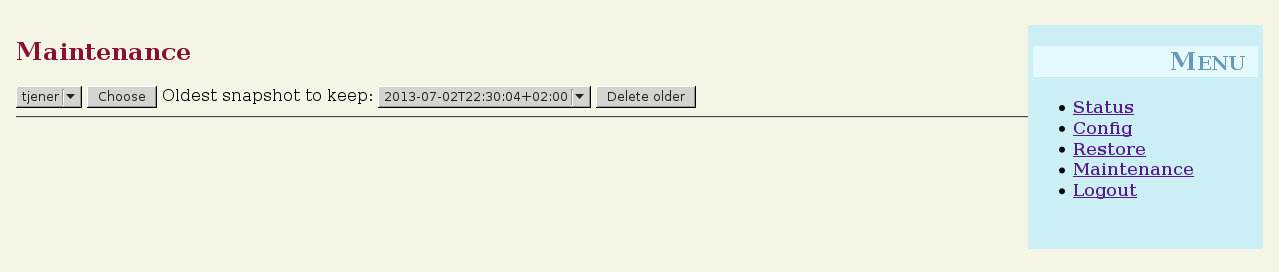
为了备份管理指示浏览器到 https://www/slbackup-php。请注意需要通过 SSL 访问这个站点,因为要在那里输入 root 密码。如果尝试不用 SSL 来访问该站点将会失败。
Note: the site will only work if you temporarily allow SSH root login on the
backup server, which is the main server (tjener.intern) by default.
By default, backups of /skole/tjener/home0,
/etc/,
/root/.svk and LDAP are stored in the
/skole/backup/ directory which is managed as separate partition by LVM. If
you only want to have spare copies of things (in case you delete them) this
setup should be fine for you.
要意识到这一备份方案不能从失灵的硬盘保护你。
如果你想要备份你的数据到外部服务器,磁带设备或者另一个硬盘你将需要修改这个存在的配置一点点。
如果您想恢复整个文件夹,最佳选择是使用如下命令行:
$ sudo rdiff-backup -r <date> \ /skole/backup/tjener/skole/tjener/home0/user \ /skole/tjener/home0/user_<date>
这将在 /skole/tjener/home0/user_<date>
文件夹中留下来自 /skole/tjener/home0/user 对于
<date> 的内容
如果您想恢复单个文件,您可以从网络界面上选择该文件(以及版本),并下载该文件。
如果要清除较旧的备份,在备份页面的菜单中选择“维护”并选择要保留的最早的快照:
从 https://www/munin/ 可得到 Munin 趋势报告系统。它提供基于一天,星期,月和每年的系统监测曲线图,并且当系统管理员在查找瓶颈及系统问题根源时给以帮助。
使用 Munin 监控的机器列表,是根据报告到 sitesummary 的主机列表自动生成的。Munin 监控所有安装了 munin-node
软件包的主机。从安装机器直到 Munin 监控启动正常地要一天,因为执行 cron 排序的工作。要加速这个过程,以 root 在 sitesummary
服务器(正常是主服务器)上运行
sitesummary-update-munin。这将更新
/etc/munin/munin.conf 文件。
收集的一组测量数据是在使用 munin-node-configure
程序的每台机器上自动生成而那些探测器插件从
/usr/share/munin/plugins/ 可以得到并符号链接相关的那些到
/etc/munin/plugins/。
从 https://munin-monitoring.org/ 可获得有关 Munin 的信息。
Icinga system and service monitoring is available from https://www/icingaweb2/. The set of machines and services being
monitored is automatically generated using information collected by the
sitesummary system. The machines with the profile Main-server and
LTSP-server receive full monitoring, while workstations and thin clients
receive simple monitoring. To enable full monitoring on a workstation,
install the nagios-nrpe-server package on
the workstation.
在默认情况下 Icinga 不发送电子邮件。这可以在
/etc/icinga/sitesummary-template-contacts.cfg
中用 host-notify-by-email 和
notify-by-email 替换
notify-by-nothing 来改变。
Icinga 配置文件使用的是
/etc/icinga/sitesummary.cfg。sitesummary
cron job 生成有主机和服务监控列表的
/var/lib/sitesummary/icinga-generated.cfg。
额外的 Icinga 检查可以在
/var/lib/sitesummary/icinga-generated.cfg.post
文件中设置将其包含在生成的文件里。
有关 Icinga 的信息可以从 https://www.icinga.com/ 或者在
icinga-doc 软件包中获得。
以下是如何处理最常见的 Icinga 警告的说明。
该分区(示例中的 /usr/)太满。这一般有两个方法来处理:(1)移除一些文件或者(2)增加该分区的大小。如果该分区是 /var/,那么通过调用
apt clean 来清理 APT 缓存可以移除一些文件。如果在 LVM
卷组中有更多空间可以获得,那么运行 debian-edu-fsautoresize
程序可以帮助扩展该分区。要在每天自动运行这个程序,可以将提及的主机添加到
fsautoresize-hosts 网络组。
New package are available for upgrades. The critical ones are normally
security fixes. To upgrade, run apt upgrade && apt
full-upgrade as root in a terminal or log in via SSH to do
the same.
如果不想手工升级软件包并且信任 Debian 对于新版本所做的优秀工作,可以配置
unattended-upgrades 在每个夜晚自动升级所有新软件包。这将不会升级
LTSP chroot。
运行中的内核比最新安装的内核旧,需要重启来激活最新安装的内核。这通常相当急迫,作为新内核通常显示在 Debian Edu 修正的安全发布中。
Sitesummary 用于从每台计算机收集信息并将其提交给中央服务器。这一汇集的信息可从
/var/lib/sitesummary/entries/
中获得。/usr/lib/sitesummary/ 中的脚本可以得到生成的报告。
可以从 https://www/sitesummary/ 获得一份出自 Sitesummary 的没有任何细节的简单报告。
从 https://wiki.debian.org/DebianEdu/HowTo/SiteSummary 可以获得一些关于 Sitesummary 的文档
在阅读这一升级指南前,请注意真实升级你的生产服务器完全承担你自己的风险。Debian
Edu/Skolelinux 完全无担保,由适用法律许可范围。
Please read this chapter and the New features in Bookworm chapter of this manual completely before attempting to upgrade.
Upgrading Debian from one distribution to the next is generally rather easy. For Debian Edu this is unfortunately a bit more complicated as we modify configuration files in ways we shouldn't. However we have documented the needed steps below. (See Debian bug 311188 for more information how Debian Edu should modify configuration files.)
In general, upgrading the servers is more difficult than the workstations and the main server is the most difficult to upgrade.
如果希望保证升级之后一切和之前一样工作,应该在和生产机器系统配置方法相同的测试系统上测试升级。在那里可以没有风险地测试升级并检查是否所有工作如其所愿。
确定也要阅读 Debian 安装手册中有关其当前稳定发布版的信息。
保持运行旧的稳定版数周长而等待一段时间也是明智的,那样其他人可以测试升级,并将他们经历的任何问题归档。Debian Edu 的旧稳定版在接下来的稳定版发布之后会受到继续支持一段时间,但当 Debian 终止对旧稳定版的支持时,Debian Edu 必然会同样做。
Be prepared: make sure you have tested the upgrade from Bullseye in a test
environment or have backups ready to be able to go back.
Please note that the following recipe applies to a default Debian Edu main server installation (desktop=xfce, profiles Main Server, Workstation, LTSP Server). (For a general overview concerning Bullseye to Bookworm upgrade, see: https://www.debian.org/releases/bookworm/releasenotes)
不要使用 X,使用虚拟控制台,以 root 登录。
如果 apt 有错误而结束,尝试修正和/或运行 apt
-f install 然后再一次 apt -y
full-upgrade。
首先确保当前系统是最新的:
apt update apt full-upgrade
Prepare and start the upgrade to Bookworm:
sed -i 's/bullseye/bookworm/g' /etc/apt/sources.list export LC_ALL=C apt update apt upgrade --without-new-pkgs apt full-upgrade
apt-list-changes:准备好阅读大量的消息;按 <return> 向下滚动,<q> 离开这一页面。所有消息会被邮递给 root 而可以再次阅读(使用 mailx 或者 mutt)。
Read all debconf information carefully, choose 'keep the local version currently installed' unless stated differently below; in most cases hitting return will be fine.
restart services: Choose yes.
Samba服务器和实用程序:选择“保持当前安装的本地版本”.
openssh-server:选择“保持当前安装的本地版本”。
应用和调整配置:
cf-agent -v -D installation
检查升级系统是否正常工作:
重启;以首个用户登录并测试
如果 GOsa² 图形用户界面正在工作,
如果能够连接 LTSP 客户端和工作站,
如果可以添加/删除系统的网络组成员资格,
如果可以发送和接收内部电子邮件,
如果可以管理打印机,
如果其他网站特定的事正在工作。
To upgrade from any older release, you will need to upgrade to the Bullseye based Debian Edu release first, before you can follow the instructions provided above. Instructions are given in the Manual for Debian Edu Bullseye about how to upgrade to Bullseye from the previous release, Buster.
起步和维护章节讲述 Debian Edu 如何开始以及如何做基本的维护工作。在这一章的叙述中有更多“进一步”的提示和技巧。
使用
etckeeper,/etc/中的所有文件使用Git作为版本控制系统来跟踪。
这可以查看文件何时添加,更改和删除,以及文件如果是文本文件时发生的改变。这个 git 存储信息的仓库是在
/etc/.git/ 中。
每个小时,任何更改都会自动记录,从而允许提取和审核配置历史记录。
To look at the history, the command etckeeper vcs
log is used. To check the differences between two points in
time, a command like etckeeper vcs diff
can be used.
更多的信息参看 man etckeeper 的输出。
常用命令列表:
etckeeper vcs log etckeeper vcs status etckeeper vcs diff etckeeper vcs add . etckeeper vcs commit -a man etckeeper
在 Debian Edu 中,除了 /boot/ 分区之外的所有分区是在逻辑 LVM
卷上。从 Linux 内核 2.6.10 以来,可以在它们被挂载时扩展分区。缩减分区仍然需要在该分区被卸载时发生。
避免创建非常大的分区(如,20GiB),因为在其上运行 fsck
或者当需要从备份恢复它们时需要时间。最好,如果可能,创建比一个很大分区较小的若干分区。
提供了助理脚本 debian-edu-fsautoresize
使其更易于扩展占满的分区。当应用时,它从
/usr/share/debian-edu-config/fsautoresizetab,/site/etc/fsautoresizetab
和 /etc/fsautoresizetab
得到配置信息。它依照这些文件中提供的值,在出现太小的自由空间时建议扩展分区。当不用参数运行它时,将仅显示该命令需要扩展这个文件系统。需要参数
-n 来实际执行这些命令扩展这个文件系统。
这个脚本每小时在列于 fsautoresize-hosts
网络组中的每个客户端被自动执行。
When the partition used by the Squid proxy is resized, the value for cache
size in etc/squid/squid.conf needs to be
updated as well. The helper script
/usr/share/debian-edu-config/tools/squid-update-cachedir
is provided to do this automatically, checking the current partition size of
/var/spool/squid/ and configuring Squid to
use 80% of this as its cache size.
逻辑卷管理 (LVM) 能够使分区被挂载并在使用时重新分划大小。可以从 LVM HowTo 中学到更多有关 LVM 的信息。
简单地指令 lvextend
命令需要增加多大来手动扩展一个逻辑卷。例如,使用下述命令来扩展 home0 到 30GiB:
lvextend -L30G /dev/vg_system/skole+tjener+home0 resize2fs /dev/vg_system/skole+tjener+home0
To extend home0 by additional 30GiB, you insert a '+' (-L+30G).
ldapvi 是一个在命令行中以常规文本编辑器编辑 LDAP 数据库的工具。
下面需要执行:
ldapvi -ZD '(cn=admin)'
注意:ldapvi 会使用任何默认编辑器。在 shell 中执行
export EDITOR=vim 使之可以配置成仿 vi 作为编辑器的环境。
提醒:ldapvi 是一个强有力的工具。当心而不弄乱 LDAP
数据库,同样的提醒适用于 JXplorer。
Using Kerberos for NFS to mount home directories is a security feature. Workstations and LTSP clients won't work without Kerberos. The levels krb5, krb5i and krb5p are supported (krb5 means Kerberos authentication, i stands for integrity check and p for privacy, i.e. encryption); the load on both server and workstation increases with the security level, krb5i is a good choice and has been chosen as default.
主服务器
作为 root 登录
运行
ldapvi -ZD '(cn=admin)',查找 sec=krb5i 并将其替换为 sec=krb5 或 sec=krb5p。edit
/etc/exports.d/edu.exportsand adjust these entries accordingly:
/srv/nfs4 gss/krb5i(rw,sync,fsid=0,crossmnt,no_subtree_check) /srv/nfs4/home0 gss/krb5i(rw,sync,no_subtree_check)
run
exportfs -r.
这一工具允许就位置,机器,或者组成员设置默认打印机。关于更多信息,参阅
/usr/share/doc/standardskriver/README.md。
其配置文件 /etc/standardskriver.cfg 由管理员提供,参看
/usr/share/doc/standardskriver/examples/standardskriver.cfg
作为一个示例。
如果希望使用图形用户界面来处理 LDAP 数据库,查看 jxplorer
软件包,默认情况下已安装。要获得写访问连接像这样:
host: ldap.intern port: 636 Security level: ssl + user + password User dn: cn=admin,ou=ldap-access,dc=skole,dc=skolelinux,dc=no
ldap-createuser-krb is a small command line
tool to create user accounts, it is invoked as follows:
ldap-createuser-krb5 [-u uid] [-g gid] [-G group[,group]...] [-d department] <username> <gecos>
All arguments except the username and GECOS field are optional, the latter
usually should contain the full name of the user. Unless specified the tool
will pick the next free UID and GID automatically and not assign any
additional groups to the user. If no department is given, it will pick the
first gosaDepartment from LDAP which is likely
skole and for regular users usually not what you want,
so you should pick an appropriate value for the user,
e.g. Teachers or Students. After
entering and confirming the password and entering the LDAP administrator
password, ldap-createuser-krb5 will create
the user account in LDAP, set the Kerberos password, create the home
directory, and add a corresponding Samba user. The following screenshot
shows an example invocation to create a user account named
harhir for a teacher whose full name is
"Harry Hirsch":
root@tjener:~# ldap-createuser-krb5 -d Teachers harhir "Harry Hirsch"
new user password:
confirm password:
dn: uid=harhir,ou=people,ou=Teachers,dc=skole,dc=skolelinux,dc=no
changetype: add
objectClass: top
objectClass: person
objectClass: organizationalPerson
objectClass: inetOrgPerson
objectClass: gosaAccount
objectClass: posixAccount
objectClass: shadowAccount
objectClass: krbPrincipalAux
objectClass: krbTicketPolicyAux
sn: Harry Hirsch
givenName: Harry Hirsch
uid: harhir
cn: Harry Hirsch
userPassword: {CRYPT}$y$j9T$TWnq55O1rvyLhjF.$oVf.t.RXC1v/4Y8FhV0umno629mo7bP7/YJyig6HET6
homeDirectory: /skole/tjener/home0/harhir
loginShell: /bin/bash
uidNumber: 1004
gidNumber: 1004
gecos: Harry Hirsch
shadowLastChange: 19641
shadowMin: 0
shadowMax: 99999
shadowWarning: 7
krbPwdPolicyReference: cn=users,cn=INTERN,cn=kerberos,dc=skole,dc=skolelinux,dc=no
krbPrincipalName: harhir@INTERN
ldap_initialize( <DEFAULT> )
Enter LDAP Password:
add objectClass:
top
person
organizationalPerson
inetOrgPerson
gosaAccount
posixAccount
shadowAccount
krbPrincipalAux
krbTicketPolicyAux
add sn:
Harry Hirsch
add givenName:
Harry Hirsch
add uid:
harhir
add cn:
Harry Hirsch
add userPassword:
{CRYPT}$y$j9T$TWnq55O1rvyLhjF.$oVf.t.RXC1v/4Y8FhV0umno629mo7bP7/YJyig6HET6
add homeDirectory:
/skole/tjener/home0/harhir
add loginShell:
/bin/bash
add uidNumber:
1004
add gidNumber:
1004
add gecos:
Harry Hirsch
add shadowLastChange:
19641
add shadowMin:
0
add shadowMax:
99999
add shadowWarning:
7
add krbPwdPolicyReference:
cn=users,cn=INTERN,cn=kerberos,dc=skole,dc=skolelinux,dc=no
add krbPrincipalName:
harhir@INTERN
adding new entry "uid=harhir,ou=people,ou=Teachers,dc=skole,dc=skolelinux,dc=no"
modify complete
Authenticating as principal root/admin@INTERN with password.
kadmin.local: change_password harhir@INTERN
Enter password for principal "harhir@INTERN":
Re-enter password for principal "harhir@INTERN":
Password for "harhir@INTERN" changed.
kadmin.local: lpcfg_do_global_parameter: WARNING: The "encrypt passwords" option is deprecated
Added user harhir.虽然可以直接使用 stable-updates,但不需要:当稳定版点发布完成时 stable-updates 定期推送到稳定版套件,这大约发生在每两个月。
运行 Debian Edu 是选择了它的稳定。Debian Edu 运行得令人满意;这正是一个难题:有时候你喜欢的软件有一点儿过时。这里介入了 backports.debian.org。
Backports 是从 Debian 测试版(大部分)和 Debian 不稳定版(仅在几个事例中,例如安全更新)重新编译的软件包,那么它们在如 Debian Edu 的稳定 Debian 发布版上将不以新的库文件运行(各个是可以的)。我们建议选出适合自己需要的个别 backports,而不要使用在这里可用的所有 backports。
使用 backports 是简单的:
echo "deb http://deb.debian.org/debian/ bookworm-backports main" > /etc/apt/sources.list.d/bookworm-backports.sources.list apt update
其后可以容易地安装那一个 backported 软件包,下面的命令将安装 backported 版本的 tuxtype:
apt install tuxtype/bookworm-backports
就像其他软件包一样自动更新 backports (如果可用)。像常规的软件库,backports 有三个部分:main,contrib 和 non-free。
If you want to upgrade from one version to another (for example from Bookworm 12.1 to 12.2) but you do not have Internet connectivity, only physical media, follow these steps:
插入 CD / DVD / 蓝光光盘 / USB 闪存驱动器并使用 apt-cdrom 命令:
apt-cdrom add
引用 apt-cdrom(8)手册页:
apt-cdrom 用于添加新的 CD-ROM 到 APT 可用源列表。apt-cdrom 负责测定盘片的结构而且校正一些可能存在的刻录错误并核对索引文件。
必须用 apt-cdrom 将光盘添加到 APT 系统,而不能以手工完成。并且一套多光盘中的每一片必须分别插入并检查以指出可能存在的刻录错误。
然后运行这两个命令来升级系统:
apt update apt full-upgrade
unattended-upgrades 是一个会自动安装安全(和其他)升级的
Debian 软件包。如已安装,该软件包已预配置来安装安全升级。其日志在
/var/log/unattended-upgrades/ 里获得;而且,一直是
/var/log/dpkg.log 和
/var/log/apt/。
It is possible to save energy and money by automatically turning client
machines off at night and back on in the morning. The package
shutdown-at-night will try to turn off the
machine every hour on the hour from 16:00 in the afternoon, but will not
turn it off if it seems to have users. It will try to tell the BIOS to turn
on the machine around 07:00 in the morning, and the main server will try to
turn on machines from 06:30 by sending Wake-on-LAN packets. These times can
be changed in the crontabs of individual machines.
当在设置这个时应当记住的一些因素:
The clients should not be shut down when someone is using them. This is ensured by checking the output from
who, and as a special case, checking for the SSH connection command to work with X2Go thin clients.为了避免使保险丝熔断,最好确保所有的客户机不要同时启动。
There are two different methods available to wake up clients. One uses a BIOS feature and requires a working and correct hardware clock, as well as a motherboard and BIOS version supported by
nvram-wakeup; the other requires clients to have support for Wake-on-LAN, and the server to know about all the clients that need to be woken up.
On clients that should turn off at night, touch
/etc/shutdown-at-night/shutdown-at-night,
or add the hostname (that is, the output from 'uname
-n' on the client) to the netgroup
"shutdown-at-night-hosts". Adding hosts to the netgroup in LDAP can be done
using the GOsa² web tool. The clients might
need to have Wake-on-LAN configured in the BIOS. It is also important that
the switches and routers used between the Wake-on-LAN server and the clients
will pass the WOL packets to the clients even if the clients are turned
off. Some switches fail to pass on packets to clients that are missing in
the ARP table on the switch, and this blocks the WOL packets.
To enable Wake-on-LAN on the server, add the clients to
/etc/shutdown-at-night/clients, with one
line per client, IP address first, followed by MAC address (ethernet
address), separated by a space; or create a script
/etc/shutdown-at-night/clients-generator to
generate the list of clients on the fly.
这个 /etc/shutdown-at-night/clients-generator
是与 sitesummary 一同使用的示例:
#!/bin/sh PATH=/usr/sbin:$PATH export PATH sitesummary-nodes -w
如果用 netgroup 来激活客户端 shutdown-at-night 的另一种选择是这一脚本使用来自
ng-utils 软件包的 netgroup 工具:
#!/bin/sh PATH=/usr/sbin:$PATH export PATH netgroup -h shutdown-at-night-hosts
要从互联网上访问防火墙背后的机器,考虑安装 autossh 软件包。它可以用来建立一个
SSH 隧道到一台你可以访问到的互联网上的机器。从该机器,可以通过 SSH 隧道访问防火墙背后的服务器。
In the default installation, all services are running on the main server, hostname tjener. To simplify moving some to another machine, there is a minimal installation profile available. Installing with this profile will lead to a machine, which is part of the Debian Edu network, but which doesn't have any services running (yet).
设置一台专用于某些服务的机器所需要的步骤:
choose the Minimal profile during installation
安装用于服务的软件包
配置服务
disable the service on the main server
update DNS (via LDAP/GOsa²) on the main server
FIXME: The HowTos from https://wiki.debian.org/DebianEdu/HowTo/ are either user- or developer-specific. Let's move the user-specific HowTos over here (and delete them over there)! (But first ask the authors (see the history of those pages to find them) if they are fine with moving the howto and putting it under the GPL.)
在这章里叙述了高级管理任务。
In this example we want to create users in year groups, with common home directories for each group (home0/2024, home0/2026, etc). We want to create the users by csv import.
(作为在主服务器上的 root 用户
创建必需的年级组目录
mkdir /skole/tjener/home0/2024
(作为 Gosa 中的第一个用户)
部门
Main menu: goto 'Directory structure', click the 'Students' department. The 'Base' field should show '/Students'. From the drop box 'Actions' choose 'Create'/'Department'. Fill in values for Name (2024) and Description fields (students graduating in 2024), leave the Base field as is (should be '/Students'). Save it clicking 'Ok'. Now the new department (2024) should show up below /Students. Click it.
组
Choose 'Groups' from the main menu; 'Actions'/Create/Group. Enter group name (leave 'Base' as is, should be /Students/2024) and 'Ok' to save it.
模板
Choose 'users' from the main menu. Change to 'Students' in the Base
field. An Entry NewStudent should show up,
click it. This is the 'students' template, not a real user. As you'll have
to create such a template (to be able to use csv import for your structure)
based on this one, notice all entries showing up in the Generic and POSIX
tabs, maybe take screenshots to have information ready for the new template.
Now change to /Students/2024 in the Base field; choose Create/Template and start to fill in your desired values, first the Generic tab (add your new 2024 group under Group Membership, too), then add the POSIX account.
导入用户
在进行 csv 导入时选择自己的新模板;建议用一些用户进行测试。
管理者用这个脚本可以在每个用户的主目录里创建文件夹并设置访问权限和所有者。
在下面显示带有 group=teachers 和 permissions=2770 的范例中一个用户可以通过向给予教师写权限而能作注释的 “assignments” 文件夹保存该文件来提交一个指定任务。
#!/bin/bash
home_path="/skole/tjener/home0"
shared_folder="assignments"
permissions="2770"
created_dir=0
for home in $(ls $home_path); do
if [ ! -d "$home_path/$home/$shared_folder" ]; then
mkdir $home_path/$home/$shared_folder
chmod $permissions $home_path/$home/$shared_folder
user=$home
group=teachers
chown $user:$group $home_path/$home/$shared_folder
((created_dir+=1))
else
echo -e "the folder $home_path/$home/$shared_folder already exists.\n"
fi
done
echo "$created_dir folders have been created"需要这些步骤为用户主目录和合理的其他数据设置专门的存储服务器。
使用 GOsa² 添加新类型的系统
server,如在本手册的开始章节所概述的。这个示例使用 ‘nas-server.intern’ 作为服务器名称。配置 ‘nas-server.intern’ 之后,检查新存储服务器上的 NFS 导出点是否被导出到相关子网或机器:
root@tjener:~# showmount -e nas-server Export list for nas-server: /storage 10.0.0.0/8 root@tjener:~#在这里主干网上的一切被授予对 /storage 导出的访问权限。(这可以像 tjener:/etc/exports 文件中所做限制网络组成员或单个 IP 地址限定 NFS 访问权限。)
添加了关于 LDAP 中 'nas-server.intern' 的自动挂载信息,允许所有用户根据需要自动挂载新的 export。
不能使用 GOsa² 来完成,因为自动挂载的模块没有了。取而代之的是,使用 ldapvi 并使用编辑器来添加需要的 LDAP 对象。
ldapvi --ldap-conf -ZD '(cn=admin)' -b ou=automount,dc=skole,dc=skolelinux,dc=no当编辑器出现时,将后面的 LDAP 对象添加到文档的底部。(上一个 LDAP 对象中的"/&" 部分是匹配于'nas-server.intern'导出的每一部分的通配符,去掉了对列出 LDAP 中各个过载点的需要。)
add cn=nas-server,ou=auto.skole,ou=automount,dc=skole,dc=skolelinux,dc=no objectClass: automount cn: nas-server automountInformation: -fstype=autofs --timeout=60 ldap:ou=auto.nas-server,ou=automount,dc=skole,dc=skolelinux,dc=no add ou=auto.nas-server,ou=automount,dc=skole,dc=skolelinux,dc=no objectClass: top objectClass: automountMap ou: auto.nas-server add cn=/,ou=auto.nas-server,ou=automount,dc=skole,dc=skolelinux,dc=no objectClass: automount cn: / automountInformation: -fstype=nfs,tcp,rsize=32768,wsize=32768,rw,intr,hard,nodev,nosuid,noatime nas-server.intern:/&
在 tjener.intern:/etc/fstab 中添加相关条目,因为 tjener.intern 不能用 automount 来避免挂载循环:
使用
mkdir创建挂载点目录,以合适的方式编辑 ‘/etc/fstab’ 并运行mount -a来挂载新资源。
通过使用任何工作站、 LTSP瘦客户端和 LTSP服务器上的任何应用,新用户应该能够通过只访问 '/tjener/nas-server/storage/'文件夹,来访问 'nas-server.intern' 上的文件。
There are several ways to restrict SSH login, some are listed here.
如果不适用 LTSP
客户端,那么简单的解决方案是创建新的用户组(也就是说sshusers)并且在机器的
/etc/ssh/sshd_config
文件中添加行。然后只有sshusers用户组的成员被允许从任何地方 ssh 到机器上。
以 GOsa 管理这种情况相当简单:
在基本层级(与用户组相关的其它系统管理,像
gosa-admins在,这里显示出来)上建立用户组sshusers。添加用户到新组
sshusers。添加
AllowGroups sshusers到 /etc/ssh/sshd_config。执行
service ssh restart。
The default LTSP diskless client setup doesn't use SSH connections. Update the SquashFS image on the related LTSP server after the SSH setup has been changed is enough.
X2Go thin clients are using SSH connections to the related LTSP server. So a different approach using PAM is needed.
在 LTSP 服务器的 /etc/pam.d/sshd 文件中开启 pam_access.so。
配置 /etc/security/access.conf 添加这几行允许(示范)用户 alice,jane,bob 和 john 从各处以及所有用户从内网连接:
+ : alice jane bob john : ALL + : ALL : 10.0.0.0/8 192.168.0.0/24 192.168.1.0/24 - : ALL : ALL #
If only dedicated LTSP servers are used, the 10.0.0.0/8 network could be dropped to disable internal SSH login access. Note: someone connecting his box to the dedicated LTSP client network(s) will gain SSH access to the LTSP server(s) as well.
To support multiple languages these steps need to be done:
运行
dpkg-reconfigure locales(作为 root)并选择语言(UTF-8 变体)。作为 root 运行这些命令来安装相关软件包:
apt update /usr/share/debian-edu-config/tools/install-task-pkgs /usr/share/debian-edu-config/tools/improve-desktop-l10n
Users will then be able to choose the language via the LightDM display
manager before logging in; this applies to Xfce, LXDE and LXQt. GNOME and
KDE both come with their own internal region and language configuration
tools, use these. MATE uses the Arctica greeter on top of LightDM whithout a
language chooser. Run apt purge
arctica-greeter to get the stock LightDM greeter.
libdvdcss 为播放大部分商业 DVD 所需要。因为法律的原因其不能包含在 Debian (Edu) 里。如果法律允许你使用它,可以使用
libdvd-pkg Debian 软件包创建你自己的本地软件包;确定
contrib 在
/etc/apt/sources.list 中启用。
apt update apt install libdvd-pkg
回答 debconf 的提问,然后运行 dpkg-reconfigure
libdvd-pkg。
LTSP 客户端 是瘦客户机和无盘工作站两者的一个统称。
Starting with Bullseye, LTSP is quite different from the previous
versions. This concerns both setup and maintenance.
As one main difference, the SquashFS image for diskless workstations is now generated from the LTSP server file system by default. This happens on a combined server at first boot, taking some time.
Thin clients are no longer part of LTSP. Debian Edu uses X2Go to still support thin client usage.
In case of a separate or an additional LTSP server, required information for setting up the LTSP client environment isn't complete at installation time. Setup can be done once the system has been added with GOsa².
For information about LTSP in general, see the LTSP homepage. On systems with LTSP
server profile, man ltsp
provides more information.
Please note that the ltsp tool from LTSP has to be used
carefully. For example, ltsp image / would
fail to generate the SquashFS image in case of Debian machines (these have a
separate /boot partition by default), ltsp
ipxe would fail to generate the iPXE menu correctly (due to
Debian Edu's thin client support), and ltsp
initrd would mess up LTSP client boot completely.
The debian-edu-ltsp-install tool is a
wrapper script for ltsp image,
ltsp initrd and ltsp
ipxe. It is used to setup and configure diskless
workstation and thin client support (both 64-Bit and 32-Bit PC). See
man debian-edu-ltsp-install or the script
content to see how it works. All configuration is contained in the script
itself (HERE documents) to facilitate site specific adjustments.
Examples how to use the wrapper script debian-edu-ltsp-install:
debian-edu-ltsp-install --diskless_workstation yesupdates the diskless workstation SquashFS image (server filesystem).debian-edu-ltsp-install --diskless_workstation yes --thin_type barecreates diskless workstation and 64-bit thin client support.debian-edu-ltsp-install --arch i386 --thin_type barecreates additional 32-bit thin client support (chroot and SquashFS image).
Besides bare (smallest thin client system), also display and desktop are available options. The display type offers a shutdown button, the desktop type runs Firefox ESR in kiosk mode on the client itself (more local RAM and CPU power required, but server load reduced).
The debian-edu-ltsp-ipxe tool is a
wrapper script for ltsp ipxe. It makes sure
that the /srv/tftp/ltsp/ltsp.ipxe file is Debian Edu specific. The command
needs to be run after iPXE menu related items (like menu timeout or default
boot settings) in the /etc/ltsp/ltsp.conf [server] section have been
modified.
The debian-edu-ltsp-initrd tool is a
wrapper script for ltsp initrd. It makes
sure that a use case specific initrd (/srv/tftp/ltsp/ltsp.img) is generated
and then moved to the use case related directory. The command needs to be
run after the /etc/ltsp/ltsp.conf [clients] section has been modified.
The debian-edu-ltsp-chroot tool is a replacement for the ltsp-chroot tool shipped with LTSP5. It is used to execute commands in a specified LTSP chroot (like e.g. install, upgrade and remove packages).
无盘工作站
A diskless workstation runs all software locally. The client machines boot directly from the LTSP server without a local hard drive. Software is administered and maintained on the LTSP server, but runs on the diskless workstations. Home directories and system settings are stored on the server too. Diskless workstations are an excellent way of reusing older (but powerful) hardware with the same low maintenance costs as with thin clients.
不像工作栈,无盘工作站无需用 GOsa² 添加它们来运行。
瘦客户机
A thin client setup enables an ordinary PC to function as an (X-)terminal, where all software runs on the LTSP server. This means that this machine boots via PXE without using a local client hard drive and that the LTSP server needs to be a powerful machine.
Debian Edu 仍然支持让非常老旧的硬件得以使用的瘦客户机应用。
Since Thin clients use X2Go, users should disable compositing to avoid
display artefacts. In the default case (Xfce desktop environment): Settings
-> Window Manager Tweaks -> Compositor.
LTSP 客户端固件
如果客户端网卡接口依赖非自由固件,则 LTSP 客户端引导会失败。PXE 安装可以用于对网络启动的机器进行故障检测;如果 Debian 安装程序提示未找到 XXX.bin 文件,那么非自由固件必须添加到 LTSP 服务器的 initrd 中。
Proceed like this on the LTSP server:
First get information about firmware packages, run:
apt update && apt search ^firmware-
Decide which package has to be installed for the network interface(s), most probably this will be firmware-linux, run:
apt -y -q install firmware-linux
更新无磁盘工作站的SquashFS映像,运行:
debian-edu-ltsp-install --diskless_workstation
yes
In case X2Go thin clients are used, run:
/usr/share/debian-edu-config/tools/ltsp-addfirmware -h
and proceed according to the usage information.
Then update the SquashFS image; e.g. for the /srv/ltsp/x2go-bare-amd64 chroot, run:
ltsp image x2go-bare-amd64
每一 LTSP 服务器有两个网卡接口:一个已配置在主 10.0.0.0/8 子网(那是与主服务器共用的),而另一个构成本地子网(每一 LTSP 服务器的单独子网)。
In both cases diskless workstation or thin client can be chosen from the iPXE menu. After waiting for 5 seconds, the machine will boot as diskless workstation.
The default iPXE boot menu item and it's default timeout can both be
configured in /etc/ltsp/ltsp.conf. A
timeout value of -1 is used to hide the menu. Run
debian-edu-ltsp-ipxe for the changes to
take effect.
192.168.0.0/24 是使用 LTSP 设定所安装机器的默认 LTSP 客户端网络。如果使用很多 LTSP 客户端抑或如果不同的 LTSP
服务器要为 i386 和 amd64 两者的 chroot 环境提供服务还可以使用第二个预先配置的 192.168.1.0/24 网络。编辑
/etc/network/interfaces 并相应调整 eth1 的设置。使用
ldapvi 或者任何其他 LDAP 编辑器来检查 DNS 和 DHCP 的配置。
创建 chroot 和 SquashFS 映像,运行:
debian-edu-ltsp-install --arch i386 --thin_type
bare
See man debian-edu-ltsp-install for details
about thin client types.
运行man ltsp.conf来看看可用的配置选项。或在线阅读:https://ltsp.org/man/ltsp.conf/
Add configuration items to the /etc/ltsp/ltsp.conf [clients] section. For the changes to take effect, run:
debian-edu-ltsp-initrd
When users insert a USB drive or DVD / CD-ROM into a Diskless Workstation, a corresponding icon appears on the desktop, allowing access to the content as on a workstation.
When users insert a USB drive into an X2Go thin client of type bare (default combined server installation), the media is mounted as soon as the existing folder icon on the Xfce desktop is double-clicked. Depending on the media content it might take some time until the content shows up in the file manager.
连接打印机到 LTSP 客户端机器(USB 和并口两者都支持)。
Configure the LTSP client with GOsa² to use a fixed IP address.
Configure the printer using the web interface
https://www.intern:631on the main server; choose network printer typeAppSocket/HP JetDirect(for all printers regardless of brand or model) and setsocket://<LTSP client ip>:9100as connection URI.
PXE stands for Preboot eXecution Environment. Debian Edu now uses the iPXE implementation for easier LTSP integration.
The iPXE menu item concerning system installations is generated using the
script debian-edu-pxeinstall. It allows
some settings to be overridden using the file
/etc/debian-edu/pxeinstall.conf with
replacement values.
The PXE installation will inherit the language, keyboard layout and mirror
settings from the settings used when installing the main server, and the
other questions will be asked during installation (profile, popcon
participation, partitioning and root password). To avoid these questions,
the file
/etc/debian-edu/www/debian-edu-install.dat
can be modified to provide preselected answers to debconf values. Some
examples of available debconf values are already commented in
/etc/debian-edu/www/debian-edu-install.dat.
Your changes will be lost as soon as
debian-edu-pxeinstall is used to recreate
the PXE-installation environment. To append debconf values to
/etc/debian-edu/www/debian-edu-install.dat
during recreation with
debian-edu-pxeinstall, add the file
/etc/debian-edu/www/debian-edu-install.dat.local
with your additional debconf values.
更多有关修改 PXE 安装的信息可以在安装一章中找到。
为所加的定制仓库添加像这样的内容到
/etc/debian-edu/www/debian-edu-install.dat.local:
d-i     apt-setup/local1/repository string      http://example.org/debian stable main contrib non-free
d-i     apt-setup/local1/comment string         Example Software Repository
d-i     apt-setup/local1/source boolean         true
d-i     apt-setup/local1/key    string          http://example.org/key.asc
然后运行 /usr/sbin/debian-edu-pxeinstall 一次。
debian-edu-config 软件包带有一个工具帮助从 10.0.0.0/8 网络改为其他网络。看一看
/usr/share/debian-edu-config/tools/subnet-change。这是为安装主服务器之后就使用而设计的,更新
LDAP 并需要编辑其他文件来变更这个子网。
注意变更一个在 Debian Edu 其他位置已经使用的子网会不工作。192.168.0.0/24 和 192.168.1.0/24 已经设置为
LTSP 客户端网络。变更这些子网会依赖配置文件的手工编辑来移除重复的项目。
There is no easy way to change the DNS domain name. Changing it would require changes to both the LDAP structure and several files in the main server file system. There is also no easy way to change the host and DNS name of the main server (tjener.intern). To do so would also require changes to LDAP and files in the main server and client file system. In both cases the Kerberos setup would have to be changed, too.
选择 LTSP 服务器配置文件或组合服务器配置文件也要安装xrdp和x2goserver软件包。
Xrdp 使用远程桌面协议将图形登录界面展示在远程客户端上。微软 Windows用户可以运行 xrdp 而不用安装另外的软件,来连接到 LTSP 服务器上——只是在 Windows 机器上启动远程桌面连接,并连接即可。
此外,xrdp 可以连接到 VNC 服务器或另一台 RDP 服务器上。
Xrdp comes without sound support; to compile (or re-compile) the required modules this script could be used. Please note: The caller needs to be root or a member of the sudo group. Also, /etc/apt/sources.list must contain a valid deb-src line.
 #!/bin/bash
 set -e
  if [[ $UID -ne 0 ]] ; then
     if ! groups | egrep -q sudo ; then
         echo "ERROR: You need to be root or a sudo group member."
         exit 1
     fi
 fi
 if ! egrep -q  ^deb-src /etc/apt/sources.list ; then
     echo "ERROR: Make sure /etc/apt/sources.list contains a deb-src line."
     exit 1
 fi
 TMP=$(mktemp -d)
 PULSE_UPSTREAM_VERSION="$(dpkg-query -W -f='${source:Upstream-Version}' pulseaudio)"
 XRDP_UPSTREAM_VERSION="$(dpkg-query -W -f='${source:Upstream-Version}' xrdp)"
 sudo apt -q update
 sudo apt -q install dpkg-dev
 cd $TMP
 apt -q source pulseaudio xrdp
 sudo apt -q build-dep pulseaudio xrdp
 cd pulseaudio-$PULSE_UPSTREAM_VERSION/
 ./configure
 cd $TMP/xrdp-$XRDP_UPSTREAM_VERSION/sesman/chansrv/pulse/
 sed -i 's/^PULSE/#PULSE/' Makefile
 sed -i "/#PULSE_DIR/a \
 PULSE_DIR = $TMP/pulseaudio-$PULSE_UPSTREAM_VERSION" Makefile
 make
 sudo cp *.so /usr/lib/pulse-$PULSE_UPSTREAM_VERSION/modules/
 sudo chmod 644 /usr/lib/pulse-$PULSE_UPSTREAM_VERSION/modules/module-xrdp*
sudo service xrdp restartThe freeRADIUS server could be used to provide secure
network connections. For this to work, install the
freeradius and winbind packages on
the main server and run
/usr/share/debian-edu-config/tools/setup-freeradius-server
to generate a basic, site specific configuration. This way, both
EAP-TTLS/PAP and PEAP-MSCHAPV2 methods are enabled. All configuration is
contained in the script itself to facilitate site specific adjustments. See
the freeRADIUS homepage for
details.
Additional configuration is needed to
enable/disable access points via a shared secret (/etc/freeradius/3.0/clients.conf).
allow/deny wireless access using LDAP groups (/etc/freeradius/3.0/users).
combine access points into dedicated groups (/etc/freeradius/3.0/huntgroups)
End user devices need to be configured properly, these devices need to be
PIN protected for the use of EAP (802.1x) methods. Users should also be
educated to install the freeradius CA certificate on their devices to be
sure to connect to the right server. This way their password can't be
catched in case of a malicious server. The site specific certificate is
available on the internal network.
https://www.intern/freeradius-ca.pem(对应于运行 Linux 的最终用户设备)
https://www.intern/freeradius-ca.crt(Linux、Android)
https://www.intern/freeradius-ca.der(macOS、iOS、iPadOS、Windows)
Please note that configuring end user devices will be a real challenge due to the variety of devices. For Windows devices an installer script could be created, for Apple devices a mobileconfig file. In both cases the freeRADIUS CA certificate can be integrated, but OS specific tools are needed to create the scripts.
To have an ability to use pGina (or any else 3rd party auth-service-application) you should have a special user account used in search inside of LDAP.
Add a special user, eg pguser with password pwd.777, on https://www/gosa website.
Download and install pGina 3.9.9.12 as usual software. Take an attention that LDAP plugin persists in pGina plugin folder:
C:\Program Files\pGina.fork\Plugins\pGina.Plugin.Ldap.dll
Considering to Debian Edu settings the connection to LDAP uses SSL by port 636.
So necessary settings in a pGina LDAP plugin are below
(these are stored in HKEY_LOCAL_MACHINE\SOFTWARE\pGina3.fork\Plugins\0f52390b-c781-43ae-bd62-553c77fa4cf7).
LDAP Host(s): 10.0.2.2 (or any else with "space" as a separator)
LDAP Port: 636 (for SSL connection)
Timeout: 10
Use SSL: YES (tick checkbox)
Start TLS: NO (don't tick checkbox)
Validate Server Certificate: NO (don't tick checkbox)
Search DN: uid=pguser,ou=people,ou=Students,dc=skole,dc=skolelinux,dc=no
("pguser" is a user to authenticate in LDAP to search users in a login session)
Search Password: pwd.777 (this is the "pguser" password)
Bind Tab:
Allow Empty Passwords: NO
Search for DN: YES (tick checkbox)
Search Filter: (&(uid=%u)(objectClass=person))
Default: Allow
Deny when LDAP authentication fails: YES (tick checkbox)
Allow when server is unreachable: NO (don't tick checkbox, optional)
LDAP: Authentication [v], Authorization [v], Gateway[v], Change Password [_]
Local Machine: Authentication [v], Gateway [v] (tick only two checkboxes)
Authentication: LDAP, Local Machine
Gateway: LDAP, Local Machine
Sources:
Samba is now configured as standalone server with
modern SMB2/SMB3 support and usershares enabled, see
/etc/samba/smb-debian-edu.conf on the main
server. This way non-admin users are enabled to provide shares.
For site specific changes, copy /usr/share/debian-edu-config/smb.conf.edu-site to the /etc/samba directory. The settings in smb.conf.edu-site will override those contained in smb-debian-edu.conf.
请留意:
By default, home directories are read only. This can be changed in /etc/samba/smb.conf.edu-site.
Samba 密码用
smbpasswd保存并且如果用 GOsa² 变更密码时被更新。要临时禁用一个用户的 Samba 帐号,运行
smbpasswd -d <username>,smbpasswd -e <username>会再启用它。在主服务器上运行
chown root:teachers
/var/lib/samba/usershares
将会禁止对于‘students’的用户共享。
Connections to a user's home directory and to additional site specific shares (if configured) are possible for devices running Linux, Android, macOS, iOS, iPadOS, Chrome OS or Windows. For example, Android based devices require a file manager with SMB2/SMB3 support, also known as LAN access. X-plore or Total Commander with LAN plugin might be a good choice.
使用 \\tjener\<username> 或者
smb://tjener/<username> 访问主目录。
这节中提到的所有 Debian 软件包可以由运行 apt install
<软件包> (作为 root)来安装。
stable/education-development 是一个得到程序工具的元软件包。请注意如果安装这个软件包大概需要 2 GiB 的磁盘空间。有关更多细节(也许只安装几个软件包),参阅 Debian Edu Development packages 页面。
一些学校用 Squidguard 或者 e2guardian 限制互联网的访问。
每个用户应该使用 GOsa² 变更自己的密码。要那么做,只是用浏览器前往
https://www/gosa/。
Using GOsa² to change the password ensures that passwords for Kerberos (krbPrincipalKey), LDAP (userPassword) and Samba are the same.
使用 PAM 变更密码也在 GDM 登录提示下工作,但这仅会更新 Kerberos 密码,而不是 Samba 和 GOsa² (LDAP)密码。所以在登录提示变更自己的密码后,实际上也应该用 GOsa² 来变更它。
所有用户可以在内网内部发送和接收邮件;提供证书允许 TLS 保护连接。允许邮件超出内网范围,管理员需要配置邮件服务器
exim4 适合本地状况,以
dpkg-reconfigure exim4-config 开始。
每个希望使用 Thunderbird 的用户需要像下面那样配置它。对于一个用户名为 jdoe 的用户的内部邮件地址是 jdoe@postoffice.intern。
Most of the time, the developer mailing list is our main medium for communication, though we also have #debian-edu on irc.debian.org and even, sometimes, real gatherings, where we meet each other in person.
正好在 Debian Edu 开发中学习的好方法是订阅提交的邮件列表。
Debian Edu uses the Debian Bug Tracking System (BTS). View existing bug reports and feature requests or create new ones. Please report all bugs against the package debian-edu-config. Take a look at How To Report Bugs for more information on bug reporting in Debian Edu.
这一文档需要你的帮助!最重要的是,文档尚未完成:如果阅读文档,会注意到文本中有许多 FIXME。如果你正好知道(一点儿)需要在这讲解的,请同我们分享你的知识。
The source of the text is a wiki and can be edited with a simple webbrowser. Just go to https://wiki.debian.org/DebianEdu/Documentation/Bookworm/ and you can contribute easily. Note: a user account is needed to edit the pages; you may need to create a wiki user account first.
另一个非常好的贡献途径是通过翻译软件和文档来帮助用户。如何翻译本文档的信息可以在本书的翻译一章中找到。请考虑协助本书的翻译努力!
https://lists.debian.org/debian-edu - 支持邮件列表
#debian-edu on irc.debian.org - IRC channel, mostly development related; do not expect real time support even though it frequently happens.
#skolelinux.de on irc.debian.org - IRC 频道支持德语用户
从 https://wiki.debian.org/DebianEdu/Help/ProfessionalHelp 可得到提供专业支持的公司列表。
New version of Debian Installer from Debian bookworm, see its installation manual for more details,
including information on
non-free-firmware, which is a new section in addition to the well knownmain,contribandnon-freesections.
New artwork based on the Emerald theme, the default artwork for Debian 12 bookworm.
Debian 12 bookworm 中所有新的事物,例如:
Linux kernel 6.1
Desktop environments KDE Plasma 5.27, GNOME 43, Xfce 4.18, LXDE 11, MATE 1.26
LibreOffice 7.4
GOsa² 2.8
Educational toolbox GCompris 3.1
Music creator Rosegarden 22.12
LTSP 23.01
Debian Bookworm includes more than 64000 packages available for installation.
安装期间的配置选项页面有 29 种语言可用,其中 22 种已完全翻译。
The Debian Edu Bookworm Manual is translated to Simplified Chinese, Danish, Dutch, French, German, Italian, Japanese, Norwegian (Bokmål), Brazilian Portuguese, European Portuguese, Spanish, Romanian and Ukrainian.
This document is written and copyrighted by Holger Levsen (2007-2024), Petter Reinholdtsen (2001, 2002, 2003, 2004, 2007, 2008, 2009, 2010, 2012, 2014), Daniel Heß (2007), Patrick Winnertz (2007), Knut Yrvin (2007), Ralf Gesellensetter (2007), Ronny Aasen (2007), Morten Werner Forsbring (2007), Bjarne Nielsen (2007, 2008), Nigel Barker (2007), José L. Redrejo Rodríguez (2007), John Bildoy (2007), Joakim Seeberg (2008), Jürgen Leibner (2009, 2010, 2011, 2012, 2014), Oded Naveh (2009), Philipp Hübner (2009, 2010), Andreas Mundt (2010), Olivier Vitrat (2010, 2012), Vagrant Cascadian (2010), Mike Gabriel (2011), Justin B Rye (2012), David Prévot (2012), Wolfgang Schweer (2012-2024), Bernhard Hammes (2012), Joe Hansen (2015), Serhii Horichenko (2022) and Guido Berhörster (2023) and is released under the GPL2 or any later version. Enjoy!
如果您向它添加内容,请只在您是作者的情况下来进行。您需要在相同的条件下发行!然后将您的姓名添加在这里,并在“GPL v2 或更新版本”的许可下发行。
这是一个软件包翻译的在线综览,时常更新。
像许多自由软件项目一样,本文档的翻译记录在 PO 文件中。有关该流程的更多信息可以在
/usr/share/doc/debian-edu-doc/README.debian-edu-bookworm-manual-translations
中找到。
Most language teams have decided to translate via Weblate. See https://hosted.weblate.org/projects/debian-edu-documentation/bookworm-manual/ for more information.
请报告任何问题。
版权 (C) 2007-2021 Holger Levsen < holger@layer-acht.org > 及其他人,版权所有者的完整列表参见版权。
This program is free software; you can redistribute it and/or modify it under the terms of the GNU General Public License as published by the Free Software Foundation; either version 2 of the License, or (at your option) any later version.
This program is distributed in the hope that it will be useful, but WITHOUT ANY WARRANTY; without even the implied warranty of MERCHANTABILITY or FITNESS FOR A PARTICULAR PURPOSE. See the GNU General Public License for more details.
Version 2, June 1991
Copyright (C) 1989, 1991 Free Software Foundation, Inc. 51 Franklin Street, Fifth Floor, Boston, MA 02110-1301, USA. Everyone is permitted to copy and distribute verbatim copies of this license document, but changing it is not allowed.
0. This License applies to any program or other work which contains a notice placed by the copyright holder saying it may be distributed under the terms of this General Public License. The "Program", below, refers to any such program or work, and a "work based on the Program" means either the Program or any derivative work under copyright law: that is to say, a work containing the Program or a portion of it, either verbatim or with modifications and/or translated into another language. (Hereinafter, translation is included without limitation in the term "modification".) Each licensee is addressed as "you".
Activities other than copying, distribution and modification are not covered by this License; they are outside its scope. The act of running the Program is not restricted, and the output from the Program is covered only if its contents constitute a work based on the Program (independent of having been made by running the Program). Whether that is true depends on what the Program does.
1. You may copy and distribute verbatim copies of the Program's source code as you receive it, in any medium, provided that you conspicuously and appropriately publish on each copy an appropriate copyright notice and disclaimer of warranty; keep intact all the notices that refer to this License and to the absence of any warranty; and give any other recipients of the Program a copy of this License along with the Program.
You may charge a fee for the physical act of transferring a copy, and you may at your option offer warranty protection in exchange for a fee.
2. You may modify your copy or copies of the Program or any portion of it, thus forming a work based on the Program, and copy and distribute such modifications or work under the terms of Section 1 above, provided that you also meet all of these conditions:
a) You must cause the modified files to carry prominent notices stating that you changed the files and the date of any change.
b) You must cause any work that you distribute or publish, that in whole or in part contains or is derived from the Program or any part thereof, to be licensed as a whole at no charge to all third parties under the terms of this License.
c) If the modified program normally reads commands interactively when run, you must cause it, when started running for such interactive use in the most ordinary way, to print or display an announcement including an appropriate copyright notice and a notice that there is no warranty (or else, saying that you provide a warranty) and that users may redistribute the program under these conditions, and telling the user how to view a copy of this License. (Exception: if the Program itself is interactive but does not normally print such an announcement, your work based on the Program is not required to print an announcement.)
These requirements apply to the modified work as a whole. If identifiable sections of that work are not derived from the Program, and can be reasonably considered independent and separate works in themselves, then this License, and its terms, do not apply to those sections when you distribute them as separate works. But when you distribute the same sections as part of a whole which is a work based on the Program, the distribution of the whole must be on the terms of this License, whose permissions for other licensees extend to the entire whole, and thus to each and every part regardless of who wrote it.
Thus, it is not the intent of this section to claim rights or contest your rights to work written entirely by you; rather, the intent is to exercise the right to control the distribution of derivative or collective works based on the Program.
In addition, mere aggregation of another work not based on the Program with the Program (or with a work based on the Program) on a volume of a storage or distribution medium does not bring the other work under the scope of this License.
3. You may copy and distribute the Program (or a work based on it, under Section 2) in object code or executable form under the terms of Sections 1 and 2 above provided that you also do one of the following:
a) Accompany it with the complete corresponding machine-readable source code, which must be distributed under the terms of Sections 1 and 2 above on a medium customarily used for software interchange; or,
b) Accompany it with a written offer, valid for at least three years, to give any third party, for a charge no more than your cost of physically performing source distribution, a complete machine-readable copy of the corresponding source code, to be distributed under the terms of Sections 1 and 2 above on a medium customarily used for software interchange; or,
c) Accompany it with the information you received as to the offer to distribute corresponding source code. (This alternative is allowed only for noncommercial distribution and only if you received the program in object code or executable form with such an offer, in accord with Subsection b above.)
The source code for a work means the preferred form of the work for making modifications to it. For an executable work, complete source code means all the source code for all modules it contains, plus any associated interface definition files, plus the scripts used to control compilation and installation of the executable. However, as a special exception, the source code distributed need not include anything that is normally distributed (in either source or binary form) with the major components (compiler, kernel, and so on) of the operating system on which the executable runs, unless that component itself accompanies the executable.
If distribution of executable or object code is made by offering access to copy from a designated place, then offering equivalent access to copy the source code from the same place counts as distribution of the source code, even though third parties are not compelled to copy the source along with the object code.
4. You may not copy, modify, sublicense, or distribute the Program except as expressly provided under this License. Any attempt otherwise to copy, modify, sublicense or distribute the Program is void, and will automatically terminate your rights under this License. However, parties who have received copies, or rights, from you under this License will not have their licenses terminated so long as such parties remain in full compliance.
5. You are not required to accept this License, since you have not signed it. However, nothing else grants you permission to modify or distribute the Program or its derivative works. These actions are prohibited by law if you do not accept this License. Therefore, by modifying or distributing the Program (or any work based on the Program), you indicate your acceptance of this License to do so, and all its terms and conditions for copying, distributing or modifying the Program or works based on it.
6. Each time you redistribute the Program (or any work based on the Program), the recipient automatically receives a license from the original licensor to copy, distribute or modify the Program subject to these terms and conditions. You may not impose any further restrictions on the recipients' exercise of the rights granted herein. You are not responsible for enforcing compliance by third parties to this License.
7. If, as a consequence of a court judgment or allegation of patent infringement or for any other reason (not limited to patent issues), conditions are imposed on you (whether by court order, agreement or otherwise) that contradict the conditions of this License, they do not excuse you from the conditions of this License. If you cannot distribute so as to satisfy simultaneously your obligations under this License and any other pertinent obligations, then as a consequence you may not distribute the Program at all. For example, if a patent license would not permit royalty-free redistribution of the Program by all those who receive copies directly or indirectly through you, then the only way you could satisfy both it and this License would be to refrain entirely from distribution of the Program.
If any portion of this section is held invalid or unenforceable under any particular circumstance, the balance of the section is intended to apply and the section as a whole is intended to apply in other circumstances.
It is not the purpose of this section to induce you to infringe any patents or other property right claims or to contest validity of any such claims; this section has the sole purpose of protecting the integrity of the free software distribution system, which is implemented by public license practices. Many people have made generous contributions to the wide range of software distributed through that system in reliance on consistent application of that system; it is up to the author/donor to decide if he or she is willing to distribute software through any other system and a licensee cannot impose that choice.
This section is intended to make thoroughly clear what is believed to be a consequence of the rest of this License.
8. If the distribution and/or use of the Program is restricted in certain countries either by patents or by copyrighted interfaces, the original copyright holder who places the Program under this License may add an explicit geographical distribution limitation excluding those countries, so that distribution is permitted only in or among countries not thus excluded. In such case, this License incorporates the limitation as if written in the body of this License.
9. The Free Software Foundation may publish revised and/or new versions of the General Public License from time to time. Such new versions will be similar in spirit to the present version, but may differ in detail to address new problems or concerns.
Each version is given a distinguishing version number. If the Program specifies a version number of this License which applies to it and "any later version", you have the option of following the terms and conditions either of that version or of any later version published by the Free Software Foundation. If the Program does not specify a version number of this License, you may choose any version ever published by the Free Software Foundation.
10. If you wish to incorporate parts of the Program into other free programs whose distribution conditions are different, write to the author to ask for permission. For software which is copyrighted by the Free Software Foundation, write to the Free Software Foundation; we sometimes make exceptions for this. Our decision will be guided by the two goals of preserving the free status of all derivatives of our free software and of promoting the sharing and reuse of software generally.
NO WARRANTY
11. BECAUSE THE PROGRAM IS LICENSED FREE OF CHARGE, THERE IS NO WARRANTY FOR THE PROGRAM, TO THE EXTENT PERMITTED BY APPLICABLE LAW. EXCEPT WHEN OTHERWISE STATED IN WRITING THE COPYRIGHT HOLDERS AND/OR OTHER PARTIES PROVIDE THE PROGRAM "AS IS" WITHOUT WARRANTY OF ANY KIND, EITHER EXPRESSED OR IMPLIED, INCLUDING, BUT NOT LIMITED TO, THE IMPLIED WARRANTIES OF MERCHANTABILITY AND FITNESS FOR A PARTICULAR PURPOSE. THE ENTIRE RISK AS TO THE QUALITY AND PERFORMANCE OF THE PROGRAM IS WITH YOU. SHOULD THE PROGRAM PROVE DEFECTIVE, YOU ASSUME THE COST OF ALL NECESSARY SERVICING, REPAIR OR CORRECTION.
12. IN NO EVENT UNLESS REQUIRED BY APPLICABLE LAW OR AGREED TO IN WRITING WILL ANY COPYRIGHT HOLDER, OR ANY OTHER PARTY WHO MAY MODIFY AND/OR REDISTRIBUTE THE PROGRAM AS PERMITTED ABOVE, BE LIABLE TO YOU FOR DAMAGES, INCLUDING ANY GENERAL, SPECIAL, INCIDENTAL OR CONSEQUENTIAL DAMAGES ARISING OUT OF THE USE OR INABILITY TO USE THE PROGRAM (INCLUDING BUT NOT LIMITED TO LOSS OF DATA OR DATA BEING RENDERED INACCURATE OR LOSSES SUSTAINED BY YOU OR THIRD PARTIES OR A FAILURE OF THE PROGRAM TO OPERATE WITH ANY OTHER PROGRAMS), EVEN IF SUCH HOLDER OR OTHER PARTY HAS BEEN ADVISED OF THE POSSIBILITY OF SUCH DAMAGES.
END OF TERMS AND CONDITIONS
出自 Debian bullseye 的 Debian Installer 新版本,更多细节参阅其安装手册。
基于 家世界主题的新图片,是 Debian 11(bullseye)的默认图片。
The Debian Installer doesn't support LTSP chroot setup anymore. In case of a combined server installation ('Main server' + 'LTSP server' profiles), setting up thin client support (now using X2Go) happens at the end of the installation. Generating the SquashFS image for diskless client support (from the server's file system) is done at first boot.
For separate LTSP servers, both steps have to be done via a tool after first boot inside the internal network when enough information is available from the main server.
安装期间的配置选项页面有 29 种语言可用,其中 22 种已完全翻译。
Debian Edu Bullseye 手册已完全翻译成荷兰语、法语、德语、意大利语、日语、挪威书面语、葡萄牙语(葡萄牙)和简体中文。
有部分翻译的丹麦语和西班牙语文本。
内网上改进的 TLS/SSL 支持。在客户端,Debian Edu-CA 认证的根用户位于整个系统的认证的 bundle 内。
新的 LTSP,从草图开始重写,去除了瘦客户端支持。现在使用 X2Go 来支持瘦客户端。
用 iPXE 替代 PXELINUX 来提供网络引导以符合 LTSP。
现在使用 /srv/tftp 目录作为网络引导基础而取代 /var/lib/tftpboot。
After a point release upgrade of a system with Main Server or LTSP Server profile,
debian-edu-pxeinstallneeds to be run to update the PXE installation environment.DuckDuckGo 被用为 Firefox ESR 和 Chromium 两者的默认搜索提供者。
Chromium 用内部网站代替 Google 作为默认起始页。
在无盘工作站上,Kerberos TGT 可在自动登录后使用。
添加具有 EAP-TTLS/PAP 和 PEAP-MSCHAPV2 方式支持的 freeRADIUS 设置新工具。
Samba 被配置为具有 SMB2/SMB3 支持的‘独立服务器’;以完成域连接。
GOsa² web 界面不显示 Samba 相关条目是因为 Samba 帐户数据不再存储在 LDAP 中。
PXE 安装使用 Debian 安装器的图形模式(取代文本模式)。
中央 CUPS 打印服务器 ipp.intern,允许属于 printer-admins 组的用户管理 CUPS。
Icinga 只限于第一个用户通过 web 界面管理。
以下是从前所做的更多 Debian Edu 发行版:
Debian Edu 10+edu0 代号 Buster 发布于 2019 年 7 月 6 日。
Debian Edu 9+edu0 代号 Stretch 发布于 2017 年 6 月 17 日。
2016 年 07 月 02 日发行的 Debian Edu 8+edu0 代号 Jessie。
发布于 2013 年 09 月 28 日的 Debian Edu 7.1+edu0 代号 Wheezy。
Debian Edu 6.0.7+r1 代号 "Squeeze",发布于 2013-03-03。
Debian Edu 6.0.4+r0 代号 "Squeeze",发布于 2012-03-11。
Debian Edu 5.0.6+edu1 代号 "Lenny",发布于 2010-10-05。
Debian Edu 5.0.4+edu0 代号 "Lenny",发布于 2010-02-08。
Debian Edu "3.0r1 Terra",发布于 2007-12-05。
Debian Edu "3.0r0 Terra" 发布于 2007-07-22。基于发布于 2007-04-08 的 Debian 4.0 Etch。
Debian Edu 2.0,发布于2006-03-14。基于 2005-06-06 发布的 Debian 3.1 Sarge。
Debian Edu "1.0 Venus" 发布于 2004-06-20。基于 2002-07-19 发布的 Debian 3.0 Woody。
在 Jessie 手册的附录 C 里包含了有关较早发行版完整而详细的概述;或参阅发行手册页面上相关的发行手册。